Creating an assistant
Overview
This guide provides detailed instructions on how to create and configure an assistant using the Mingleego platform. Assistants power both social chatbots (e.g., on Facebook Messenger, WhatsApp, Instagram, Telegram, and Discord) and web chatbots (e.g., on your website). You will learn how to set up an assistant, customize its behavior, and prepare it for integration into your preferred platforms. Start with the creating a new assistant section to begin the process.
Note: this guide assumes you have already created an account on the Mingleego platform. If not, please sign up here before proceeding.
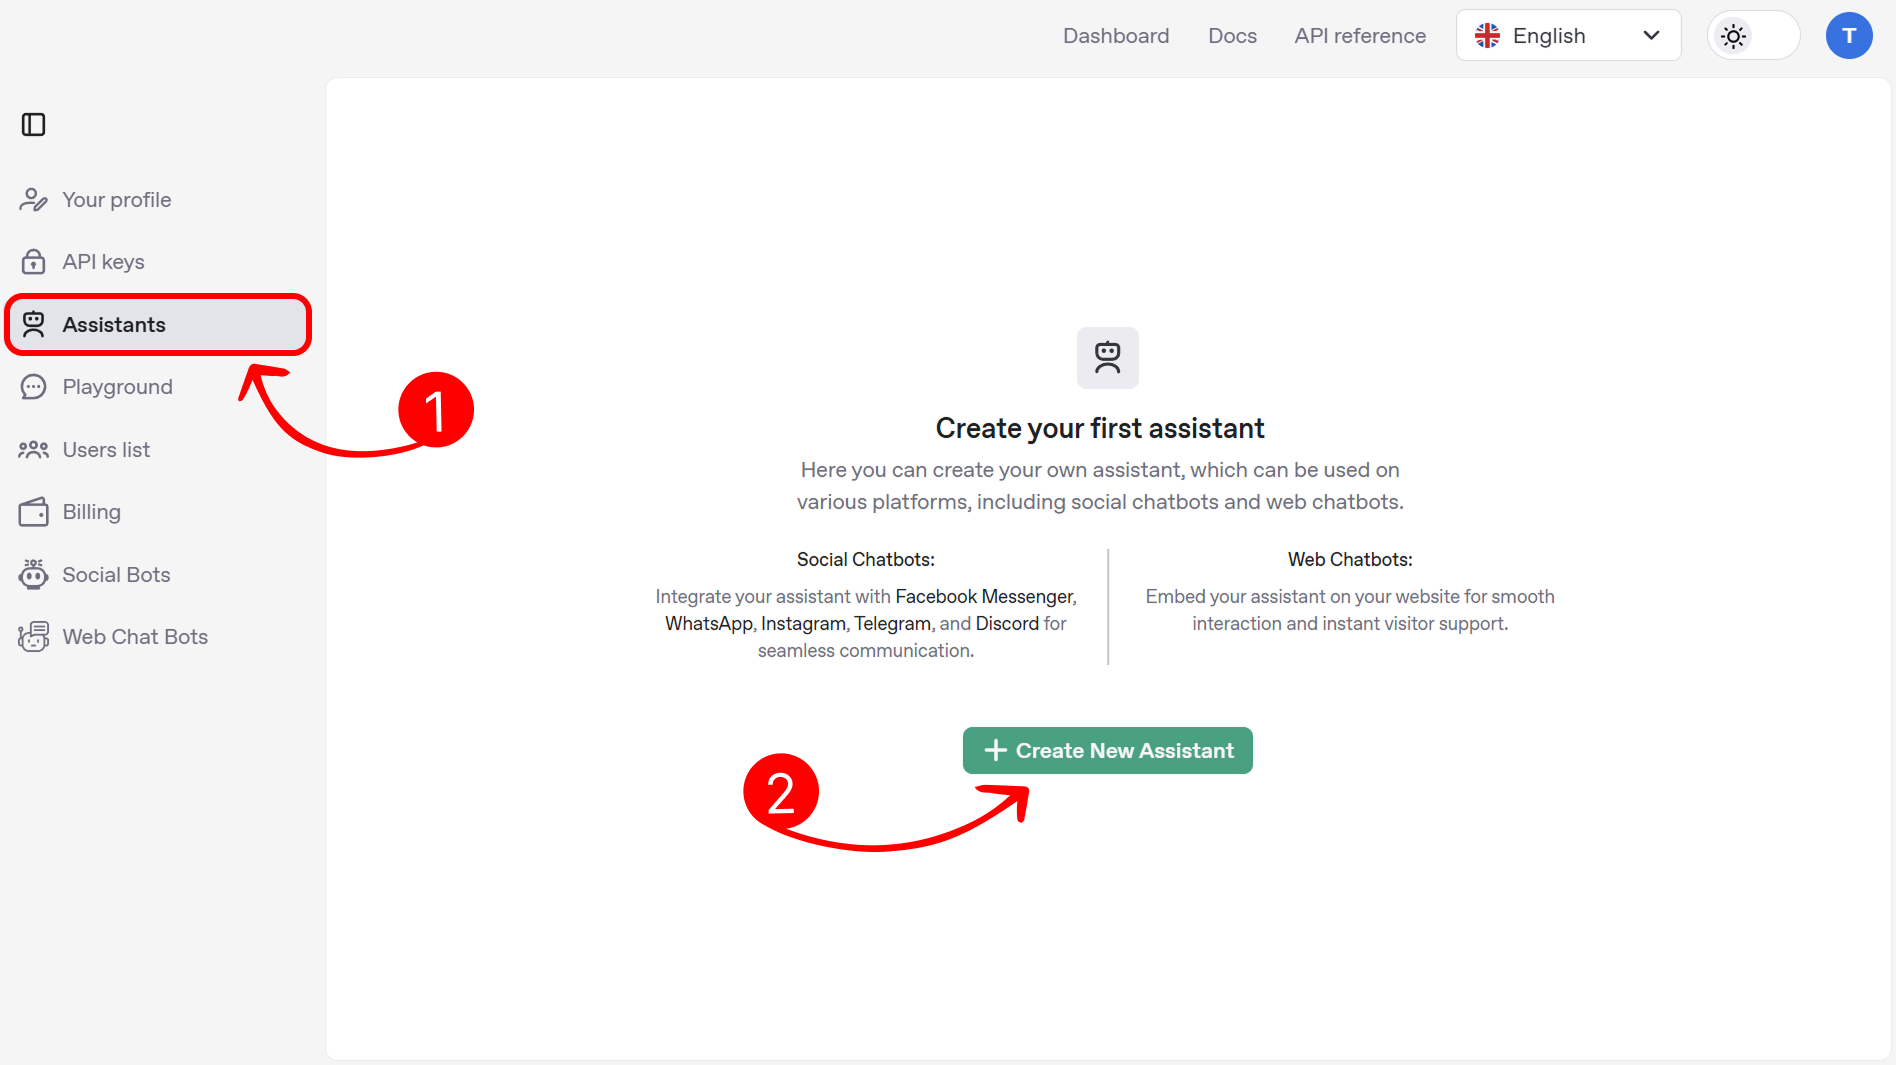
Creating a new assistant
To create a new assistant, navigate to the assistants page on the Mingleego platform. Click the create new assistant button to start the setup process.
First-time setup guide
When you open the form for the first time, an interactive guide will assist you in filling out the fields through a series of pop-up tips that highlight specific elements and provide helpful explanations. The following steps will be highlighted:
-
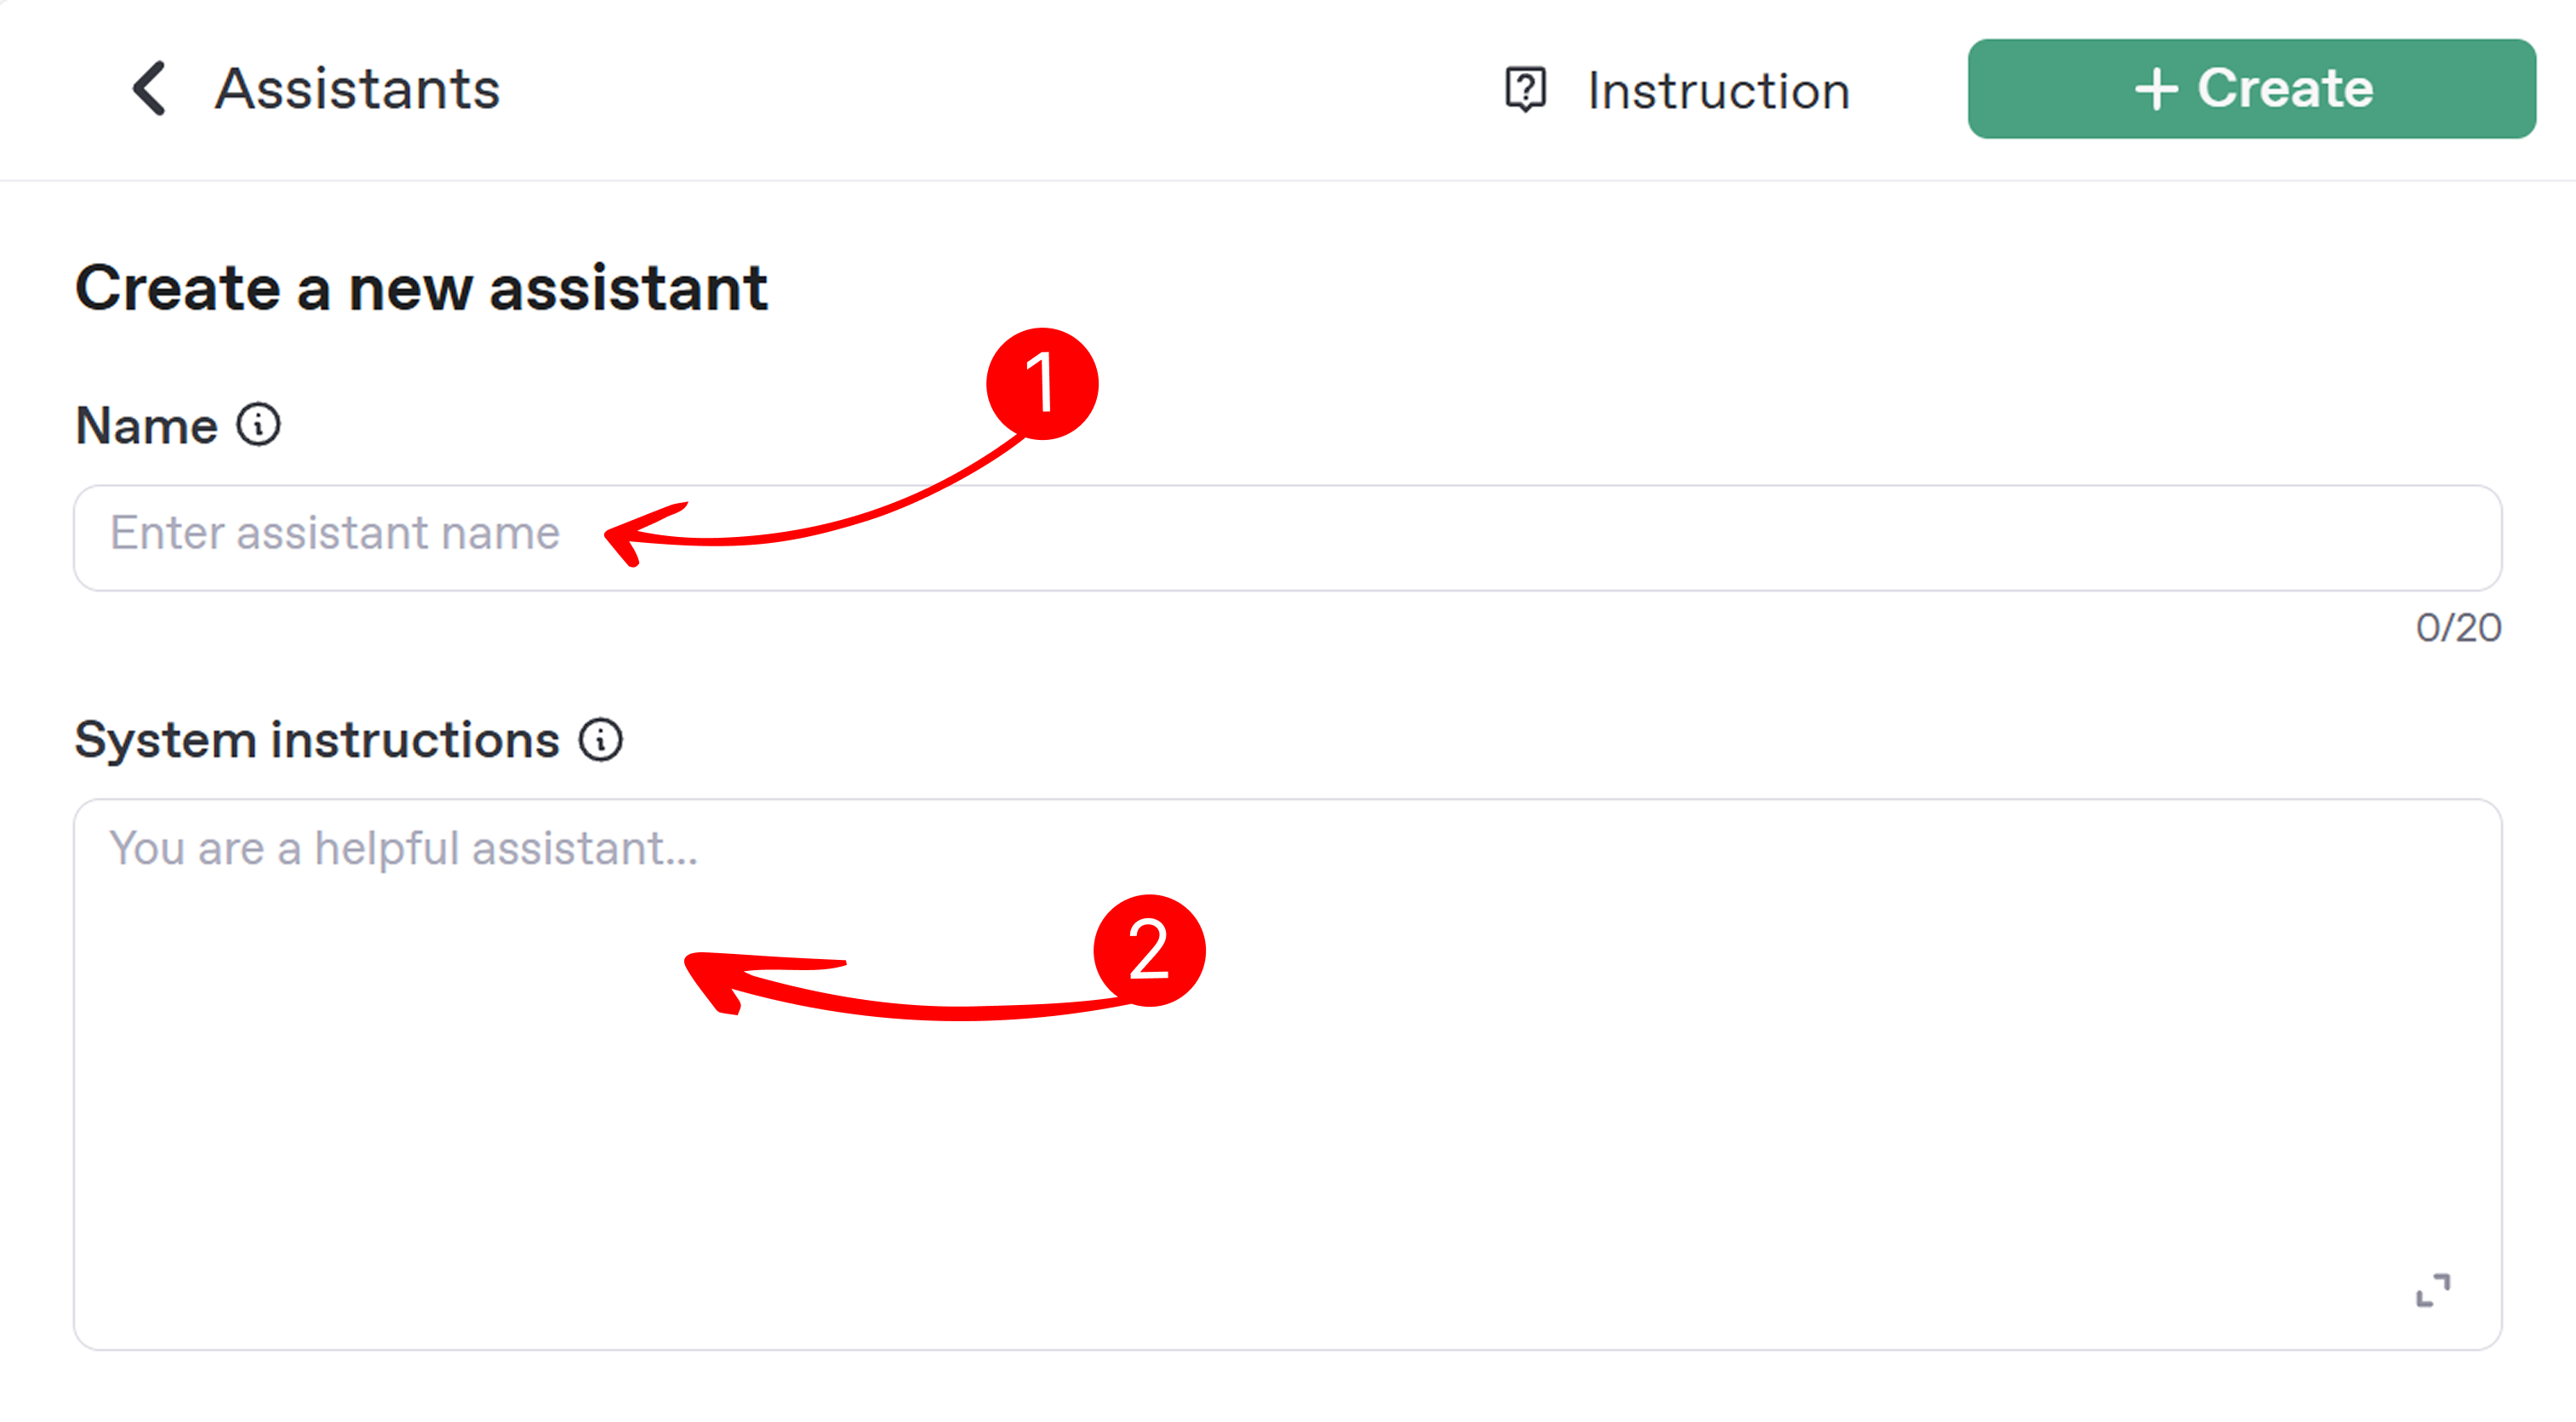
Assistant name:
- Enter a unique name for your assistant in the field labeled Name. For example, "CustomerSupportBot" for a support-focused assistant or "ProductGuideBot" for a product information assistant.
-
System instructions:
-
System instructions define how your assistant behaves, such as its tone or response style. Add instructions in the field labeled System instructions to customize its behavior. For example, you might specify "Respond in a professional tone and avoid using slang". This field is optional, and you can create an assistant without providing system instructions, as only the name and model are required.
-
To learn more about crafting effective system instructions, visit the system instructions guide.
-
-
Model selection:
- Choose the AI model that will power your assistant’s responses. Click the dropdown menu labeled Model to view available options, such as GPT-4o, GPT-4.1, or GPT-5 series models, each optimized for different conversational capabilities. Select the model that best suits your assistant’s purpose.
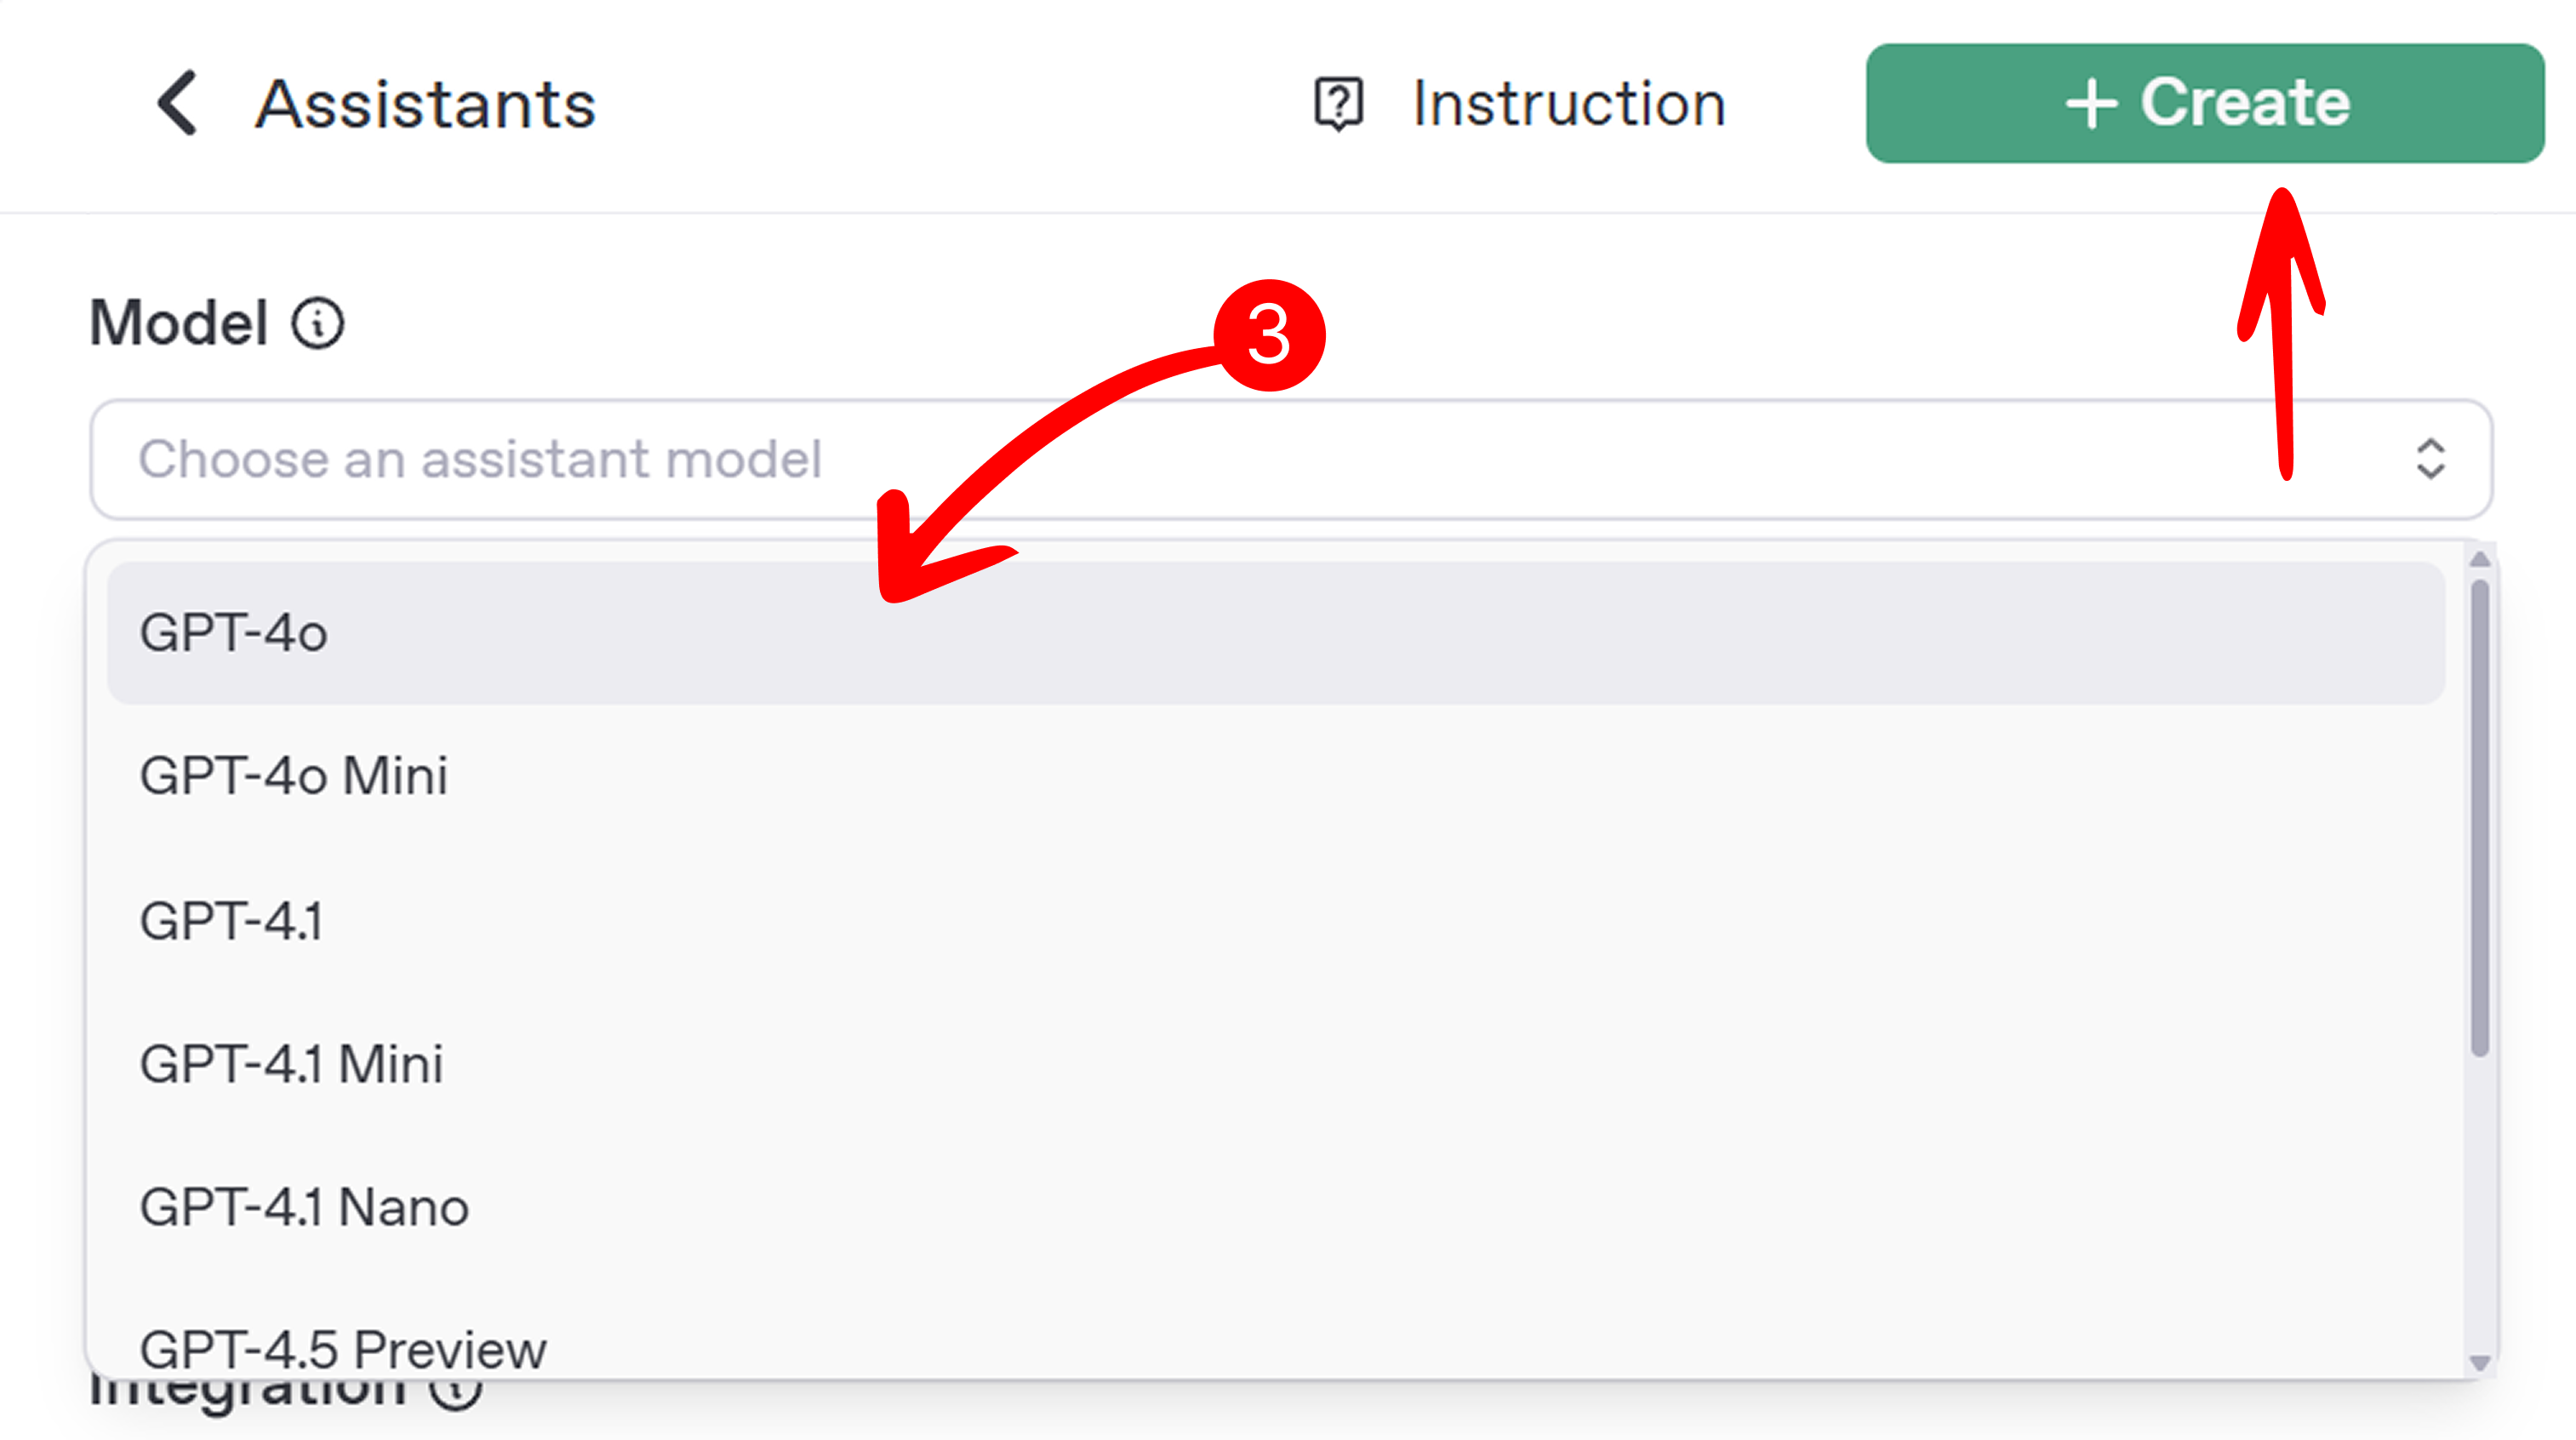
At this point, you can click the Create button to create a basic assistant, or proceed to the next steps to enhance it with tools such as:
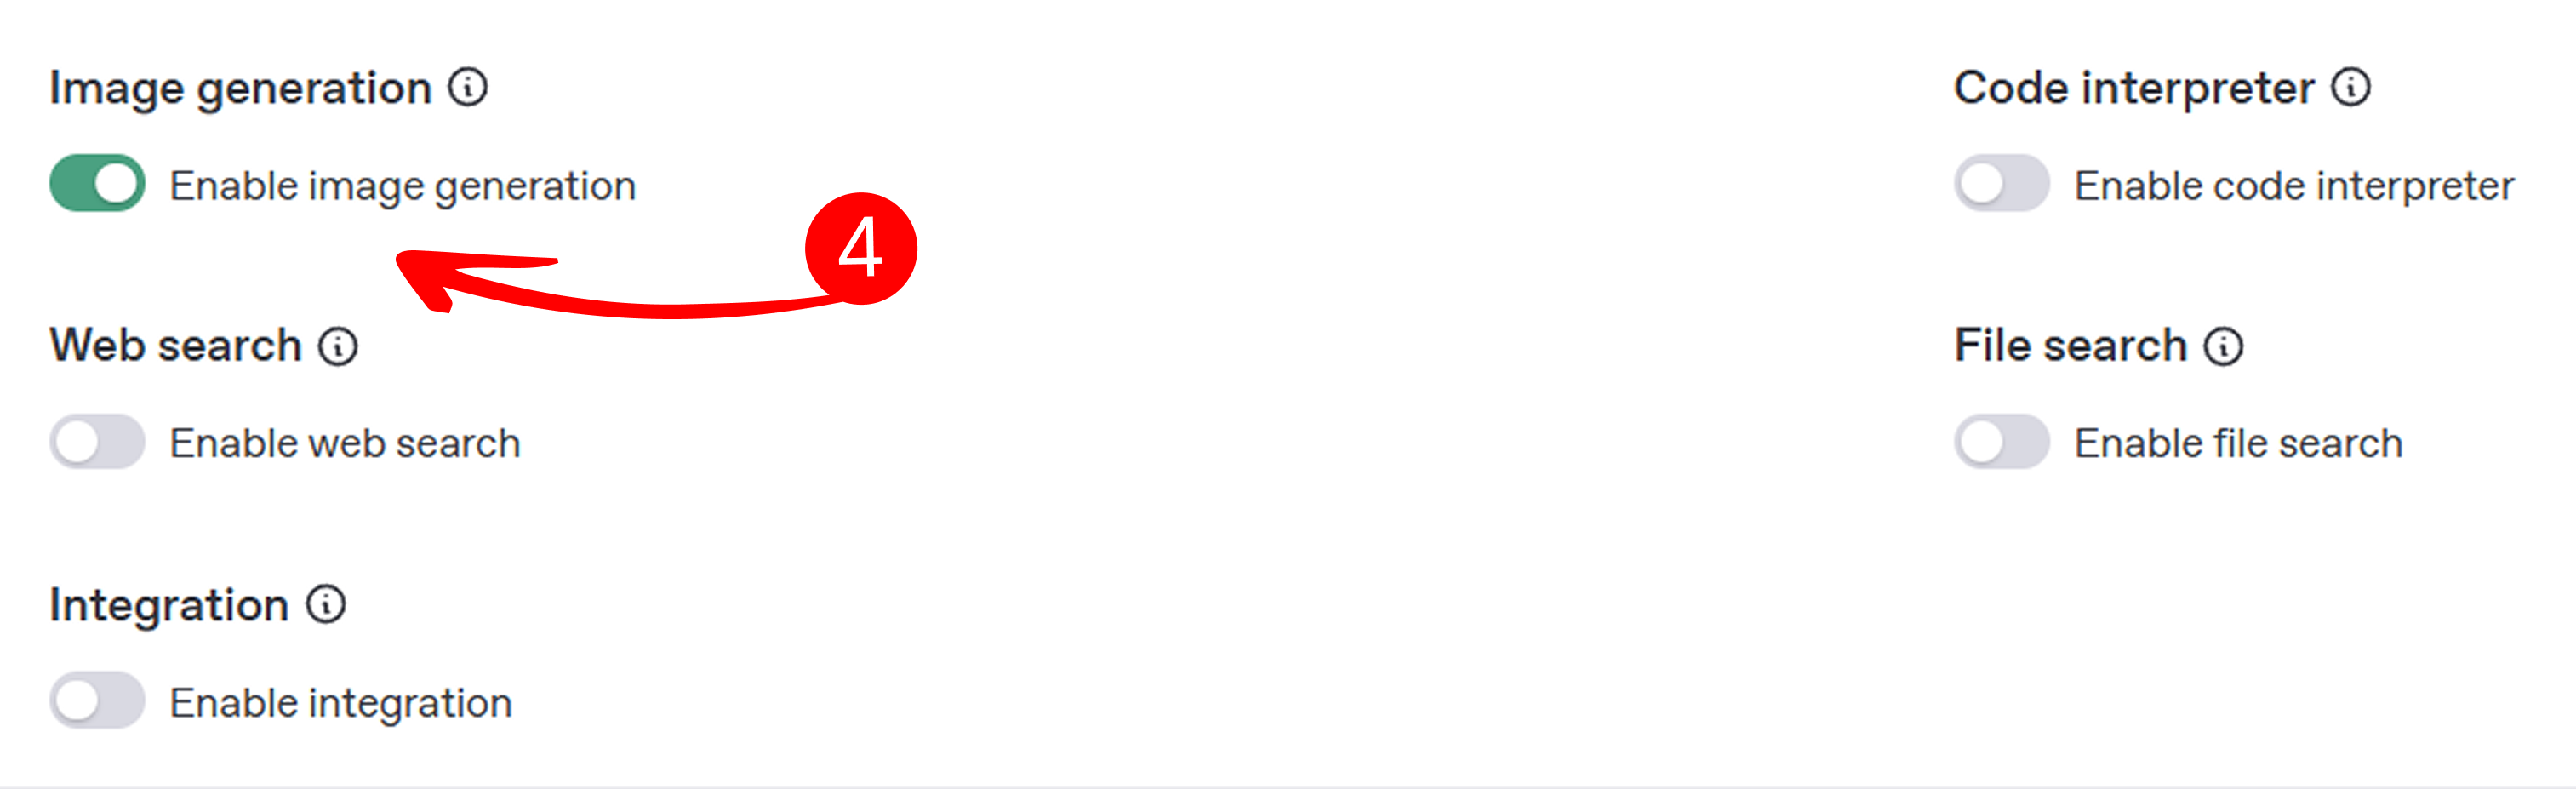
Image generation
Create visual content like product designs or illustrations based on user prompts.
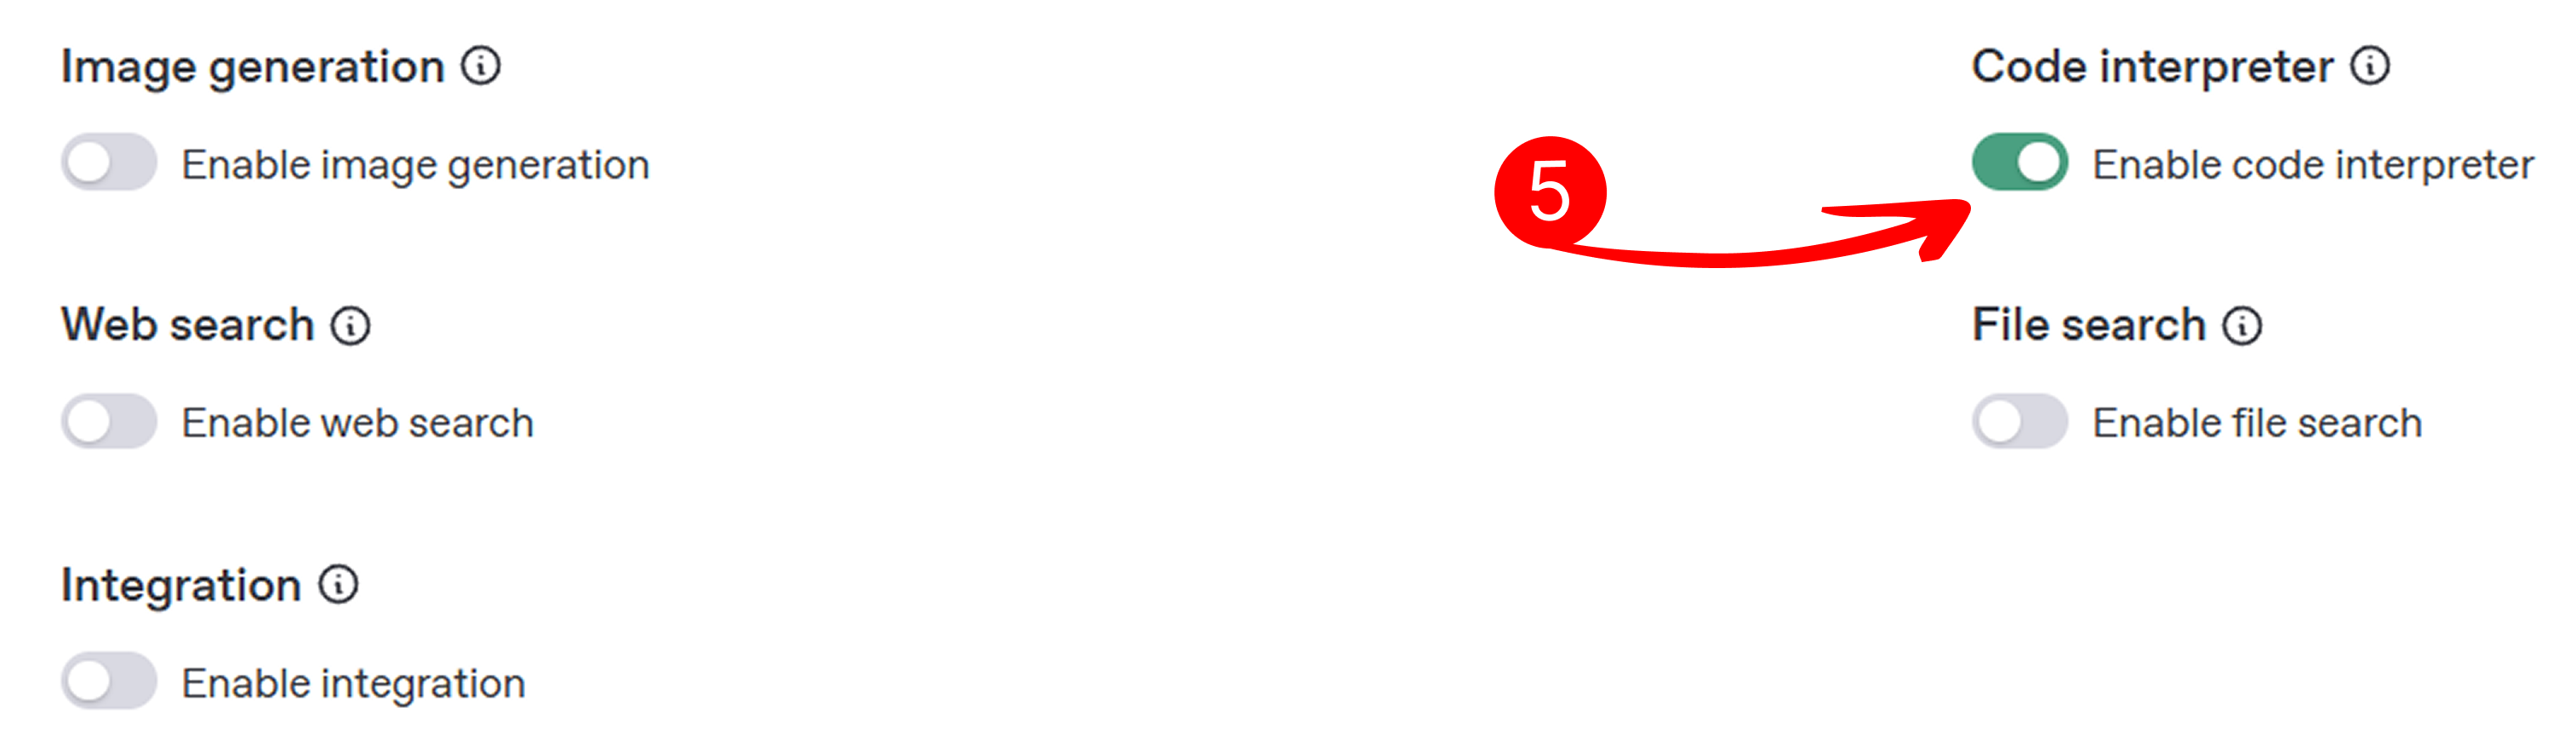
Code interpreter
Write, execute, and debug code for technical tasks and problem-solving.
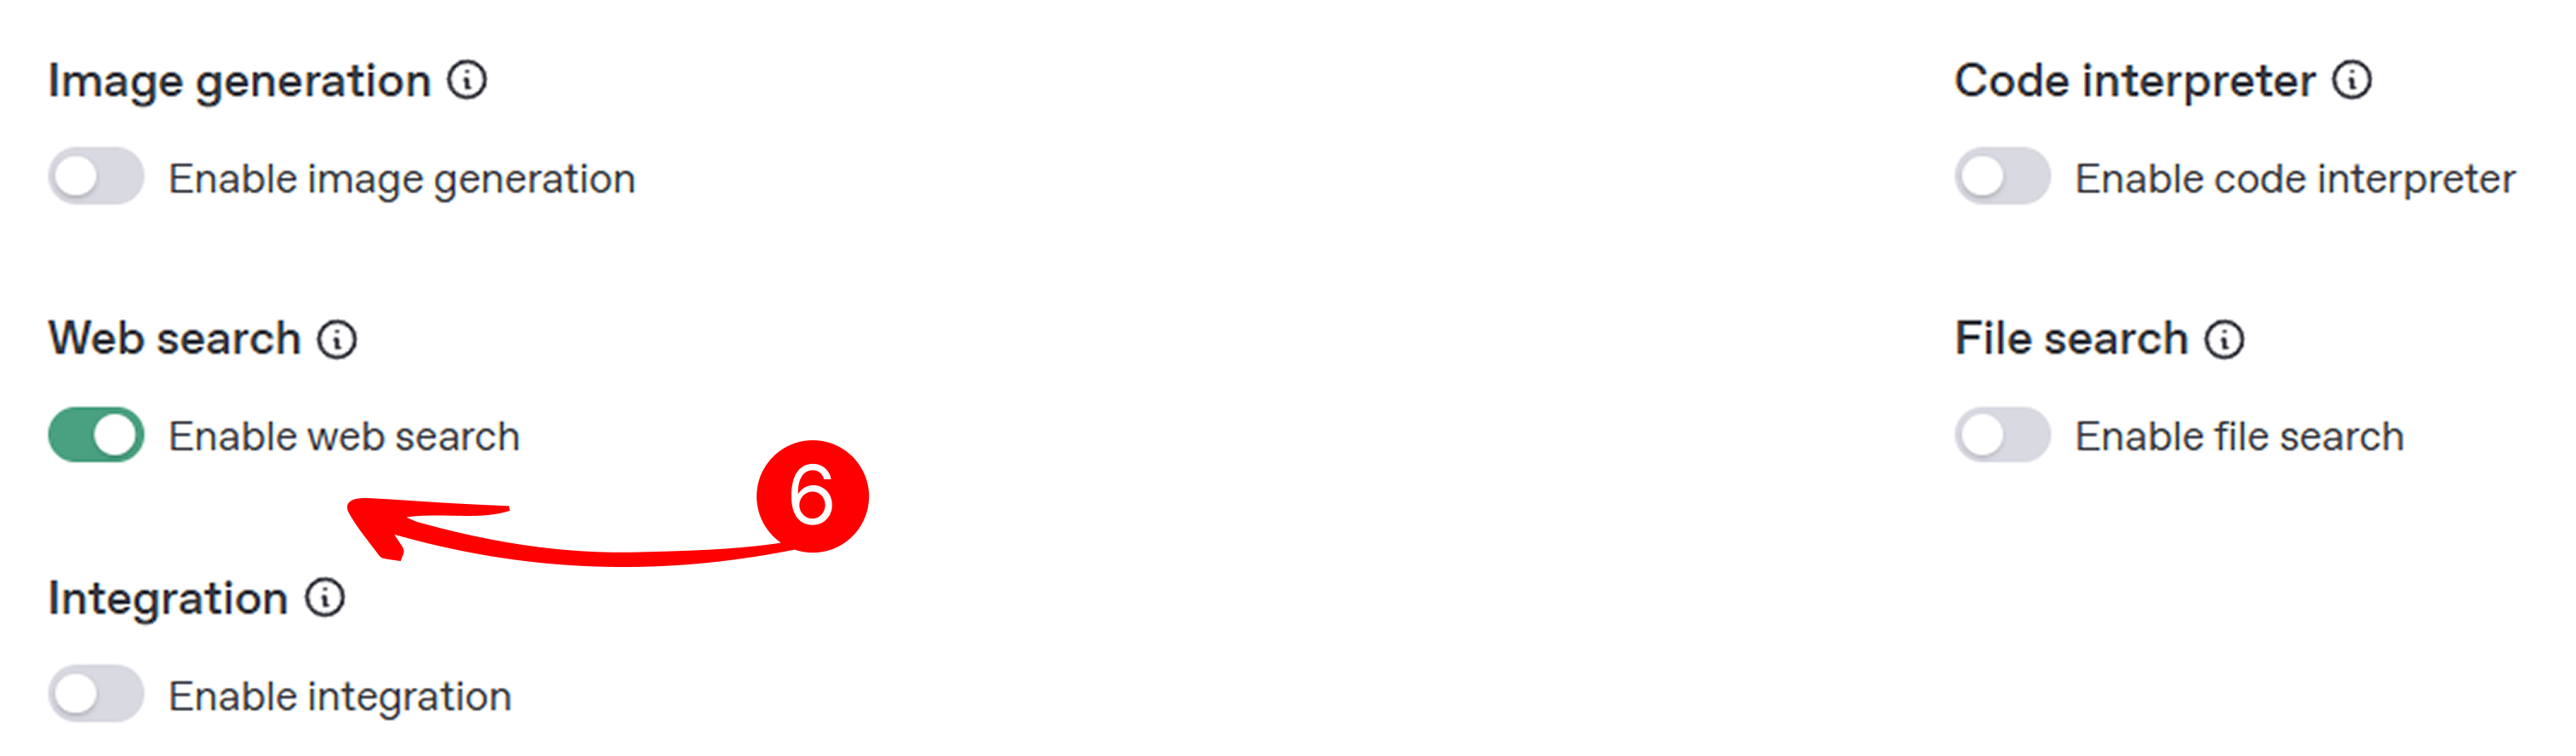
Web search
Fetch real-time information from the web for up-to-date answers.
File search
Access and retrieve information from uploaded files like FAQs or manuals.
Integration
Connect with services like google calendar to automate scheduling.
-
Enable image generation:
- Toggle the enable image generation option to allow your assistant to create images from user prompts. This is ideal for generating visuals like designs or illustrations. For example, a user might ask, “Create an image of a modern logo” and the assistant will generate a relevant image.
-
Enable code interpreter:
-
Toggle the enable code interpreter option to allow your assistant to write and run code. This is useful for technical tasks like scripting or debugging. For example, a user might ask, "Write a Python script for a calculator" and the assistant will provide executable code.
-
Code Interpreter is required if you want to generate PDF files with tables and charts. However, be careful as it is resource-intensive and consumes a lot of resources, so enable it only when necessary.
-
-
Enable web search:
- Toggle the enable web search option to allow your assistant to fetch real-time web information. This is great for answering questions needing current data, like news or trends. For example, a user might ask, “What’s the latest tech news?” and the assistant will retrieve relevant results.
-
Enable file search:
-
Toggle the enable file search option to allow your assistant to access knowledge from uploaded files. This is useful for providing specific information like FAQs, manuals, or company policies.
Upload files:
-
If file search is enabled, you can upload files by dragging and dropping them into the field labeled Upload Files, or click to select files from your device. Ensure your files are in JSON, TXT, PDF, or CSV format and do not exceed 500MB in size.
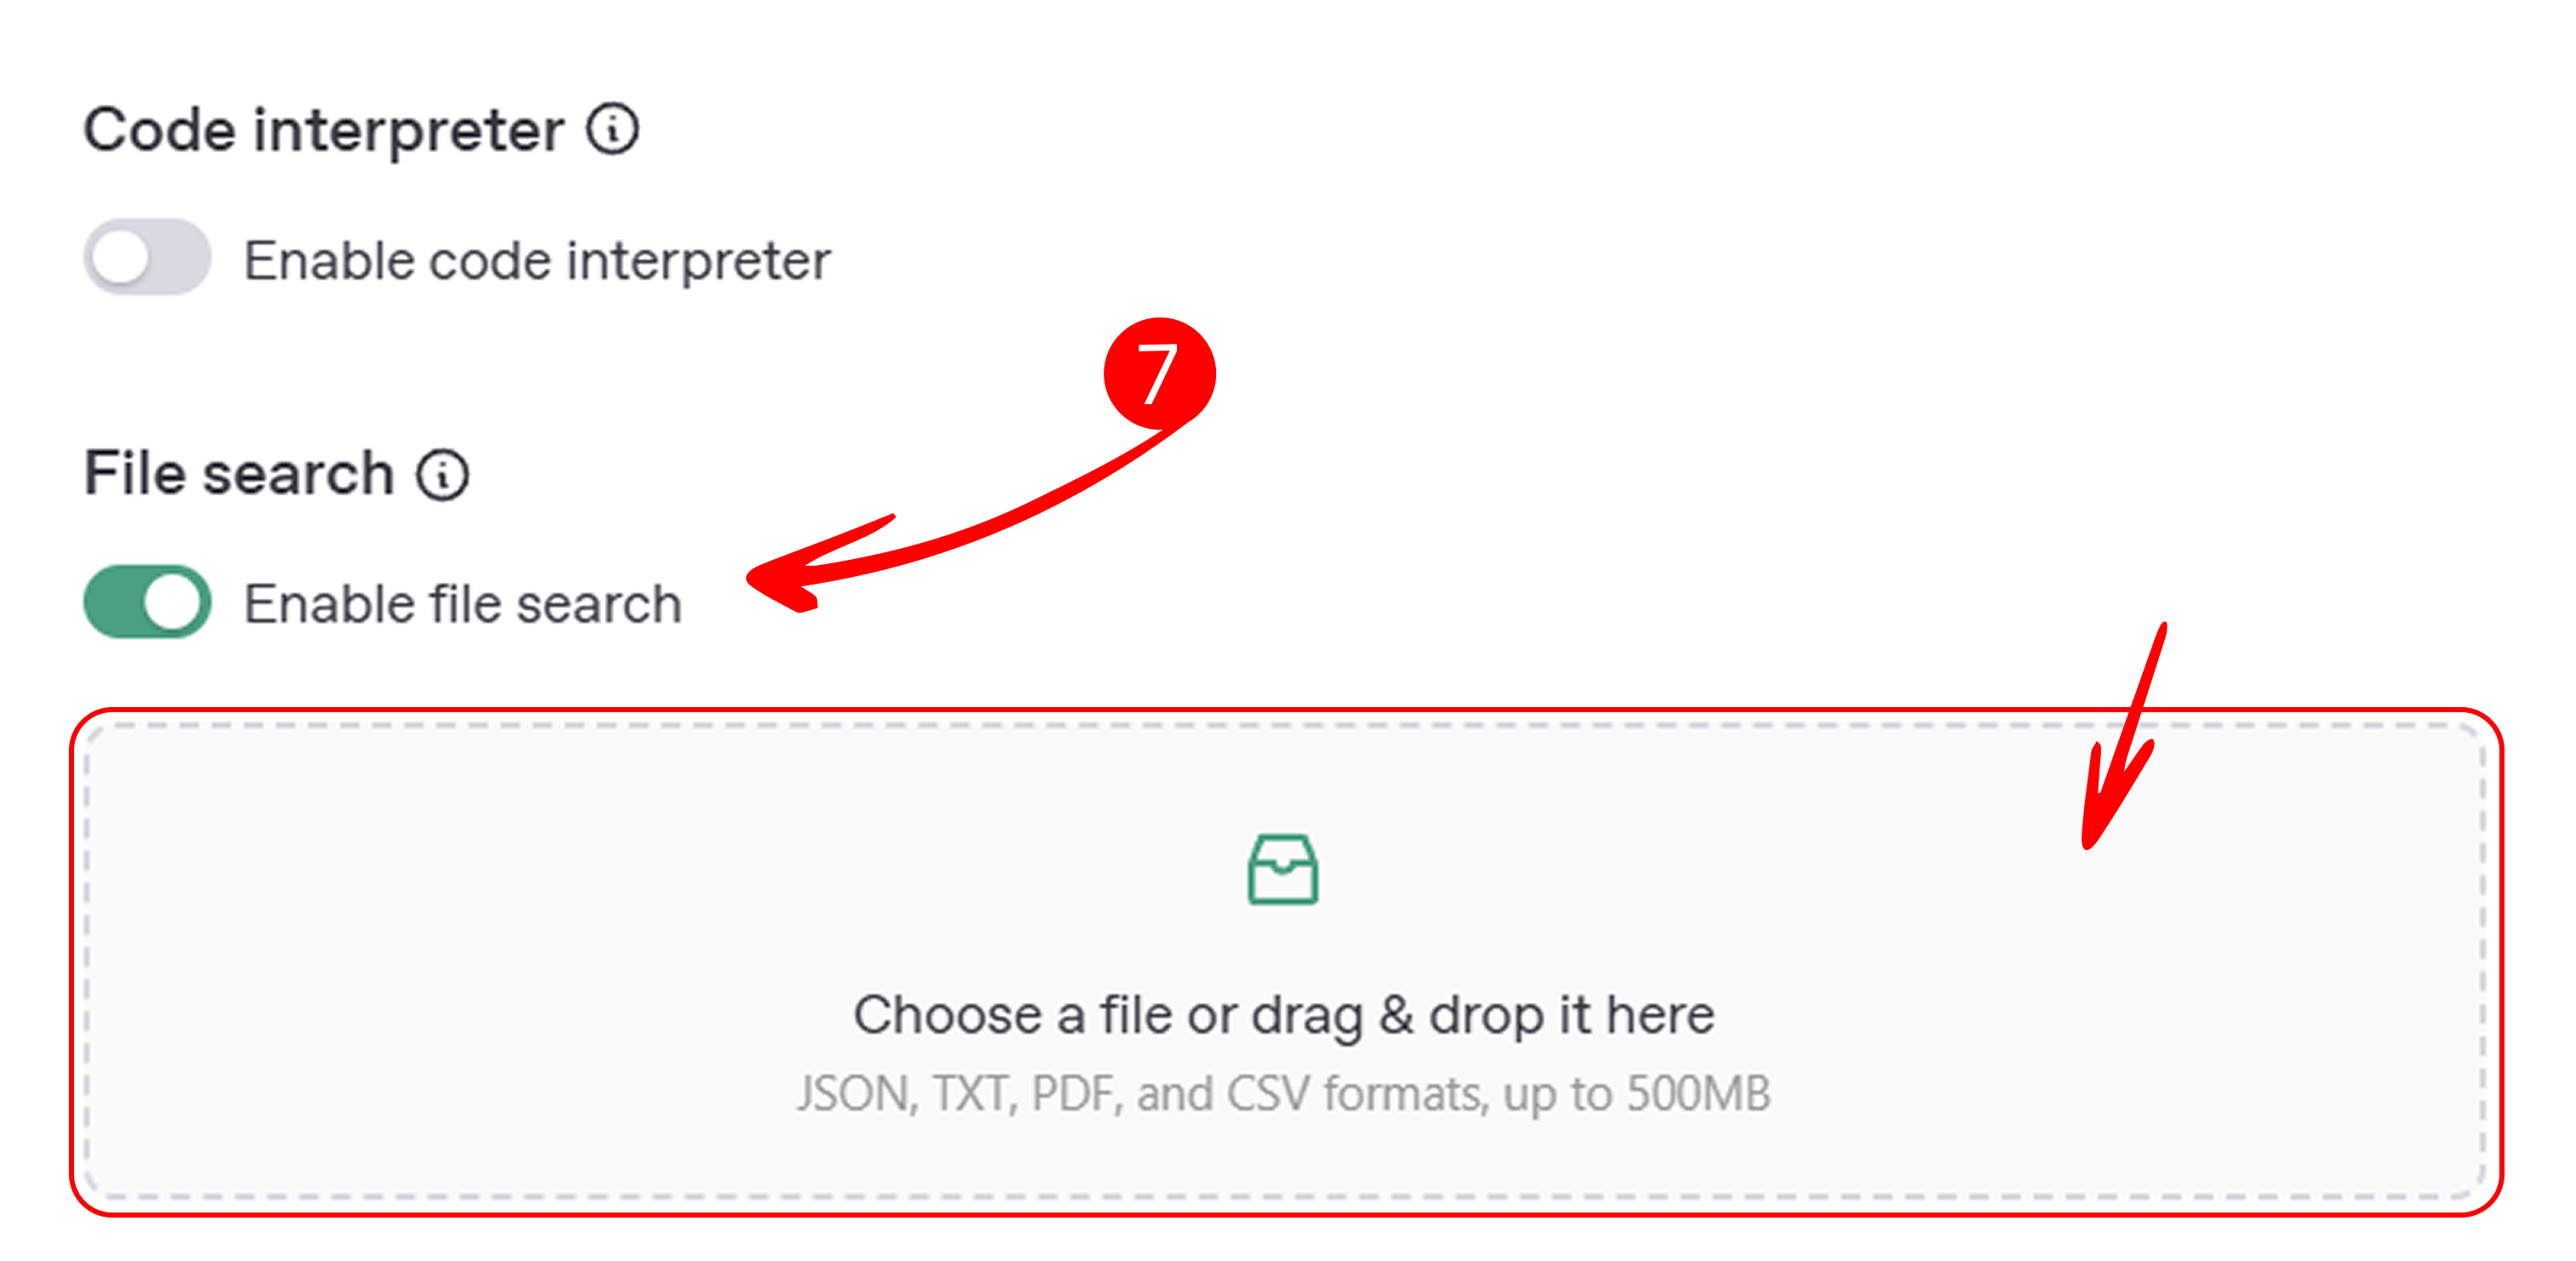
- To learn more about using file search, visit the file search guide.
-
-
Enable integration:
- Toggle the enable integration option to allow your assistant to connect with external services, such as scheduling tools, email platforms, or file storage systems. This enhances functionality by automating tasks or accessing external data. For example, a user might ask, “Book an appointment for tomorrow at 10 AM”, and the assistant will create a calendar event.
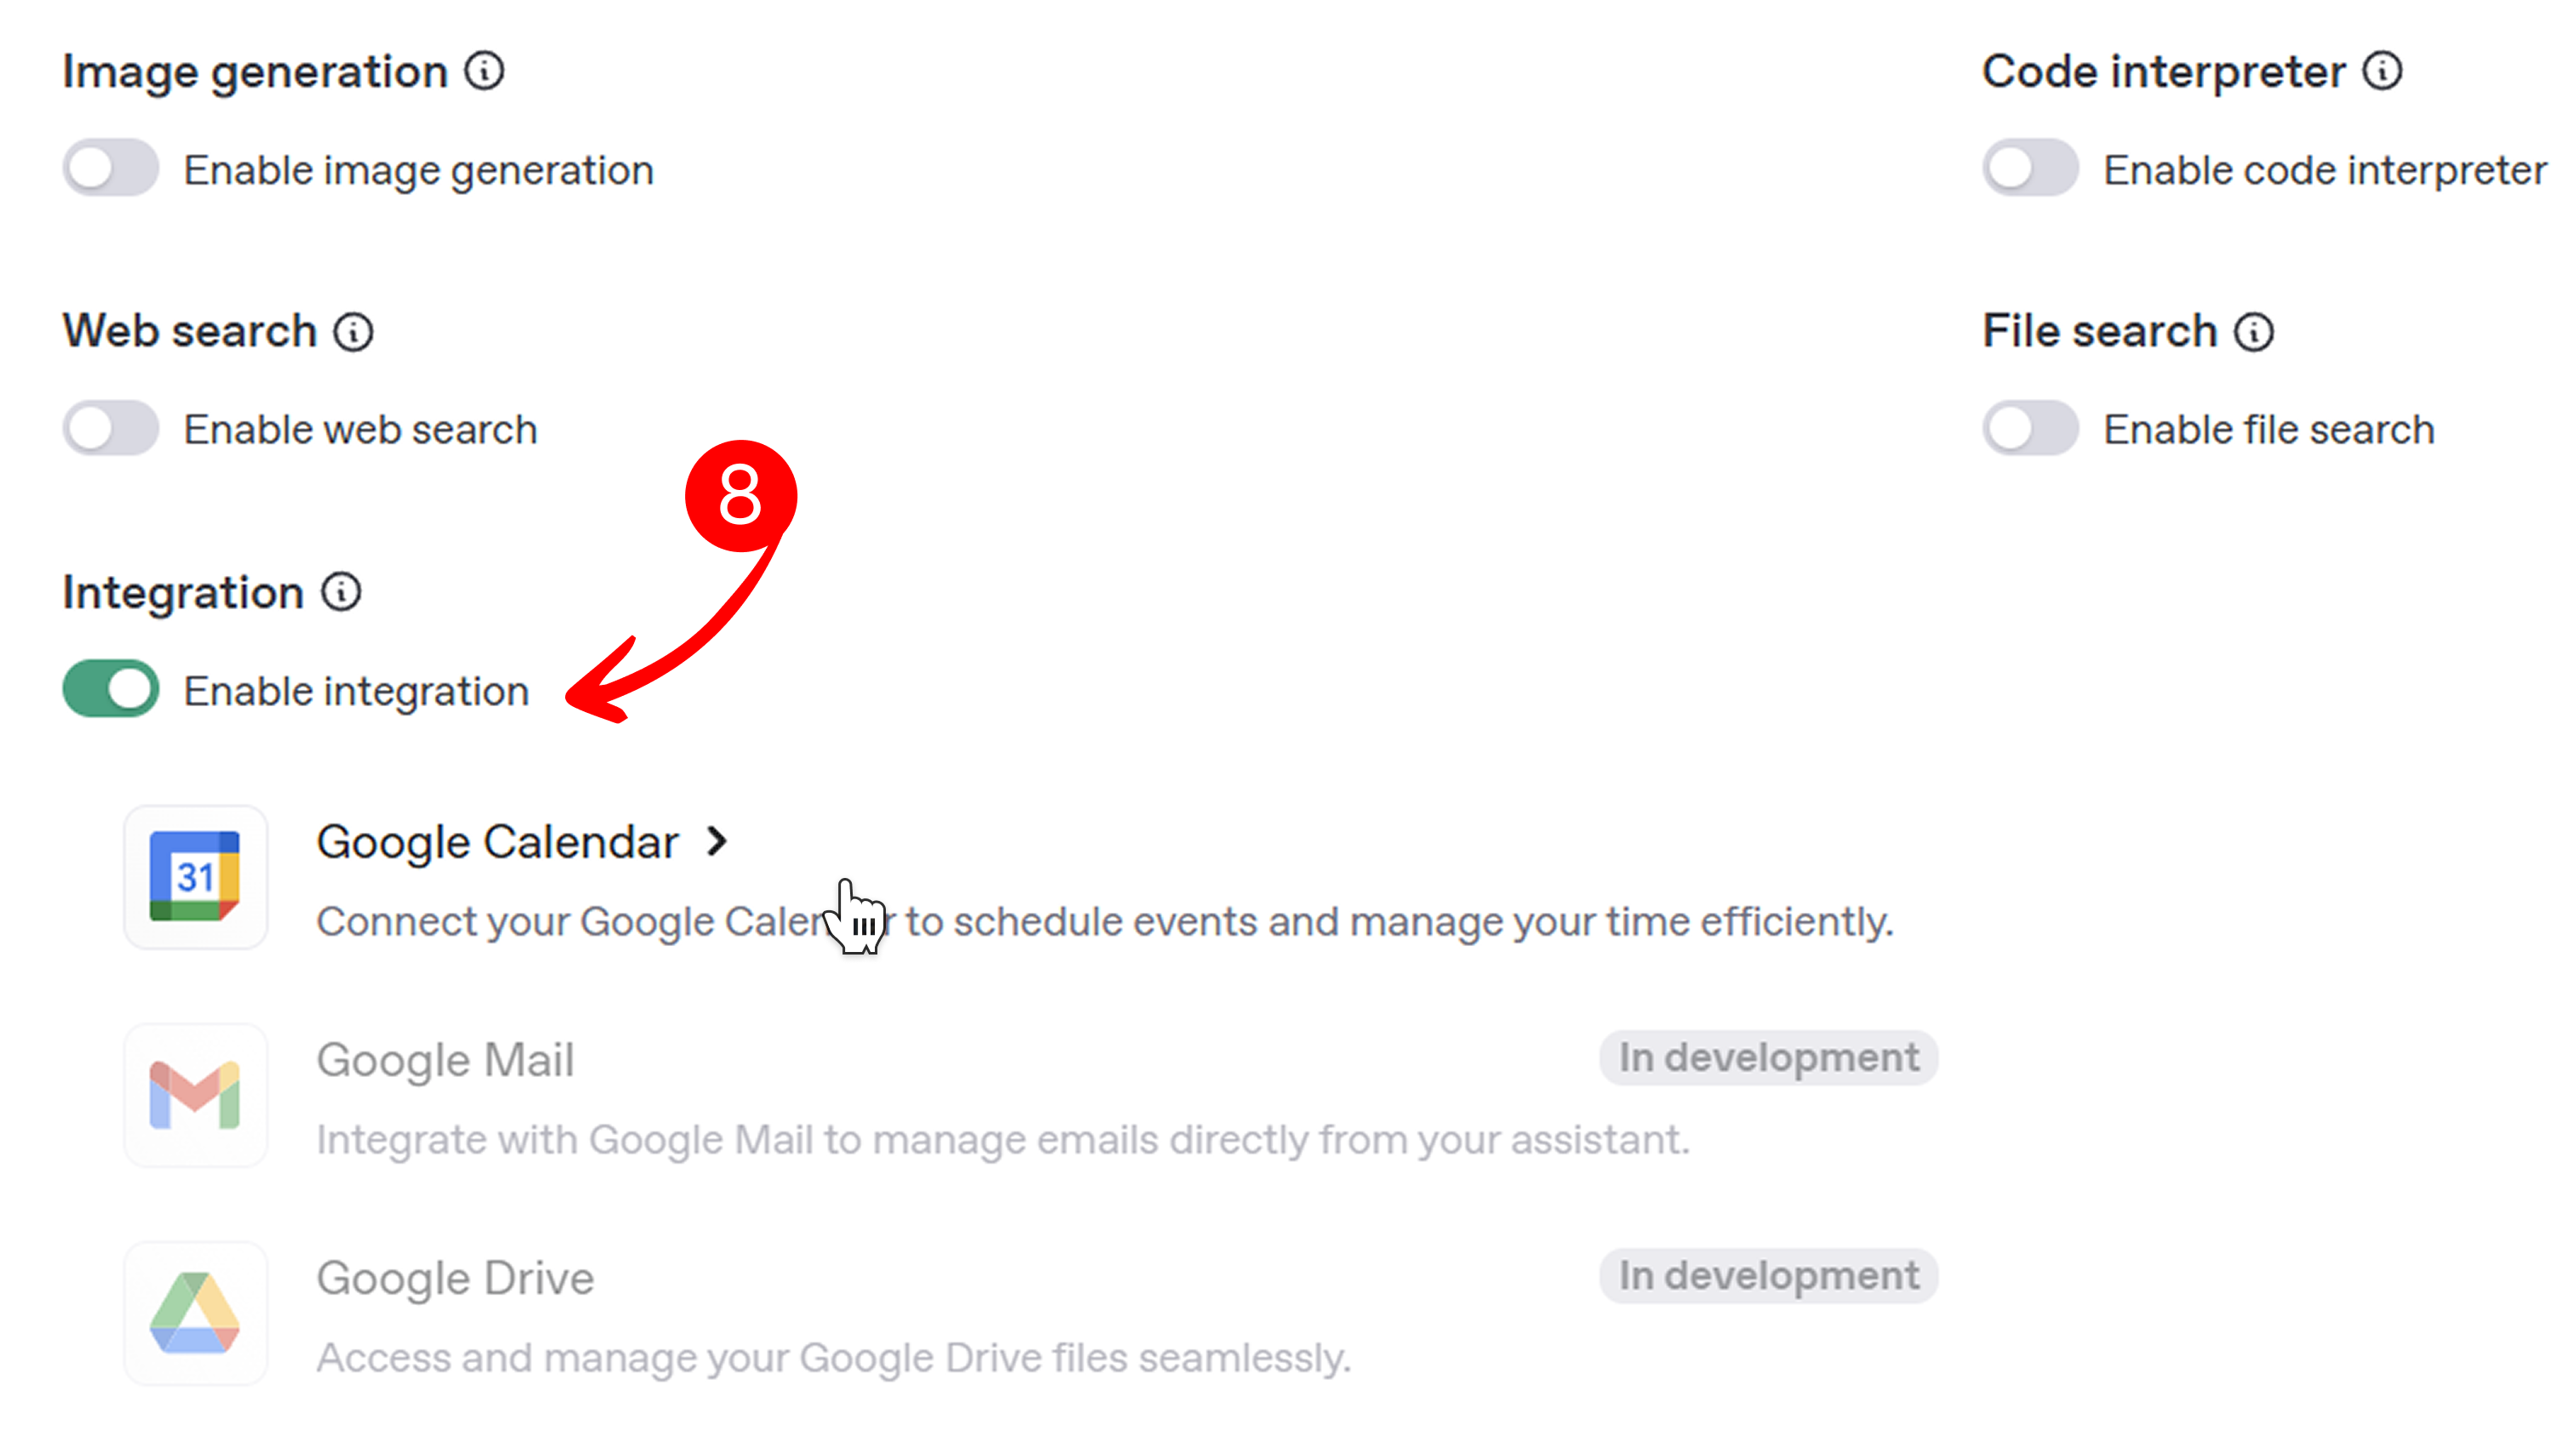
- Some integrations, like Google Gmail and Google Drive, are currently in development and will be available soon. Select an integration below to learn more about its setup and capabilities.
Available integrations:
Google calendar
Automate scheduling of meetings and events.
Google gmail
Automate sending and managing email communication (in development).
Google drive
Retrieve and manage files stored in Google Drive (in development).
After completing the guide, you can proceed to fill out the form as described above. Each pop-up will automatically close after you interact with the highlighted field, and the next tip will appear until the guide is complete.
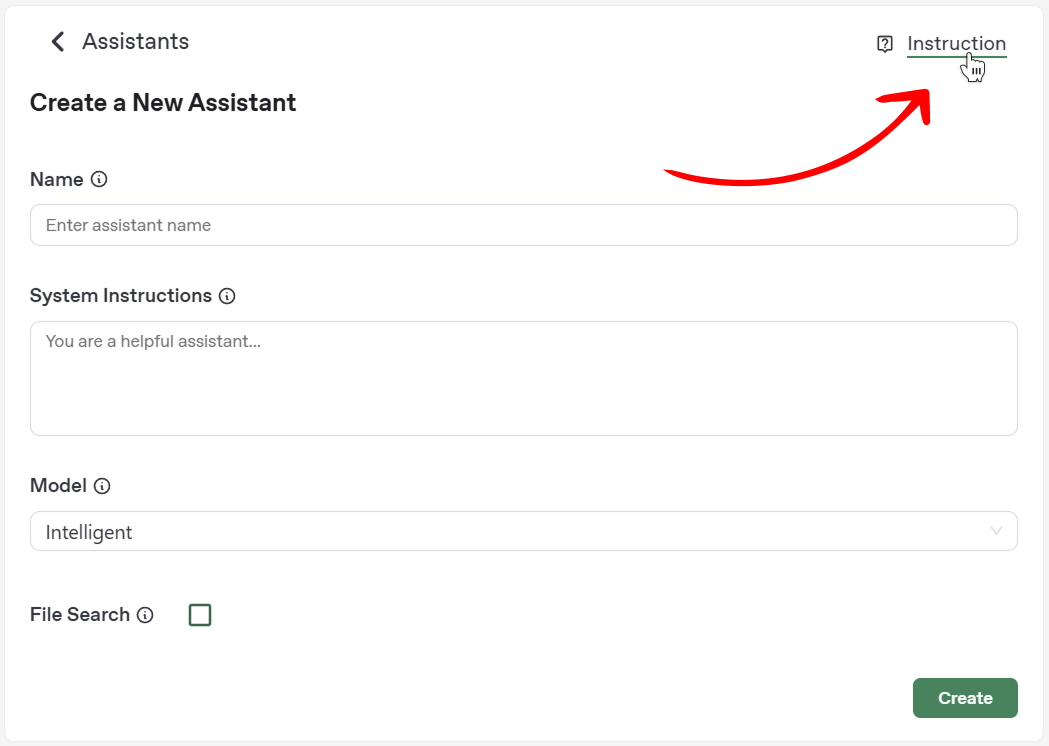
Note: the interactive guide appears only during your first use of the assistant creation form. To revisit the guide, click the flag icon in the top-right corner of the form, as shown in the image below.
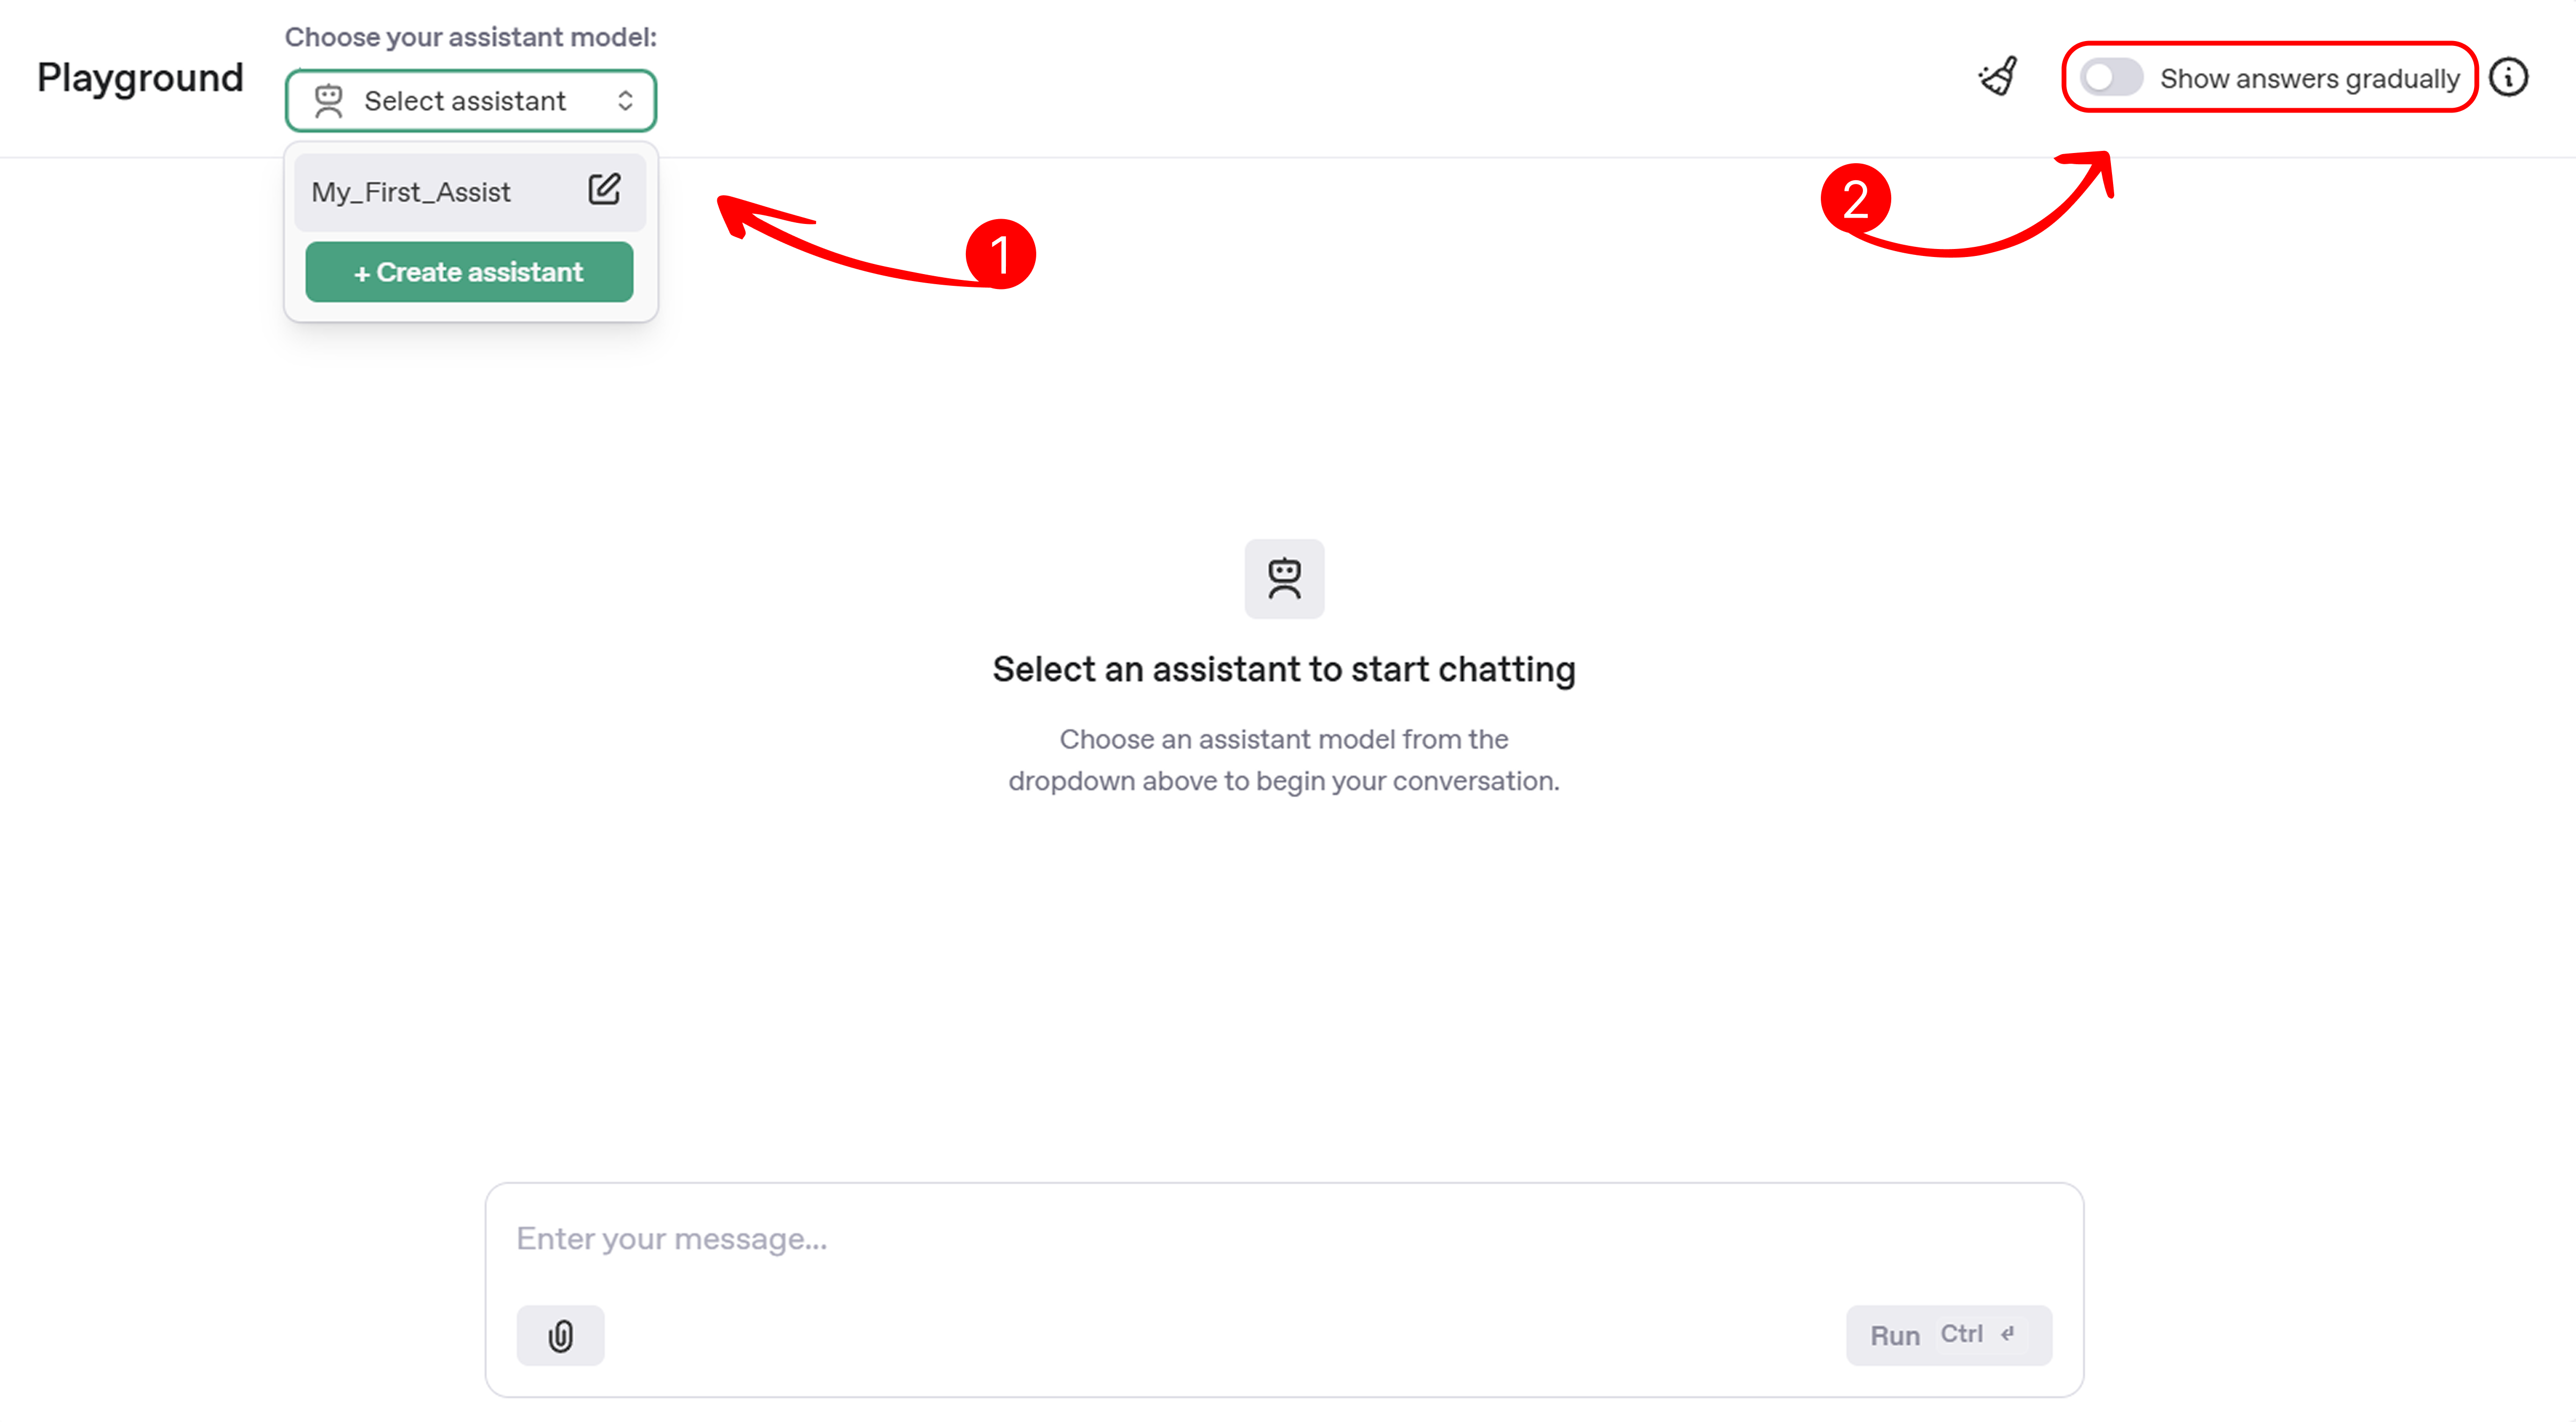
Testing your assistant
After creating your assistant, you can test its functionality on the playground page to ensure it responds as expected. This page allows you to interact with your assistant in real-time and refine its behavior based on the responses.
-
Select an assistant: Choose your assistant from the dropdown menu to start chatting. This lets you test the specific assistant you’ve created and verify its configuration, such as system instructions or enabled tools like integrations or file search. For example, you might ask, “What can you do?” to see how the assistant describes its capabilities.
-
Show answers gradually: Toggle the Show answers gradually option to control how responses appear. By default, answers display instantly, but enabling this option makes responses appear gradually, simulating a real chat experience. This is useful for testing how your assistant’s tone and pacing feel to users.
Integrating Your Assistant
Once you’ve created and tested your assistant, you can integrate it into social chatbots or web chatbots to engage with users on your preferred platforms. The Mingleego platform supports integration with social platforms like Instagram, Facebook Messenger, WhatsApp, Telegram, and Discord, as well as web chatbots that can be embedded on your website.
-
Social chatbots: connect your assistant to social platforms to provide automated customer support, product recommendations, or other services. Each platform requires specific setup steps, such as verifying your meta business portfolio for Instagram, Facebook, or WhatsApp, or configuring API keys for Telegram and Discord. For detailed instructions, refer to the following guides:
- Social bots overview for general setup steps for Meta platforms.
- Messenger bots
- Instagram bots
- WhatsApp bots
- Telegram bots
- Discord bots
-
Web chatbots: embed your assistant as a chat widget on your website to assist visitors with real-time interactions. This requires generating an API key and embedding a script provided by the Mingleego platform. For detailed setup instructions, refer to the web chat bots guide.
-
Next steps: after integrating your assistant, track user interactions statistics on the Mingleego platform. Return to the Playground page to refine its responses or update settings as needed to optimize user experience.
Start integrating your assistant today to bring intelligent, automated interactions to your audience!