Integrations
Overview
This guide provides detailed instructions on how to connect your Mingleego assistant to external services such as calendars, email platforms, communication tools, and e-commerce systems to enhance its functionality. Integrations allow your assistant to automate tasks, access external data, and provide seamless user experiences.
For example, your assistant can schedule meetings via Google Calendar or Outlook, send and manage emails through Gmail or Outlook, notify teams in Slack, manage store operations in Shopify, or handle listings and orders on eBay based on user requests.
This guide covers enabling and setting up integrations, with a focus on Google Calendar, while other integrations such as Gmail, Outlook, Slack, Shopify, and eBay are in development.
Note: This guide assumes you have an account on the Mingleego platform. If not, please sign up here before proceeding.
Available integrations
The Mingleego platform supports the following integrations. Select an integration to learn more about its setup and capabilities:
Google Calendar (Business)
Automate appointment booking with working hours and time slots.
Google Calendar (Classic)
Let the assistant read, create, and delete events in your personal calendar.
Google gmail
Automate email sending and management (in development).
Outlook
Automate email communication and calendar management.
Slack
Enable real-time team communication and notifications.
Shopify
Manage store operations and automate customer interactions.
eBay
Manage listings and automate marketplace interactions.
HubSpot CRM
Manage contacts, deals, and companies through your assistant.
Bitrix24 CRM
Create contacts, companies, leads, and tasks in Bitrix24.
Notion
Search, read, create, and update pages and databases in your Notion workspace.
Calendly
Check real availability and book meetings on your Calendly calendar.
Google Calendar (Business) integration
Integrating your assistant with google calendar allows it to create, manage, and retrieve calendar events based on user requests. For example, a user might say, “Book an appointment for tomorrow at 10 AM”, and the assistant will create a corresponding event in your google calendar.
Setting up google calendar
To enable Google calendar integration, follow these steps:
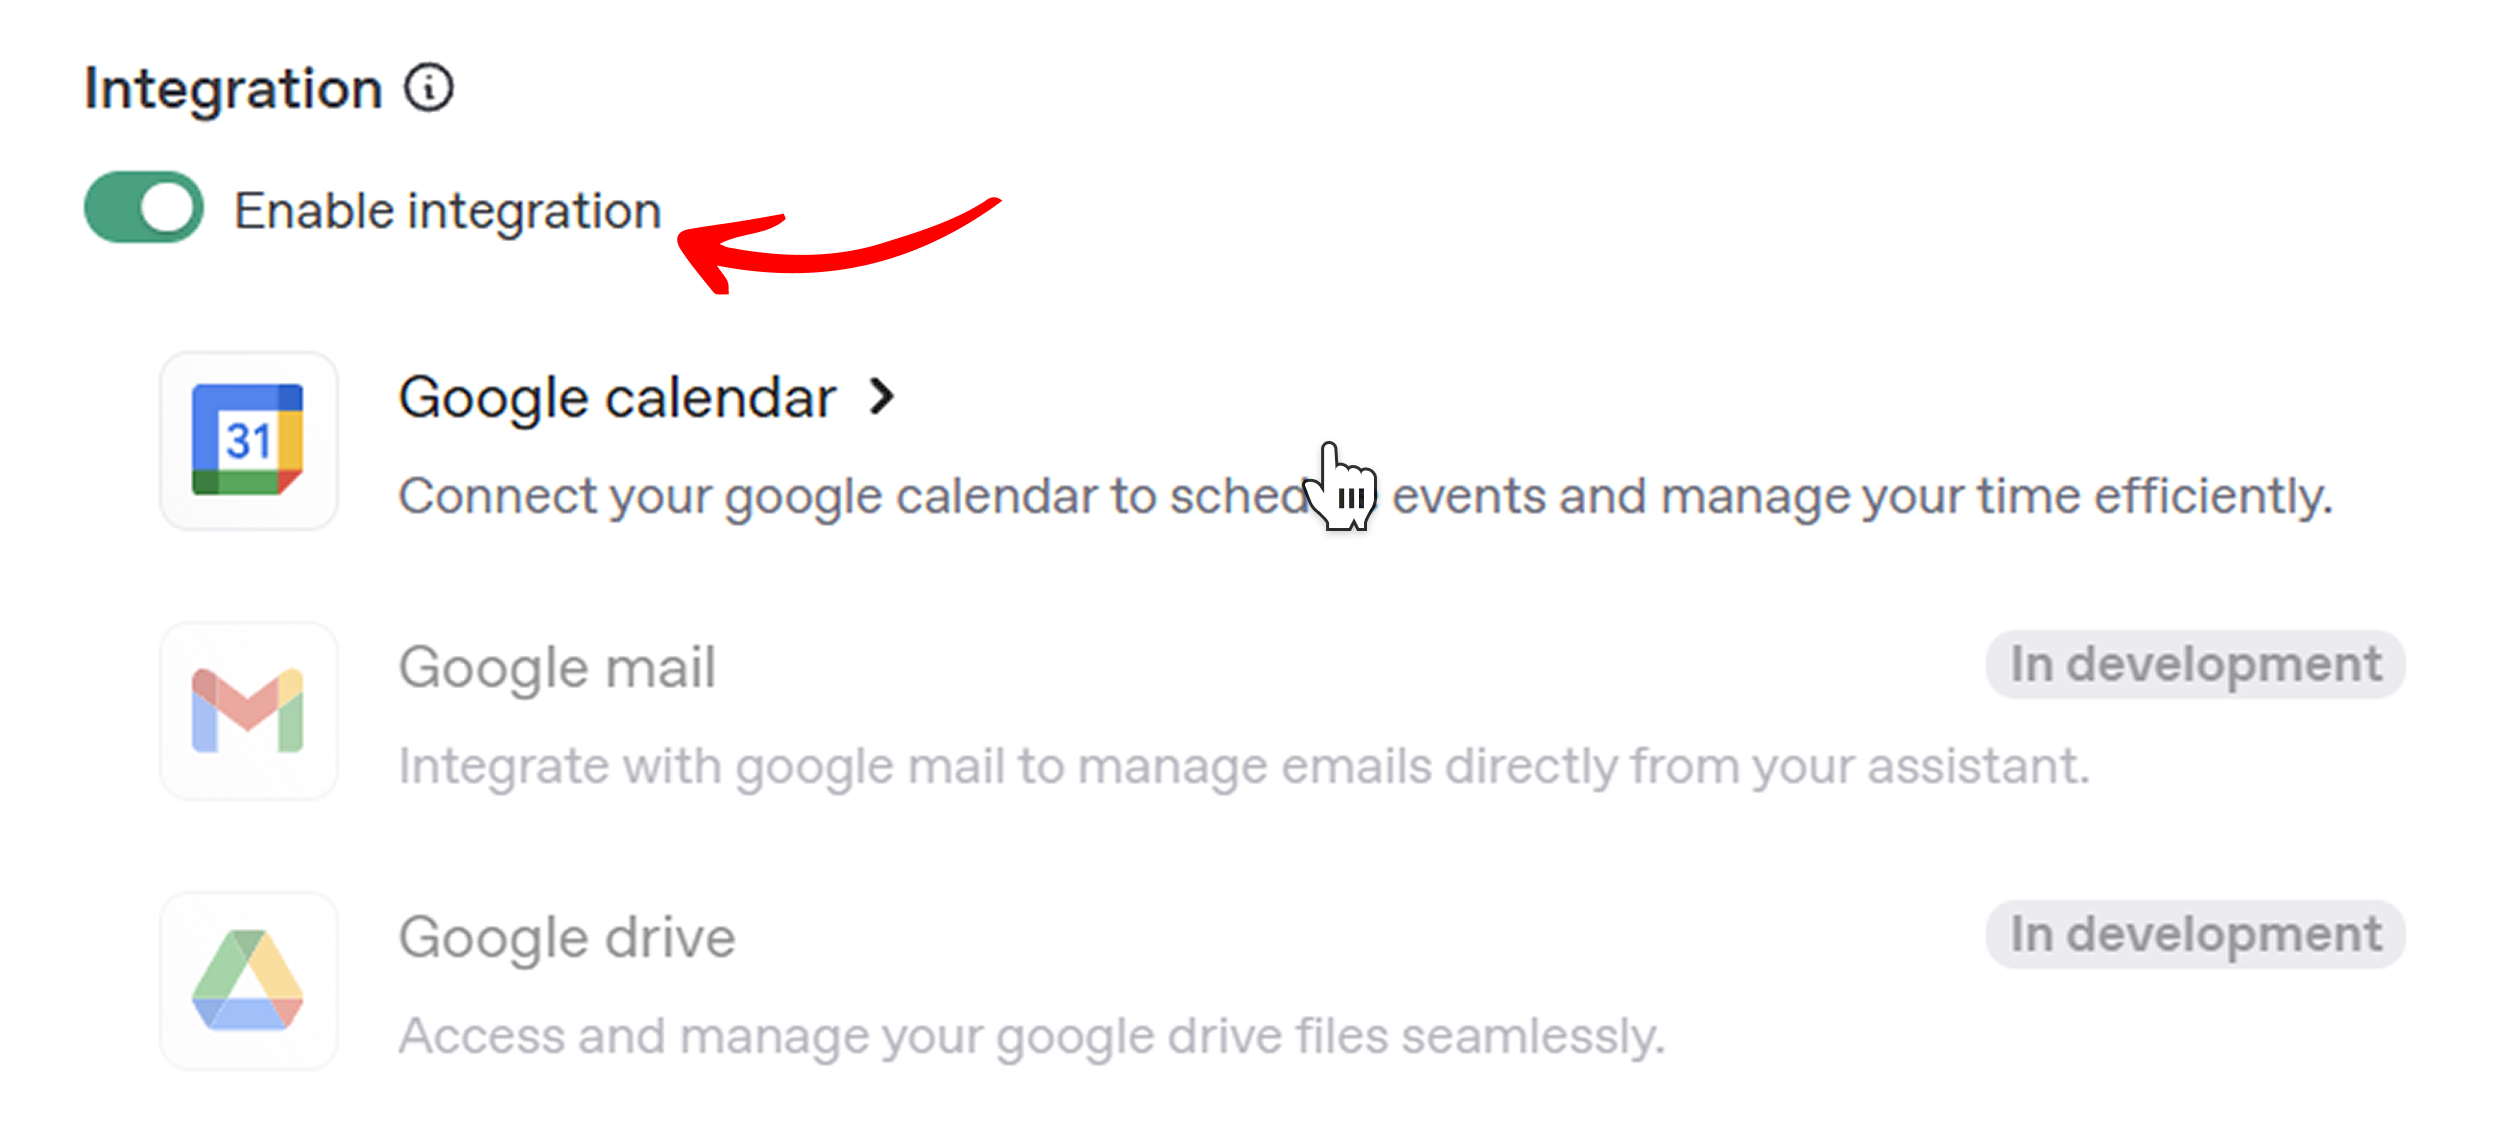
Enable integration
- Navigate to the assistants page and select your assistant.
- Toggle the enable integration option in the assistant settings.
- Select Google calendar from the list of available integrations.
Authenticate with Google
- Sign in with your Google account and grant the necessary permissions.
Configure calendar settings
After authentication, a configuration form will appear. Fill in the following fields to set up how your assistant manages calendar events:
Event Summary:
Enter a default title for events created by the assistant (e.g., “Client Meeting”). This will appear as the event title in the Google calendar.
Event Description:
Add details for the event, such as a phone number, email, address, or preparation instructions (e.g., “Please bring project documents”). These will be visible in the calendar event description.
Timezone:
Select the timezone that matches your Google calendar. This ensures events are scheduled correctly.
Time Slot Duration:
Specify the default duration of each event in minutes (e.g., 30 minutes for a consultation).
Working Hours:
Set the start and end times for your availability (e.g., 9:00 AM to 5:00 PM). The assistant will only schedule events within these hours.
Calendar Instructions:
The system automatically generates instructions for managing calendar events based on your input in fields like timezone, time slot duration, and working hours. After generation, you can review and edit these instructions to include business-specific details, such as “Avoid scheduling on weekends” or “Include a 15-minute buffer between meetings”.
Note: Any manual changes to the calendar Instructions will be overwritten if you modify timezone, time slot duration, or working hours. To add custom settings, such as non-working days or breaks, edit the instructions after they are generated. For more details on customizing instructions, refer to the system instructions guide.
Test the integration
- Go to the Playground page.
- Select your assistant and test a command, such as “Schedule a meeting for next Monday at 2 PM”.
- Verify that the event appears in your Google calendar.
Example Usage
- User Prompt: “Book a team meeting for tomorrow at 3 PM for 1 hour.”
- Assistant Action: Creates a Google Calendar event titled “Team Meeting” on the specified date and time, with a duration of 1 hour.
- Response: “I’ve scheduled a team meeting for tomorrow at 3 PM. Check your Google Calendar for details!”
Google Calendar (Classic) integration
The classic Google Calendar integration is the simpler, personal counterpart to the business calendar above. Instead of configuring booking rules, working hours, and meeting templates, you simply connect your Google account and choose which calendar actions the assistant may perform. It is ideal for managing your own day — reading your schedule, checking availability, and creating or removing events on request.
Business vs personal: the business calendar is built for appointment booking with fixed working hours, time slots, and branded events shown to your clients. The personal calendar has no booking configuration — it just exposes a set of tools that act on your own calendar. You can connect either one, or both, on the same assistant.
Setting up the personal calendar
Connecting the personal calendar uses Google OAuth — there are no credentials to copy or apps to register.
- Open the assistants page and select the assistant you want to connect.
- Turn on Enable integration and choose Google Calendar (Classic) from the list (in the Calendar category, next to the business calendar).
- Click the card. You will be redirected to Google's sign-in and consent screen.
- Sign in with the Google account whose calendar you want to use and approve the requested calendar permission.
- Google redirects you back to Mingleego and the integration becomes active.
Once connected, choose which tools the assistant is allowed to use in the personal-calendar configuration. See Google Calendar tools below for what each tool does. The assistant always reads live calendar data and detects your timezone automatically from your Google Calendar settings — it never asks you for it.
Google Calendar tools
Each tool below is a specific capability the assistant uses when working with your personal Google Calendar. Enable only the ones you need — for example, a read-only assistant might enable viewing and availability but not creation or deletion.
Scheduling
Create event
google_calendar_create_event
Creates a new event in your Google Calendar — meetings, appointments, reminders, and calls — directly from the conversation, without opening Google Calendar separately. The assistant accepts natural-language dates and times in any format ("Book a call with Anna next Friday at 3pm") and uses the timezone configured in your Google Calendar account automatically.
Viewing & availability
Get events
google_calendar_get_events
Shows what's on your calendar during a selected period, answering questions like "What do I have tomorrow?" or "Show me my Friday schedule" with real, live data. The assistant presents event names, times, and relevant details in plain language so you get a clear picture of your day without switching apps.
Check availability
google_calendar_get_availability
Checks whether you are free or busy during a specific time window. When you ask "Am I available Thursday afternoon?" or "Do I have anything at 2pm?", the assistant reads your live calendar and returns a clear answer — free or busy, and which slots are taken — useful before proposing a meeting time.
Managing events
Delete events
google_calendar_delete_events
Removes events within a selected time range. When you want to clear your schedule — "Cancel everything tomorrow morning" or "Delete my Friday meetings" — the assistant finds the matching events and removes them, confirming which events will be affected before deleting so nothing is removed by accident.
Example Usage
- User Prompt: "What's on my calendar tomorrow, and am I free at 2pm?"
- Assistant Action: Reads tomorrow's events and checks availability at 2pm from the live calendar.
- Response: "Tomorrow you have a 10am standup and a 4pm review. You're free at 2pm — want me to book something?"
 Outlook integration
Integrating your assistant with outlook allows it to send and manage emails, as well as create and manage calendar events based on user requests. For example, a user might say, "Send a follow-up email and schedule a check-in for next week", and the assistant will perform both actions through your outlook account.
Setting up outlook
To enable Outlook integration, follow these steps:
Enable integration
- Navigate to the assistants page and select your assistant.
- Toggle the enable integration option in the assistant settings.
- Select Outlook from the list of available integrations.
Authenticate with Microsoft
- You will be redirected to Microsoft account authorization.
- Sign in with your Microsoft account.
- Grant the required permissions for email and calendar access.
Configure Outlook tools
After authentication, a configuration panel will appear with selectable tools. Enable only the tools your assistant needs for your workflow.
Search tools:
- Find emails: Allows the assistant to search emails by sender, subject, keywords, or date range.
- Get email: Allows the assistant to retrieve the full content of a specific email.
- Find calendar events: Allows the assistant to search upcoming or past calendar events.
Action tools:
- Send email: Allows the assistant to send emails on behalf of the user.
- Reply to email: Allows the assistant to reply to existing email threads.
- Delete email: Allows the assistant to delete selected emails.
- Delete calendar event: Allows the assistant to remove events from the user's calendar.
- Edit calendar event: Allows the assistant to update event details such as title, time, or attendees.
- Create calendar event: Allows the assistant to create new calendar events.
Note: Enable only the tools required for your use case. Limiting enabled tools helps reduce unintended actions and keeps assistant behavior predictable.
Test the integration
- Go to the Playground page.
- Select your assistant and test a command, such as "Send an email to john@example.com and create a calendar event for Friday at 2 PM".
- Verify that the email is sent and the calendar event appears in Outlook.
Example Usage
- User Prompt: "Reply to anna@example.com that we confirmed the proposal, then schedule a follow-up meeting for next Tuesday at 11 AM."
- Assistant Action: Sends the email reply in Outlook and creates a calendar event for the requested time.
- Response: "I've sent your reply to anna@example.com and scheduled the follow-up meeting for next Tuesday at 11 AM."
Slack integration
Integrating your assistant with slack allows it to search conversations, retrieve messages, and perform channel actions based on user requests. For example, a user might say, "Find the latest incident update in #ops and reply with an acknowledgment", and the assistant will complete these actions in your Slack workspace.
Setting up Slack
Connecting Slack takes just a few clicks. Mingleego uses a managed OAuth application, so you do not need to create your own Slack app or copy any bot tokens — you only need to authorize access to your Slack workspace.
- Open the assistants page and select the assistant you want to connect.
- Turn on Enable integration and choose Slack from the list.
- Click Connect. You will be redirected to Slack's authorization page.
- Sign in to Slack, pick the workspace, and approve the requested permissions.
- Slack redirects you back to Mingleego, and the integration becomes active.
Once connected, choose which tools the assistant is allowed to use in the Search tools and Action tools sections of the Slack configuration. See Slack tools below for what each tool does. To verify everything works, open the Playground and try a command such as "Search messages in #support for password reset and reply with the help center link".
Slack tools
Each tool below is a specific capability the assistant uses when working with Slack. All tools require a connected Slack integration. The assistant has no built-in knowledge of your workspace structure — channel IDs, user IDs, and message timestamps are either provided directly or first obtained through the lookup tools (Find public channel, Find user by email, Search messages).
Finding people & channels
Find user by email
slack_find_user_by_email
Looks up a Slack user by email address or username and returns their basic profile — user ID, display name, and email. This is the starting point for any action targeting a specific person: you need their user ID before you can message them, check their memberships, or remove them from a channel.
The value is sent directly to the Slack API — no fuzzy matching is applied. If the user is not found, the lookup fails without retrying.
Find public channel
slack_find_public_channel
Resolves a public channel name into its Slack channel ID. Since every other tool works with channel IDs rather than names, this is usually the first step whenever a channel is referenced by name.
Performs an exact name lookup (do not include the # symbol). Private channels cannot be discovered this way — their IDs must be provided directly.
Reading messages & conversations
Get message
slack_get_message
Fetches a single specific message using its channel ID and timestamp. Returns the message text, the author's user ID, and the timestamp. This is an exact lookup — it does not browse history or search by content.
Requires both the channel ID and the message timestamp. System messages (bot events, join notices) are not supported. Use Search messages if you don't have the exact timestamp.
Get message permalink
slack_get_message_permalink
Returns a permanent, shareable URL pointing to a specific Slack message — useful for referencing messages in documents, emails, or other channels.
Returns the link only, not the message text. If you need both, this tool and Get message are called separately.
Get conversation
slack_get_conversation
Retrieves basic metadata about a Slack channel by its channel ID — the channel ID, name, and whether it is public or private. A background utility used to verify channel details before performing an action.
Exact lookup by channel ID only — it does not accept channel names. Use Find public channel first if you only have the name.
Get conversation members
slack_get_conversation_members
Returns a list of user IDs for the members of a channel or direct message.
Returns up to 50 user IDs per call; additional pages must be requested explicitly. User IDs are not resolved to names automatically — use Find user by email for that.
Search messages
slack_search_messages
Searches the whole Slack workspace for messages matching a text query. Each result includes the author's username, message text, timestamp, and a direct permalink. This is the right tool when you don't know the exact message location — for example, "find messages about the budget approval".
Requires a user token with the search:read scope — a bot token alone is not sufficient.
Sending messages
Send message
slack_send_message
Posts a single new message to a public Slack channel. Each call sends exactly one standalone message.
Requires the channel ID (not the channel name). Does not create or continue threads — use Reply to message for that, or Send private channel message for private channels.
Send private channel message
slack_send_private_channel_message
Posts a single message to a private (invite-only) Slack channel. Works like Send message, but for restricted channels.
The bot must already be a member of the private channel — this tool cannot join channels on its own. The private channel ID must be provided directly.
Reply to message
slack_reply_message
Posts a reply inside an existing Slack thread. Requires the channel ID, the timestamp of the parent message, and the reply text. The message appears as a thread reply, not as a top-level channel message.
Always posts inside the thread. To post a standalone message instead, use Send message.
Managing messages & members
Delete message
slack_delete_message
Permanently deletes a specific message from a Slack channel, using its channel ID and timestamp.
This action is permanent and irreversible — there is no confirmation step and no undo. The bot can typically only delete messages it posted itself, unless it has admin-level permissions.
Remove user from channel
slack_remove_user_from_channel
Removes a specific user from a Slack channel, using the channel ID and the user's Slack user ID.
Requires the user's Slack user ID (not their name or email). Depending on workspace permissions, Slack may return a restricted_action error — a Slack-side restriction that cannot be bypassed by retrying.
Example Usage
- User Prompt: "Find messages about deployment in #engineering, then reply in thread that rollback is complete."
- Assistant Action: Searches Slack messages in the specified channel and posts a threaded reply to the relevant message.
- Response: "I found the deployment thread in #engineering and posted your rollback confirmation reply."
Note: Enable only the tools required for your use case. Limiting enabled tools helps reduce unintended actions and keeps assistant behavior predictable.
Advanced: create your own Slack app
Note: This section is optional and kept for reference. The standard Mingleego integration uses a managed OAuth application — most users should follow Setting up Slack above and can skip this section entirely. Creating your own Slack app is only relevant for advanced or self-hosted setups.
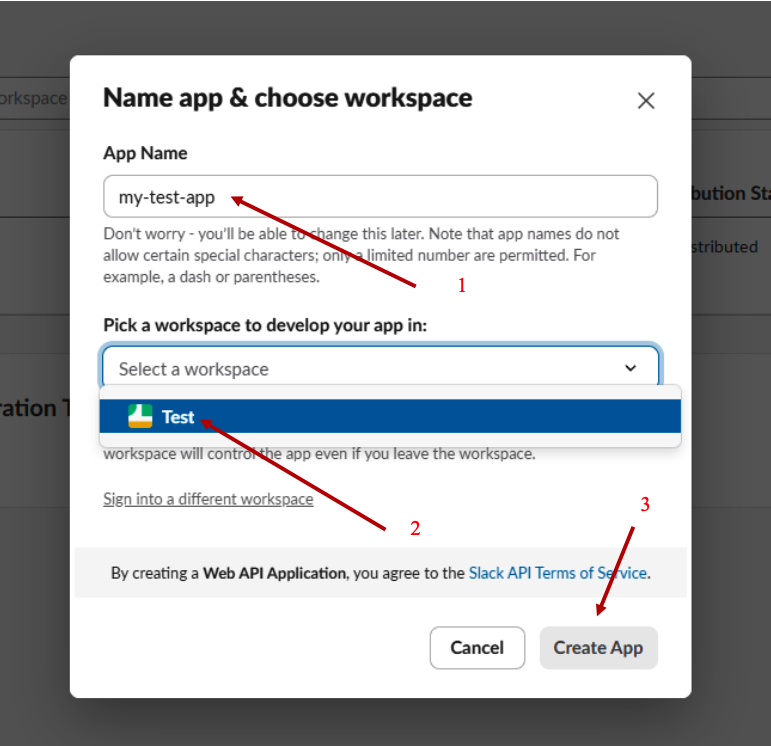
Create a Slack App
- Go to https://api.slack.com/apps.
- Click Create App.
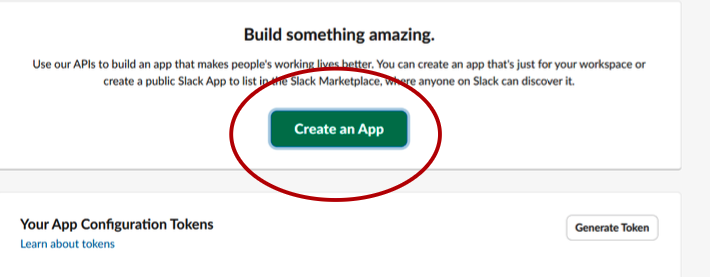
- Choose: From scratch.
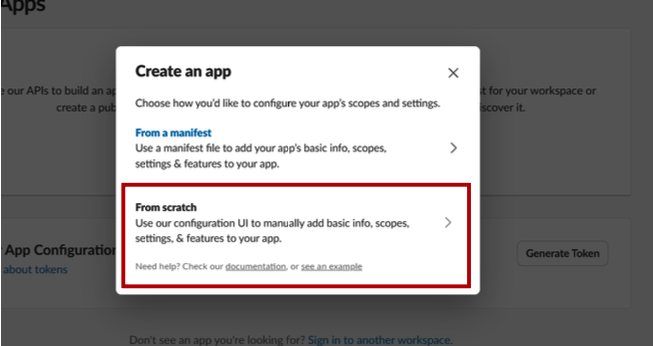
- Fill in:
- App Name (e.g. my-test-app) (1)
- Workspace (2)
- Click Create App (3)
Add Redirect URL in OAuth & Permissions
- In the left sidebar, click OAuth & Permissions.
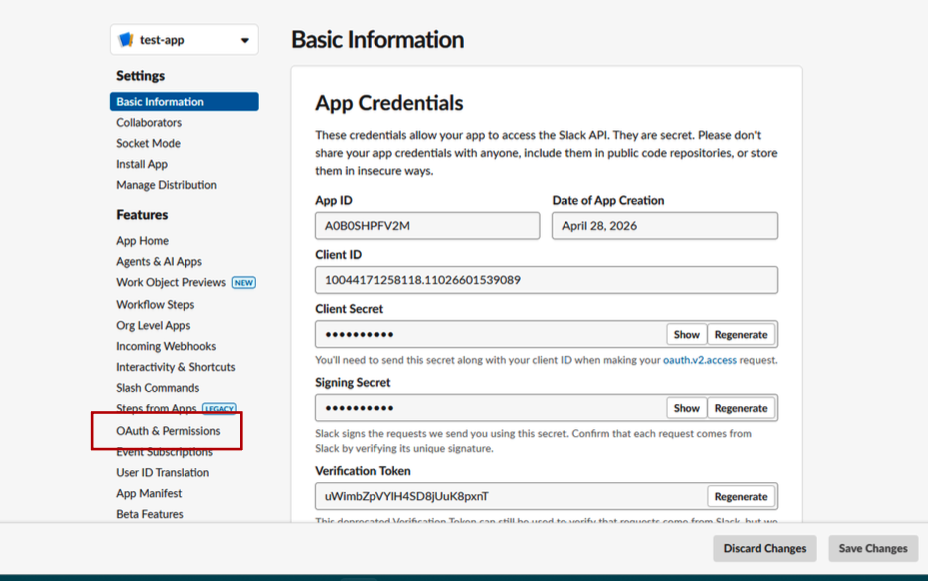
- Scroll down to Redirect URLs and click Add New Redirect URL.
- Enter
https://mingleego.com/api/slack/callbackand click Add. - Click Save URLs.

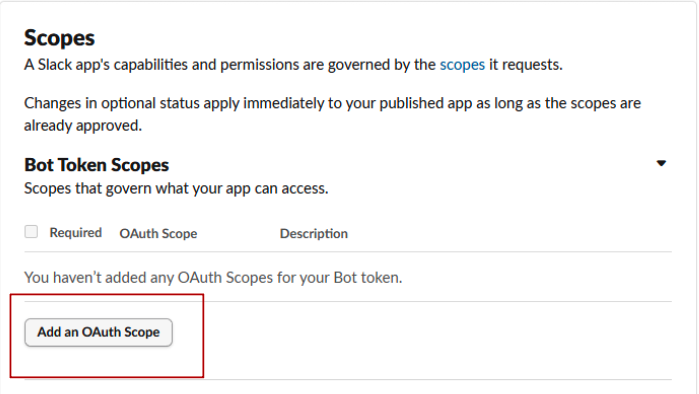
Add Bot Token Scopes
- Scroll down to the Scopes section and click Bot Token Scopes to expand it.
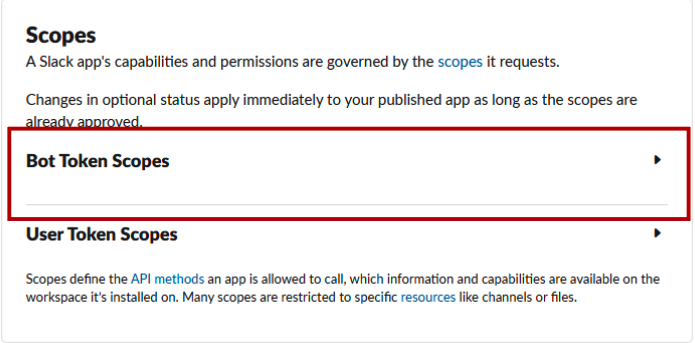
- Click Add an OAuth Scope.
- Add the following scopes:
| OAuth Scope | Description |
|---|---|
bookmarks:read | Read channel bookmarks |
channels:history | Read messages in public channels |
channels:manage | Create, archive, manage public channels |
channels:read | View list of public channels |
channels:write.invites | Invite users to public channels |
chat:write | Send messages as the bot |
conversations.connect:read | Access shared channel info (Slack Connect) |
groups:history | Read messages in private channels |
groups:read | View private channels the bot is in |
groups:write | Manage private channels |
im:history | Read direct messages |
im:read | View direct message conversations |
im:write | Send direct messages |
mpim:history | Read group direct messages |
mpim:read | View group DM conversations |
mpim:write | Send messages in group DMs |
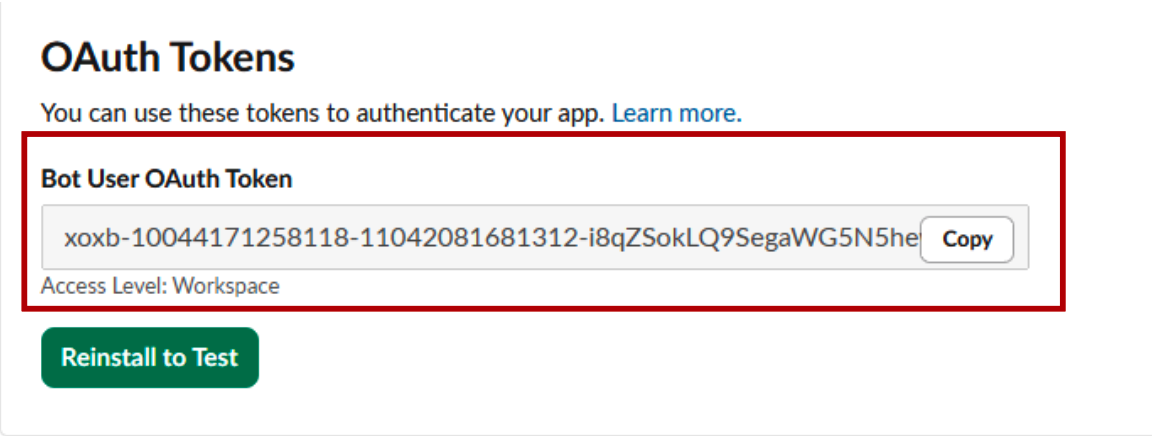
Install App & Get Token
- Scroll up to the OAuth Tokens section and click Install to Test to install the app to your workspace.
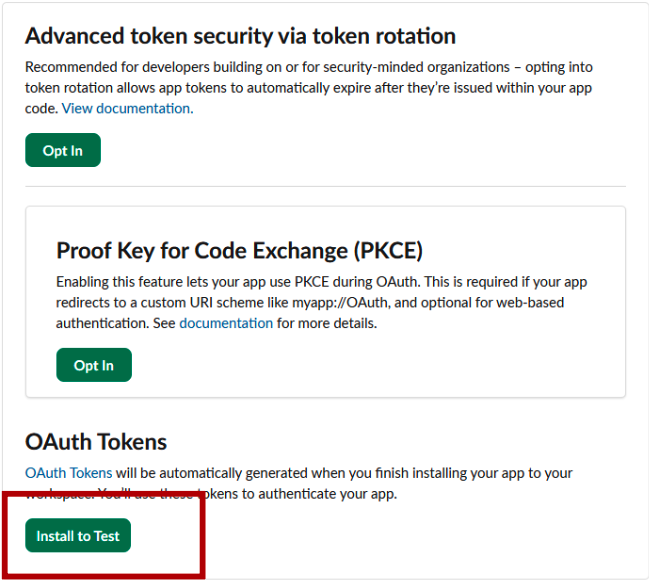
- After installation, the Bot User OAuth Token will be generated (starts with
xoxb-). - Click Copy to copy the token.
Shopify integration
Integrating your assistant with shopify allows it to access store data and automate commerce-related workflows based on user requests. For example, a user might say, "Check product availability and prepare an update for the customer", and the assistant will use your Shopify connection to support that request.
Setting up shopify
To enable Shopify integration, follow these steps:
Create a Shopify app
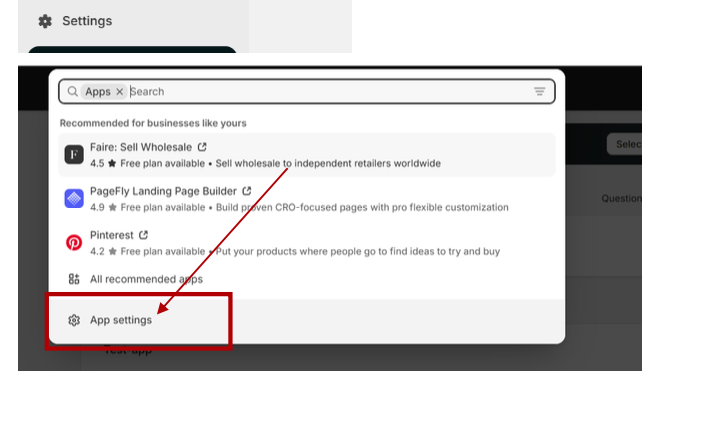
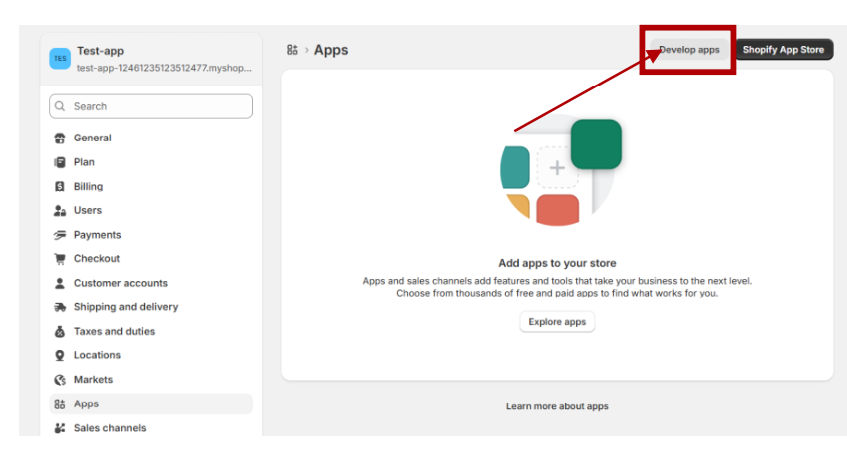
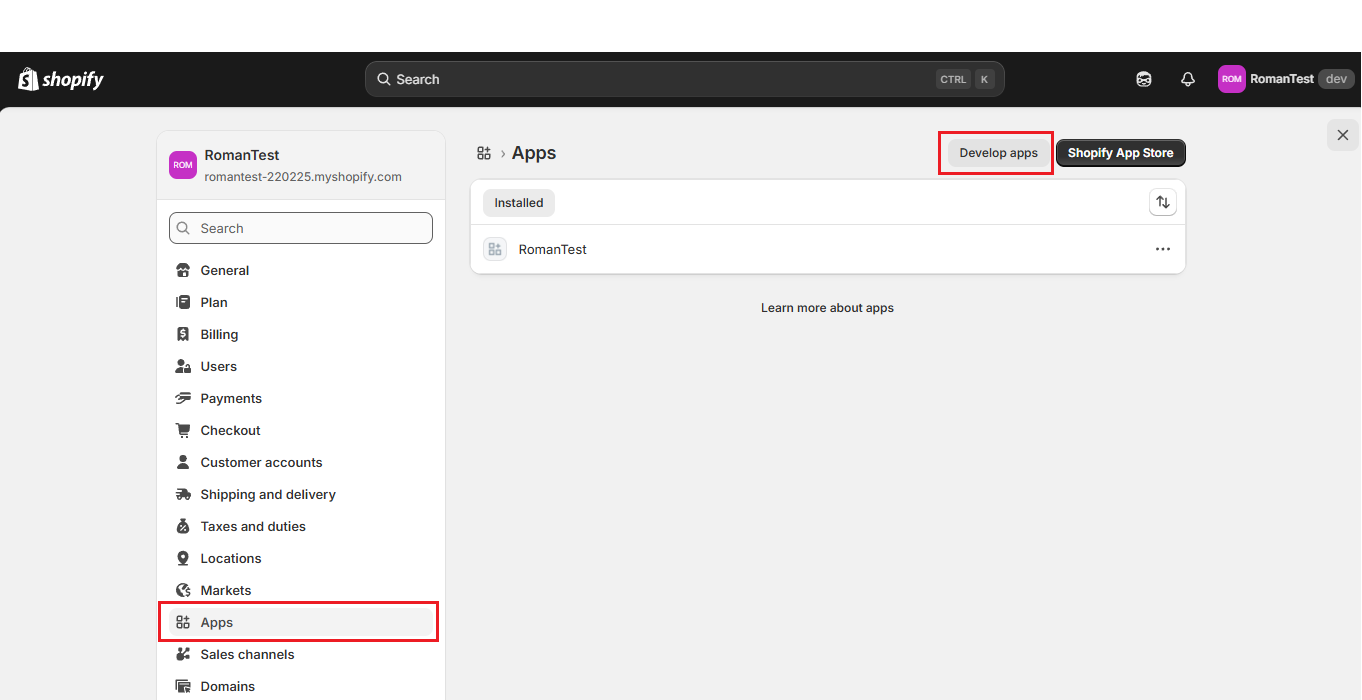
- Go to your Shopify Admin Panel.
- Navigate to Apps → App settings → Develop apps.
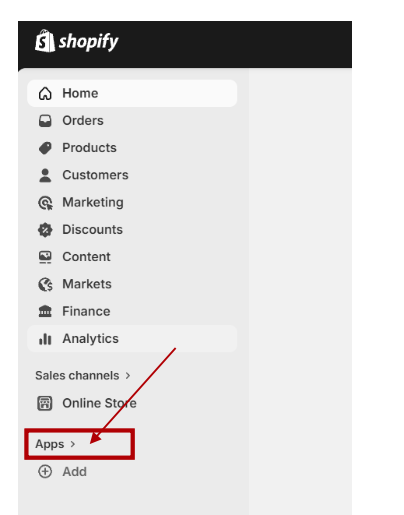
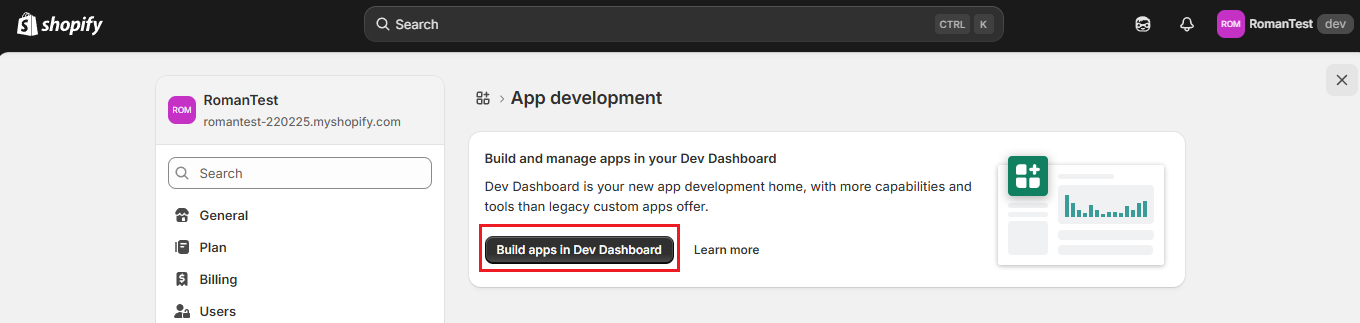
- Click Develop apps.
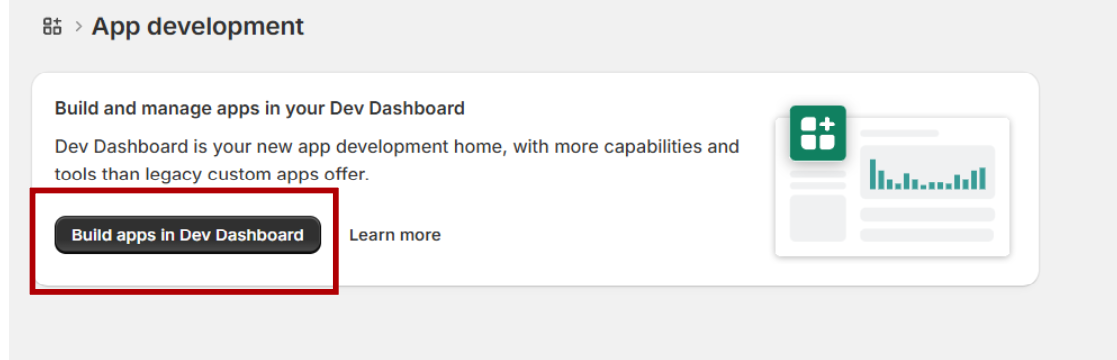
- Click Build apps in Dev Dashboard.
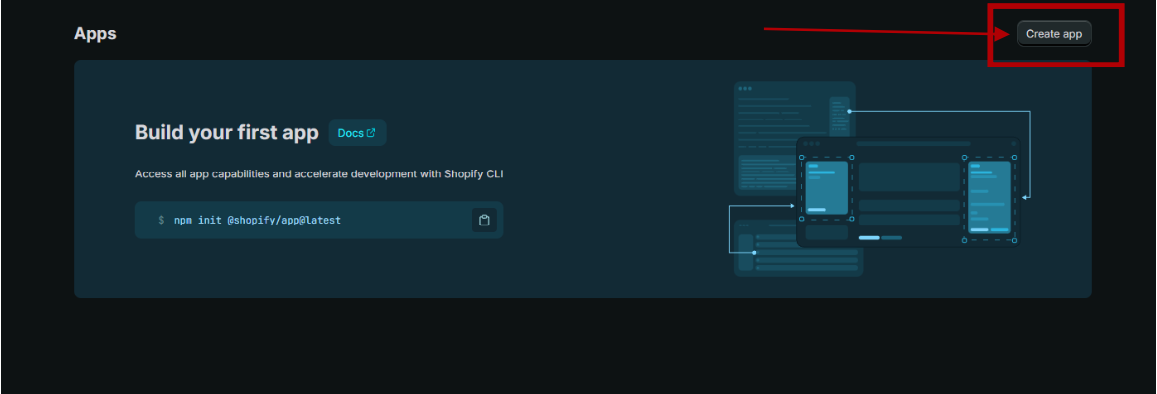
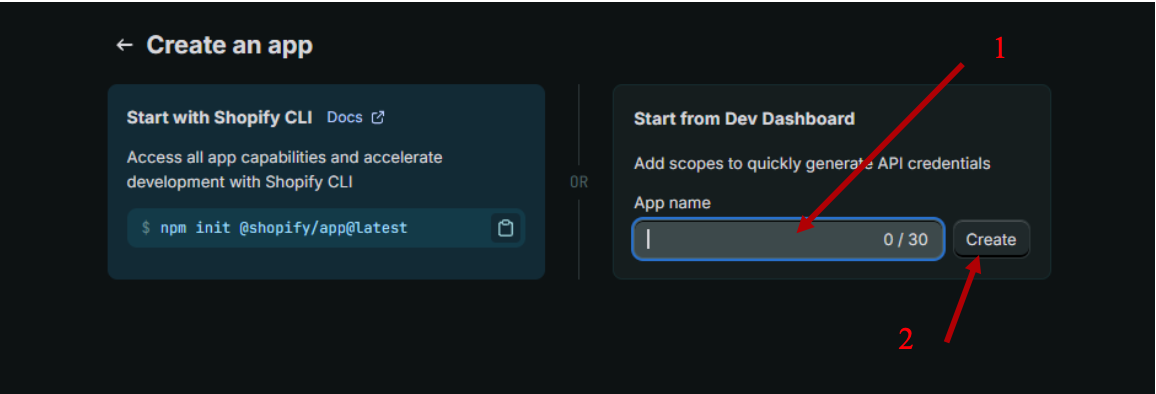
- Click Create App, fill in the App Name (e.g. my-test-app) (1), and click Create (2).
Configure URLs
- Set App URL:
https://mingleego.com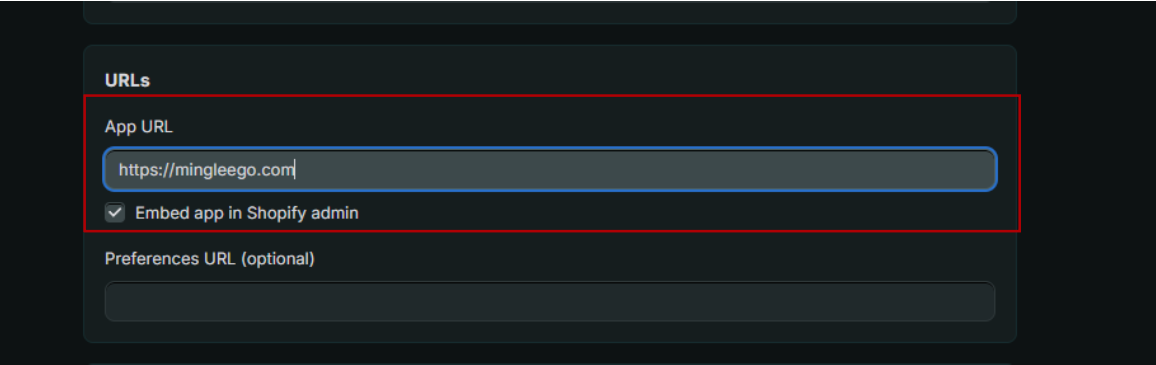
- Set Redirect URL:
https://mingleego.com/api/slack/callback
Add Scopes
Add the following scopes to your app:
| Scope | Description |
|---|---|
| read_customers | view customer data |
| write_customers | create or update customers |
| read_fulfillments | view fulfillment information |
| read_orders | view orders |
| write_orders | create or update orders |
| read_products | view products |
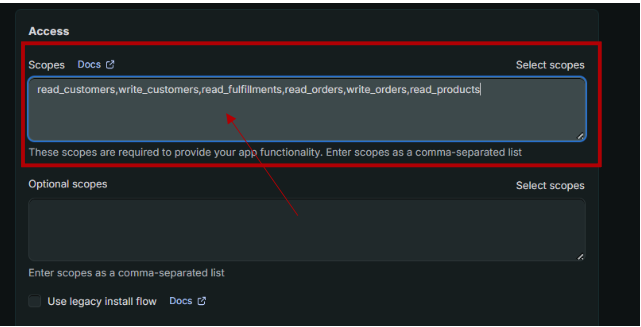
For proper functionality and seamless integration of this service, all scopes listed above must be added and granted to the application. After adding the required scopes and configuring the redirect URL, you must click the Release button to apply and save the changes.
Get Shop Domain
- Go to https://admin.shopify.com/ and log in to your account.
- Open Settings.
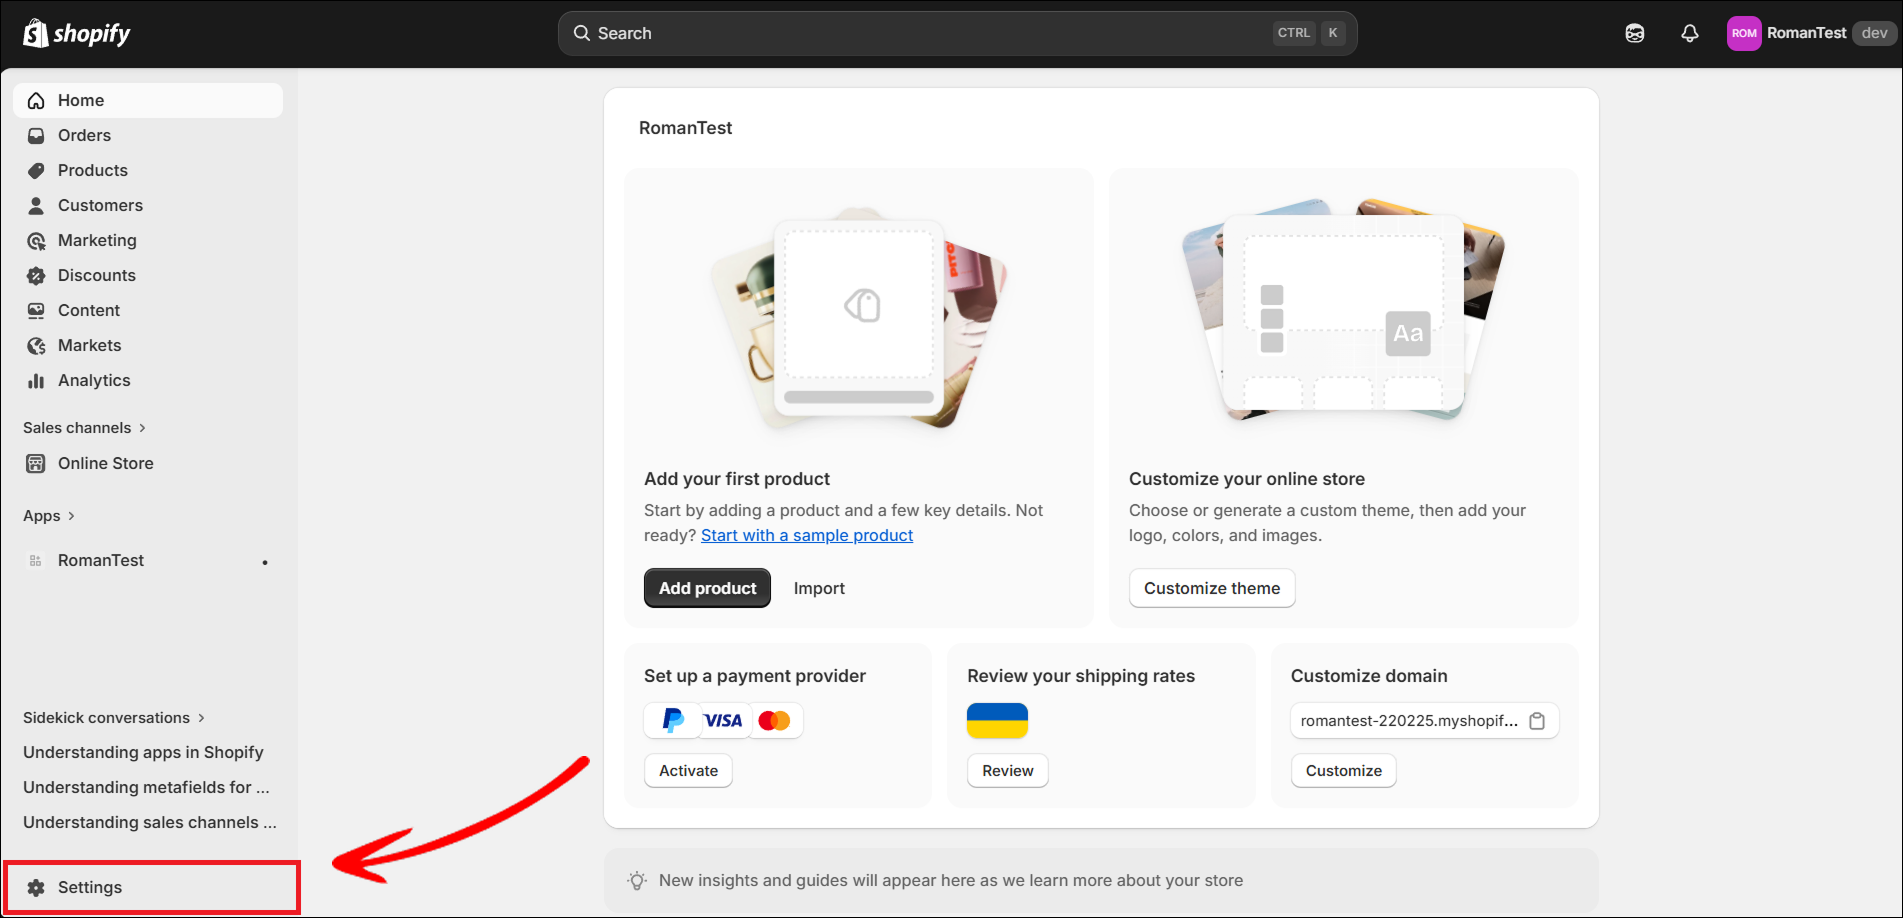
- Navigate to Domains.
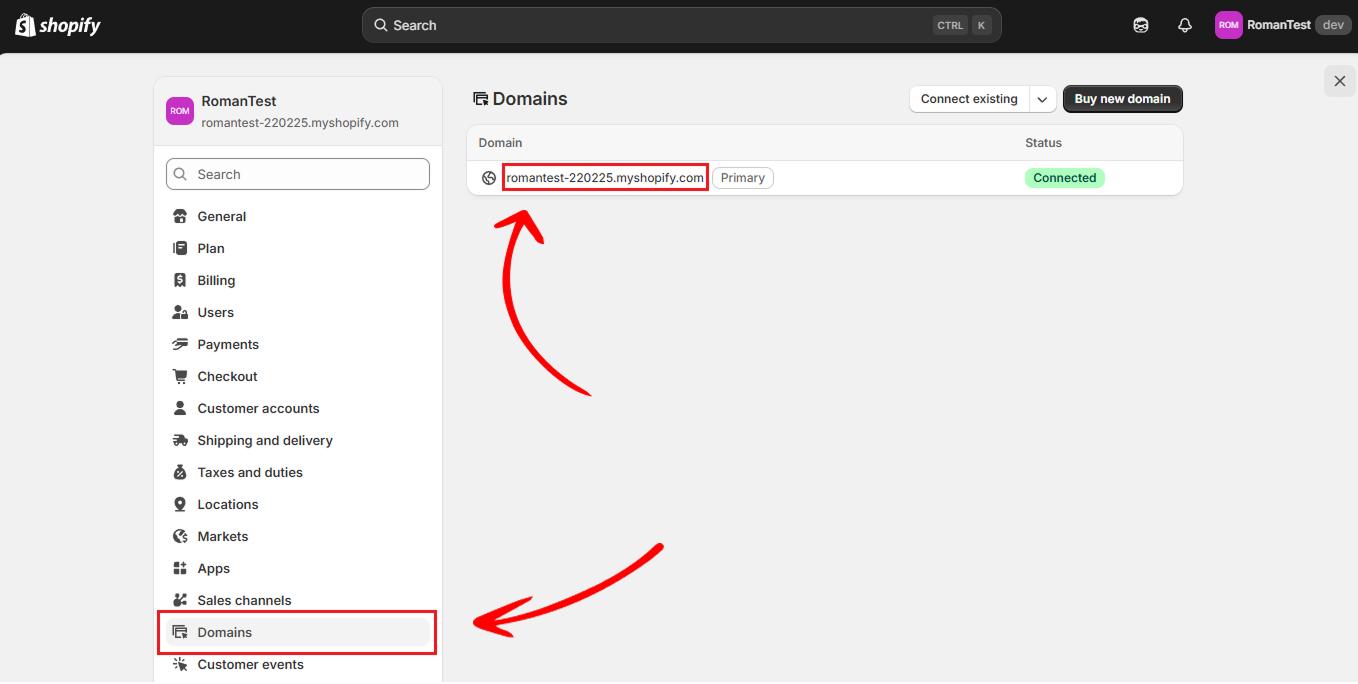
- Copy your
.myshopify.comdomain.
Get Client ID and Client Secret
- In Shopify Admin, open Settings.
- Go to Apps and click Develop apps.
- Click Build apps in Dev Dashboard (redirect to dev.shopify.com).
- Log in if required.
- In the right-side menu, go to Apps and select your app from the list.

- Open Settings and find Credentials.

- Copy:
- Client ID (API key)
- Client Secret (API secret key)
Note: Shopify credentials are tied to a custom app. If you do not have one yet, create a custom app first (see Create a Shopify app) and then use its credentials to connect the integration.
Connect to Mingleego
- Navigate to the assistants page and select your assistant.
- Toggle the enable integration option in the assistant settings.
- Select Shopify from the list of available integrations.
- In the connection modal, enter:
- Shop domain
- Client ID (API key)
- Client secret (API secret key)
- Click Connect — the integration becomes active.
Test the integration
- Go to the Playground page.
- Select your assistant and test a command, such as "Check inventory for SKU-1024 in Shopify and summarize the result".
- Verify that the assistant can access Shopify data successfully.
Shopify tools
Each tool below is a specific capability the assistant uses when working with Shopify. All tools require a connected Shopify integration and work only with data from your own store.
Finding orders
Find order by number
shopify_find_order_by_number
Finds a specific order by its order number — for example, "#1001". The assistant uses this tool whenever a customer mentions a specific order number, and it returns a single order with full details.
List orders
shopify_list_orders
Returns a list of store orders, up to 50 at a time. The assistant uses this tool to browse through all orders in the store, requesting the next page with the cursor from the previous response.
Order details
Get order info
shopify_get_order_info
Returns the essential information about an order — its status, total price, and list of items — using the order's internal Shopify ID.
The internal order ID is different from the human-readable order number. If the assistant only has the number (e.g. "#1001"), it first uses Find order by number to resolve it.
Get order tracking
shopify_get_order_tracking
Returns shipment tracking data for a specific order — carrier name, tracking number, and a tracking link when one is available. The assistant uses this tool when a customer asks where their package is.
The assistant never constructs tracking URLs on its own — it only uses the link provided by Shopify in the response.
Products
Search products
shopify_client_search_products
Searches for products by a fragment of their title and returns up to 50 matches — partial words work too. The assistant uses this tool when a customer refers to a product by name but doesn't know its ID.
Get product info
shopify_client_get_product_info
Returns full details for a single product — description, variants, prices, and availability. The assistant uses this tool after a search to show a complete product card to the customer.
Example Usage
- User Prompt: "Find the stock status for the Blue Hoodie and tell me whether it is available in size M."
- Assistant Action: Retrieves product inventory details from Shopify and checks variant availability for size M.
- Response: "The Blue Hoodie is currently in stock in size M. I can also provide quantity by location if needed."
eBay integration
Integrating your assistant with ebay allows it to work with marketplace-related workflows using your seller account context. For example, a user might say, "Check listing details and prepare a seller response", and the assistant will use your eBay integration to support that request.
Setting up eBay
Connecting eBay takes just a few clicks. Mingleego uses a managed OAuth application, so you do not need to create your own eBay developer app or copy any API keys — you only need your eBay seller username and to authorize access to your account.
- Open the assistants page and select the assistant you want to connect.
- Turn on Enable integration and choose eBay from the list.
- In the connection window, enter your eBay seller username. This is your public seller name on eBay — you can find it on any of your product pages under the Seller information section, or in your eBay account profile.
- Click Connect. You will be redirected to eBay's authorization page.
- Sign in to eBay and approve the requested permissions.
- eBay redirects you back to Mingleego, and the integration becomes active.
Once connected, choose which tools the assistant is allowed to use in the eBay configuration. See eBay tools below for what each tool does. To verify everything works, open the Playground and try a command such as "Check the listing status for item 1234567890 and summarize it".
eBay tools
Each tool below is a specific capability the assistant uses when working with eBay. All tools require a connected eBay integration with a valid seller account, and product and order lookups work only with data from your own eBay store.
Searching & browsing products
Search products
ebay_client_search_products
Searches your eBay store's listings by keyword and returns matching products with their prices.
Connect this tool so customers can ask the assistant things like "Do you have any red sneakers?" or "Show me laptops under $500" and get real results from your live eBay listings — without leaving the chat. The assistant searches only within your store, so customers only see what you actually sell.
Get product info
ebay_client_get_product_info
Pulls up the full details of a specific eBay listing — title, price, condition, and seller.
Once a customer finds a product they're interested in, this tool lets the assistant show them the complete listing card right inside the conversation — what it is, what condition it's in, how much it costs, and who's selling it.
Seller information
Get seller info
ebay_client_get_seller_info
Looks up the public profile of the seller behind a specific eBay listing.
Connect this tool if you want the assistant to answer questions like "Who is selling this?" or "Can I see the seller's profile?". It returns the seller's username, feedback score, and a direct link to their eBay profile — helping customers make a more confident buying decision.
Orders
Get order info
ebay_get_order_info
Retrieves the status and key details of a specific eBay order by its order ID.
Connect this tool so the assistant can answer customer questions like "What's the status of my order?" or "When was my purchase placed?". It shows the order date, current fulfillment status, total amount paid, and the buyer's username — a quick order summary without needing to open eBay separately.
Example Usage
- User Prompt: "Use my eBay seller account to check listing status for item 1234567890 and summarize it."
- Assistant Action: Uses the connected eBay integration to retrieve listing status details for the specified item.
- Response: "I checked item 1234567890 in your eBay seller account and summarized the current listing status."
Advanced: create your own eBay app
Note: This section is optional and kept for reference. The standard Mingleego integration uses a managed OAuth application — most users should follow Setting up eBay above and can skip this section entirely. Creating your own eBay developer app is only relevant for advanced or self-hosted setups.
Create eBay Developer Account & Application
- Go to https://developer.ebay.com/ and sign in (or create an account).
- After login, open My Account → Application Keysets.
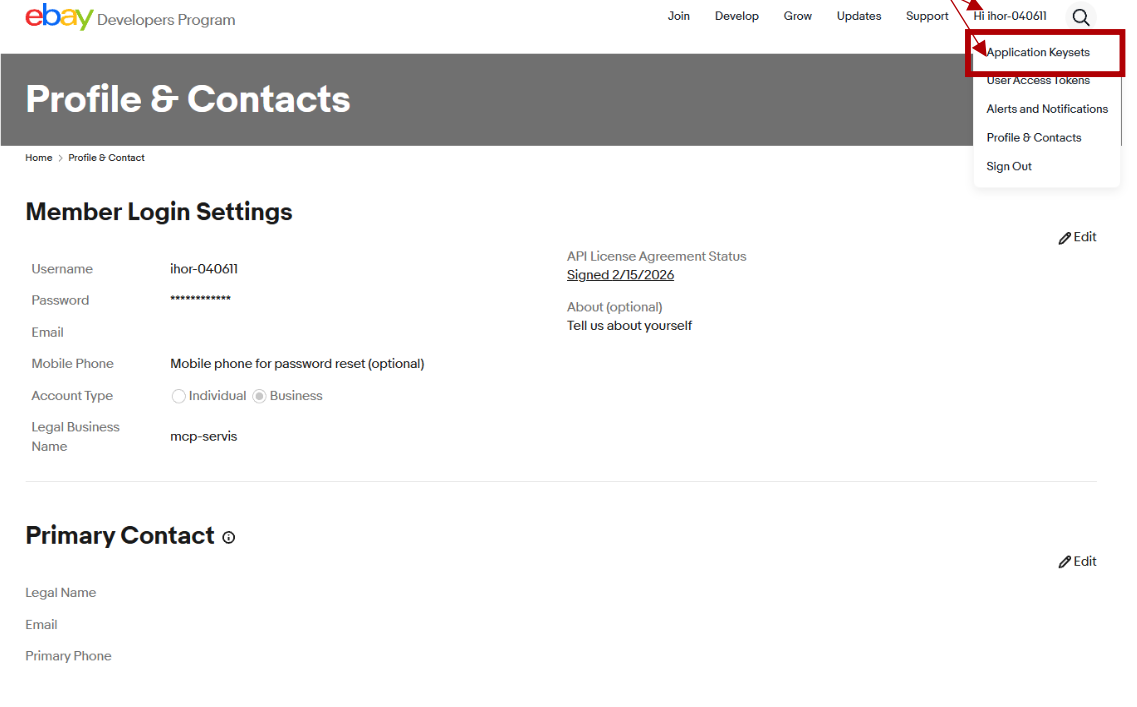
- Navigate to Application Keys, choose environment Production (for real usage), and click Create a keyset.
eBay Notification Setup
After creating your application, eBay will redirect you to the Alerts & Notifications configuration page. You must configure the Event Notification Delivery Method:
- Select: Production → Alerts & Notifications → Marketplace Account Deletion.
- Fill in the required fields:
- Email — your email address for notifications
- Marketplace account deletion notification endpoint:
https://mingleego.com/api/ebay/account-deletion - Verification token:
mcp_production_verification_token_2026_secure
- Click Send Test Notification.
Note: eBay requires a successful test notification. Your endpoint must respond correctly and validate the verification token. If the test fails — you will NOT be able to proceed.
Configure OAuth URLs
- Open the User Access Tokens → eBay Sign-in Settings section.
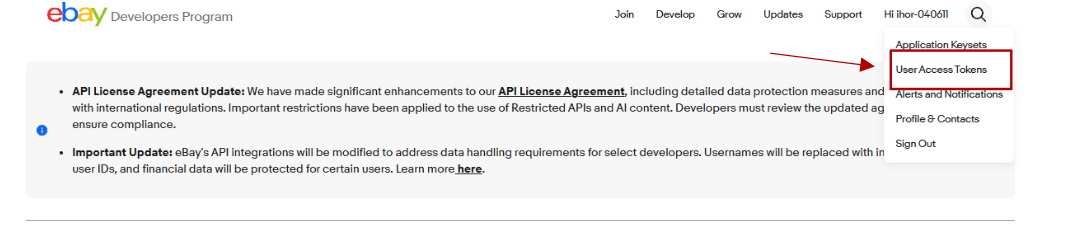
- Click Add eBay Redirect URL.
- Set Your auth accepted URL to:
https://mingleego.com/api/ebay/callback.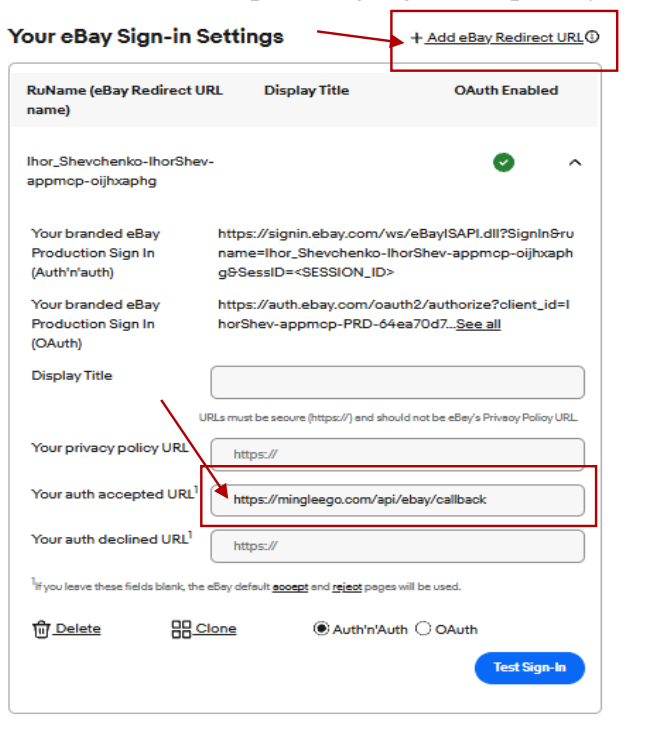
Get Client ID (App ID) and Client Secret (Cert ID)
- Go to https://developer.ebay.com/ and log in.
- In the top-right corner, hover over "Hi, (your username)".
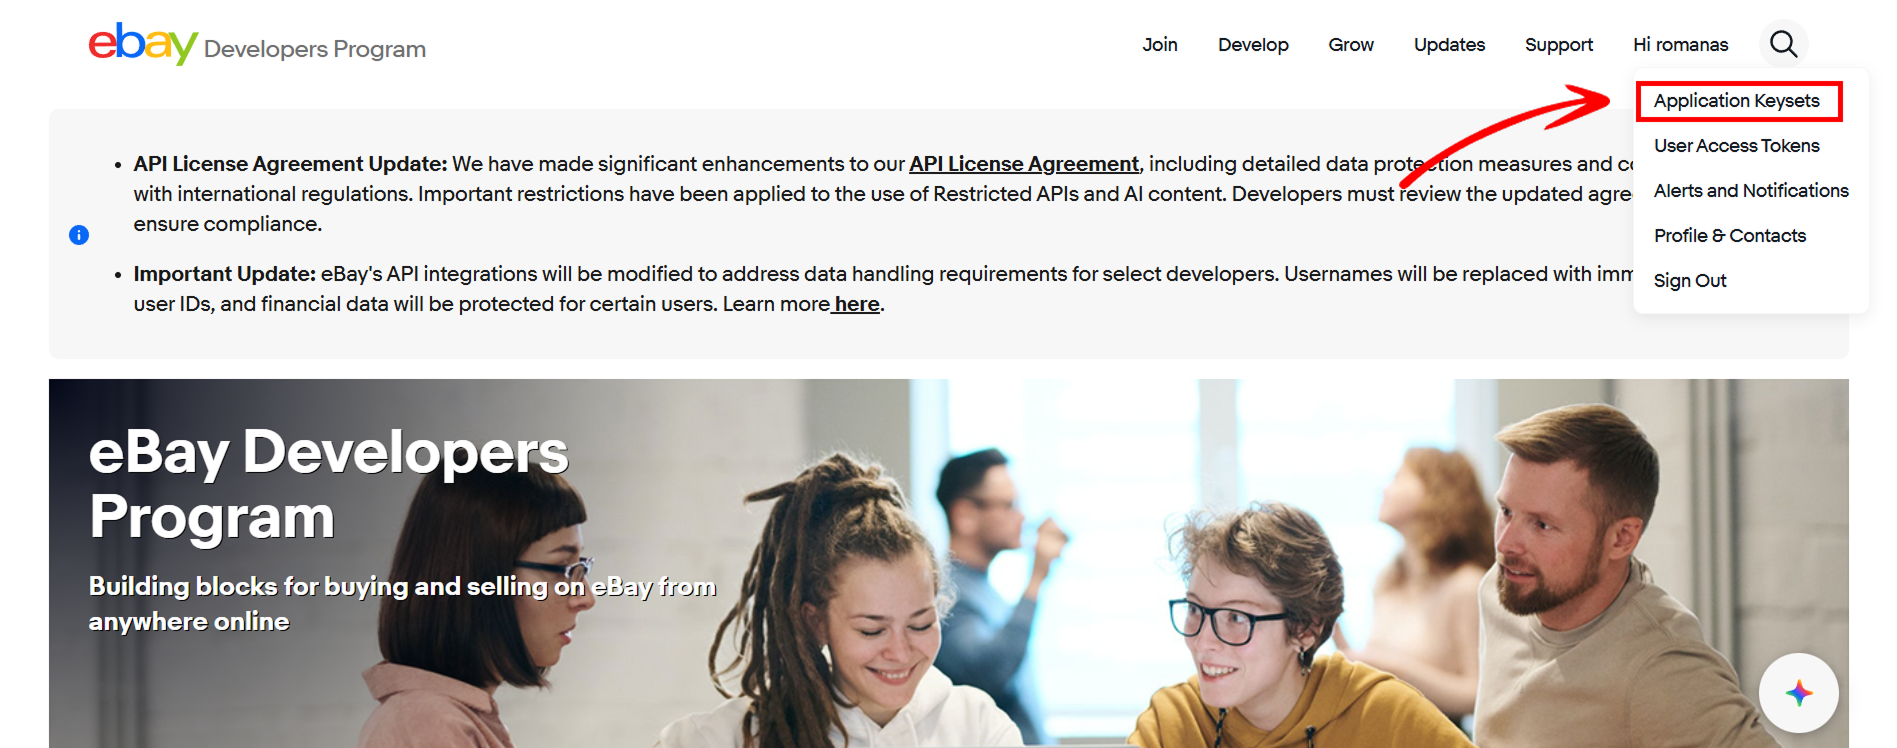
- In the dropdown menu, click Application Keysets.
- On the Application Keys page, locate your app.

- Copy:
- App ID (Client ID)
- Cert ID (Client Secret)
Note: Use credentials from the eBay Developer Program for the same environment (Sandbox or Production) you plan to use in Mingleego.
HubSpot CRM integration
Integrating your assistant with HubSpot CRM allows it to manage contacts, deals, and companies based on user requests. For example, a user might say, "Create a new contact for John Smith from Acme Corp", and the assistant will add it directly to your HubSpot CRM.
Setting up HubSpot CRM
Connecting HubSpot takes just a few clicks. Mingleego uses a managed OAuth application, so you do not need to create your own HubSpot app or copy any API keys — you only need to authorize access to your HubSpot account.
- Open the assistants page and select the assistant you want to connect.
- Turn on Enable integration and choose HubSpot CRM from the list.
- Click Connect. You will be redirected to HubSpot's authorization page.
- Sign in to HubSpot and approve the requested permissions.
- HubSpot redirects you back to Mingleego, and the integration becomes active.
Once connected, choose which tools the assistant is allowed to use in the Customer and User sections of the HubSpot configuration. See HubSpot tools below for what each tool does.
HubSpot tools
Each tool below is a specific capability the assistant uses when working with HubSpot. Some run automatically in the background, others are triggered naturally during a conversation. In every case the goal is the same: keep the CRM clean, accurate, and well-structured — without burdening the user with technical details.
In the HubSpot configuration, related tools are grouped together. Enabling a Search tool also enables its matching "view record" and "explore relationships" tools, since they are used together.
Creating records
Create contact
hubspot_create_contact
Creates a contact record in HubSpot, or reuses an existing one if the person has been in touch before. Before creating anything, the assistant searches by first name, last name, or email and tries different variations — a new contact is created only when no match is found.
The assistant never behaves like a registration form. Details are gathered naturally over the conversation — the name early on, the email only when a follow-up is needed, the phone number only when it is genuinely useful.
Create company
hubspot_create_company
Creates an organization record, or finds and reuses an existing one. Used whenever the conversation has a business dimension — sales, B2B onboarding, partnerships, or corporate support. The assistant searches by company name, abbreviation, domain, or partial match before creating a new record.
The assistant asks for company details only when the business context is clear. If it is unsure, it may simply ask whether the person is reaching out individually or on behalf of an organization.
Create deal
hubspot_create_deal
Creates a deal, support request, onboarding case, or any other matter that needs follow-up. The assistant decides on its own when a conversation has become significant enough to track — a serious problem, a business opportunity, or a situation that may need human involvement.
Before creating a deal, the assistant finds the related contact and company, links them together, and checks for a similar open case — all in the background.
Create full lead
hubspot_create_full_lead
The full-cycle CRM tool: it creates a contact, a company, and a deal at once, links them all together, and ensures a clean data structure from the start. Best used when a new lead or customer needs to be fully onboarded into the system.
The assistant searches for existing records, creates whatever is missing, builds all the associations, and sends notifications if configured. The user simply explains the situation — everything else happens automatically.
Updating records
Update contact
hubspot_update_contact
Updates an existing contact's information. When the new data differs from what is already on file — a changed phone number, a corrected surname, a new email — the assistant explains exactly what is different and asks for confirmation before applying any change.
This tool never silently overwrites data. Only the fields that actually changed are updated, which keeps CRM records accurate and trustworthy.
Linking records
Link records
hubspot_link_contact_to_company · hubspot_link_deal_to_contact · hubspot_link_deal_to_company
These tools manage the internal relationships in your CRM: connecting contacts to companies, deals to people, and deals to organizations. They usually work automatically in the background, and the user never interacts with them directly.
When the context is clear — someone mentions the company they work for, or a conversation clearly belongs to a specific deal — the assistant builds the necessary associations on its own, without asking the user to manage CRM relationships manually.
Searching the CRM
Search contacts
hubspot_customer_search_contacts
Searches contacts by first name, last name, email, or partial values. The search is not limited to exact matches — the assistant can split a full name into separate parts, try different spellings, and fall back to an email lookup, all without asking the user to refine their input.
Search companies
hubspot_customer_search_companies
Searches companies by name, abbreviation, domain, or partial match. It recognizes that the same organization may be referred to in different ways — "Acme Corp", "Acme", "acme.io" — and tries several variations before concluding that no matching record exists.
Search deals
hubspot_customer_search_deals
Searches deals, support requests, onboarding cases, and other business records. The assistant understands conversational queries such as "find the Acme onboarding" or "show open support tickets" and translates them into accurate CRM searches.
Viewing full records
Get record by ID
hubspot_customer_get_contact_by_id · hubspot_customer_get_company_by_id · hubspot_customer_get_deal_by_id
Retrieve a complete record when its ID is already known. Used to open a full customer profile, company page, or deal card rather than just a short line from search results.
Exploring relationships
Get associations
hubspot_customer_get_contact_associations · hubspot_customer_get_company_associations · hubspot_customer_get_deal_associations
Show which records are connected to a given contact, company, or deal. Useful for understanding the full picture: who a client works with, which companies are involved in a deal, or who owns a particular case.
Email notifications: if the assistant's email integration is enabled, key CRM events — contact creation, data updates, deal creation — can automatically send notifications to the account owner.
Example Usage
- User Prompt: "Add a new contact — Jane Doe, email jane@acme.com, company Acme Corp."
- Assistant Action: Creates a new contact record in HubSpot CRM with the provided details.
- Response: "I've added Jane Doe from Acme Corp to your HubSpot contacts."
The assistant also works proactively, not only on explicit requests. Whenever it talks to a new customer, it can record the new lead's details in your CRM right away — or update an existing contact's information if something has changed — as long as the matching tool (Create contact, Create full lead, or Update contact) is enabled in the HubSpot configuration. The data is gathered naturally during the conversation, so the customer never feels like they are filling out a form.
Advanced: create your own HubSpot app
Note: This section is optional and kept for reference. The standard Mingleego integration uses a managed OAuth application — most users should follow Setting up HubSpot CRM above and can skip this section entirely. Creating your own HubSpot app is only relevant for advanced or self-hosted setups.
Create a HubSpot Developer Account
- Go to https://developers.hubspot.com/.
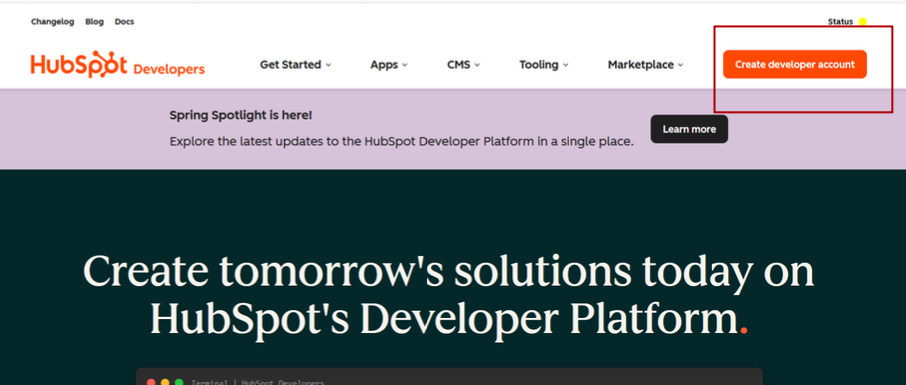
- Sign in to your account (or create one via Google, Facebook, or email).
- After authorization, you will be redirected to your HubSpot workspace dashboard.
Create a Legacy App
- Navigate to Development → Legacy Apps in the left sidebar.
- Click Create Legacy App.
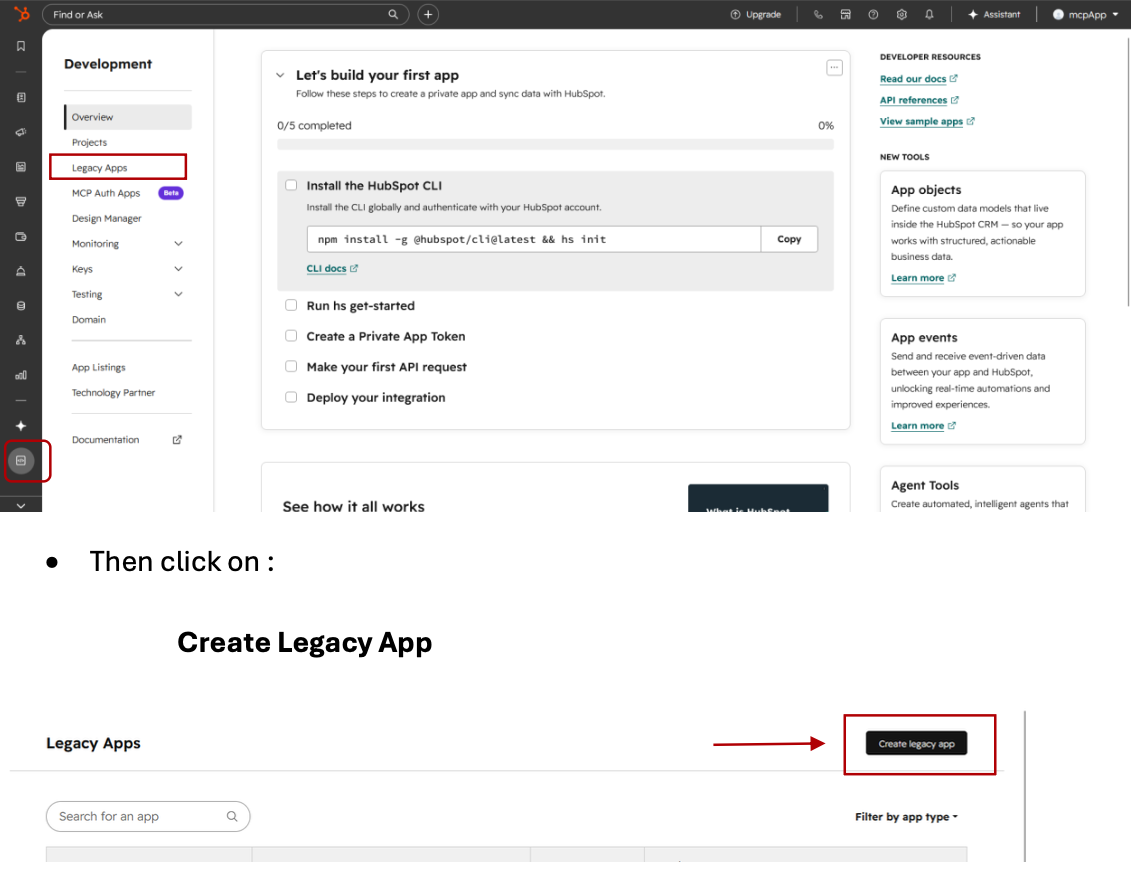
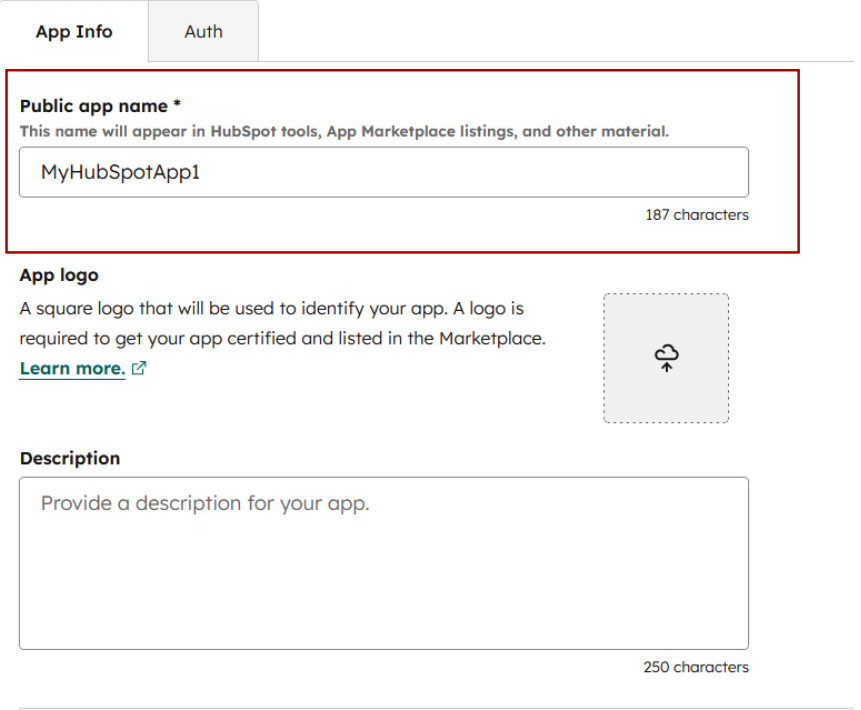
- Choose Public (for many accounts) and fill in the Public app name (e.g. MyHubSpotApp1).
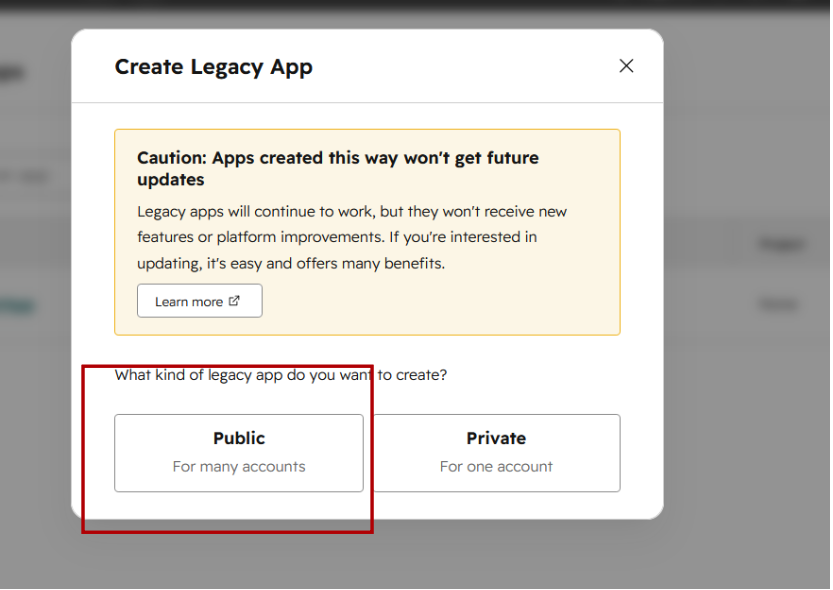
- In this menu, you can set the name of your application, which will be displayed in HubSpot tools, the App Marketplace, and other related areas.
Configure Redirect URL
- In the Auth tab, scroll to Redirect URLs.
- Add:
https://mingleego.com/api/hubspot/callback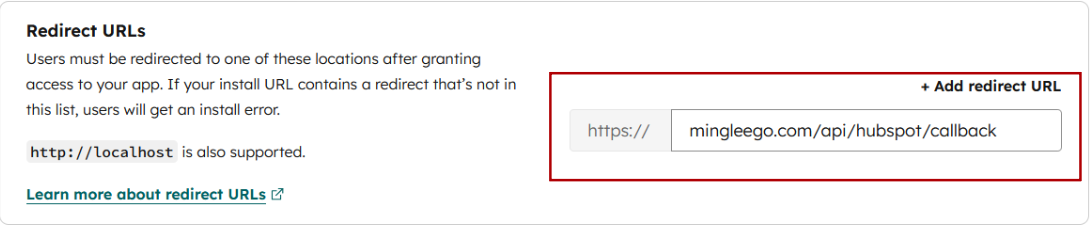
Add Scopes (Permissions)
- Scroll to the Scopes section and click Add new scope.
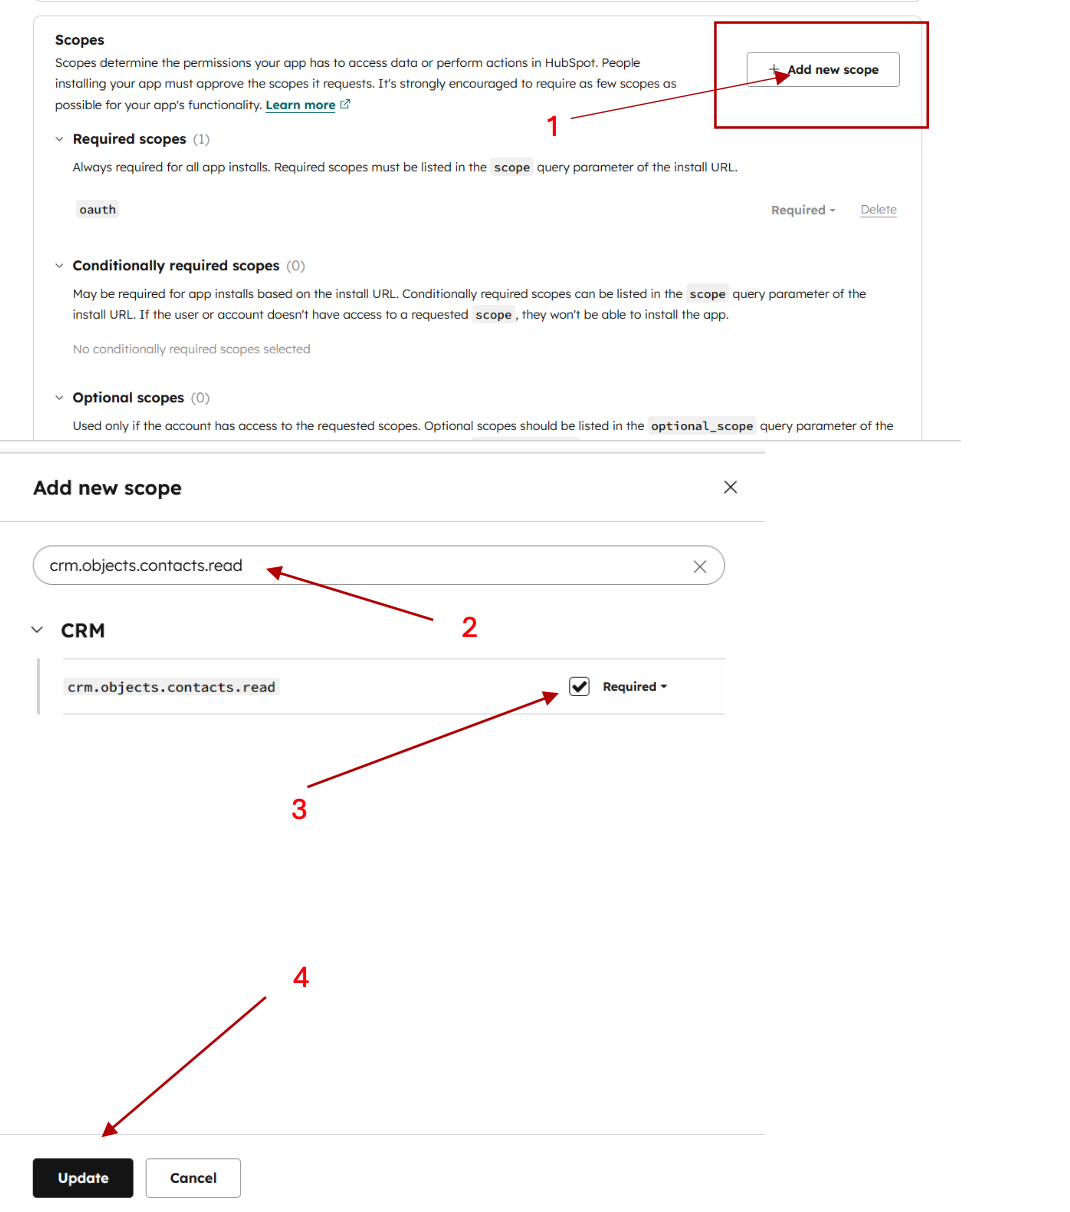
- Add all of the following scopes:
| Scope | Description |
|---|---|
crm.objects.contacts.read | Read contacts |
crm.objects.contacts.write | Create or update contacts |
crm.objects.deals.read | Read deals |
crm.objects.deals.write | Create or update deals |
crm.objects.companies.read | Read companies |
crm.objects.companies.write | Create or update companies |
crm.schemas.contacts.read | Read contact schema (fields structure) |
crm.schemas.deals.read | Read deal schema (fields structure) |
Note: All scopes listed above must be added and granted to the application for proper functionality.
Create the App
- Click the Create app button to finalize and save the application setup.

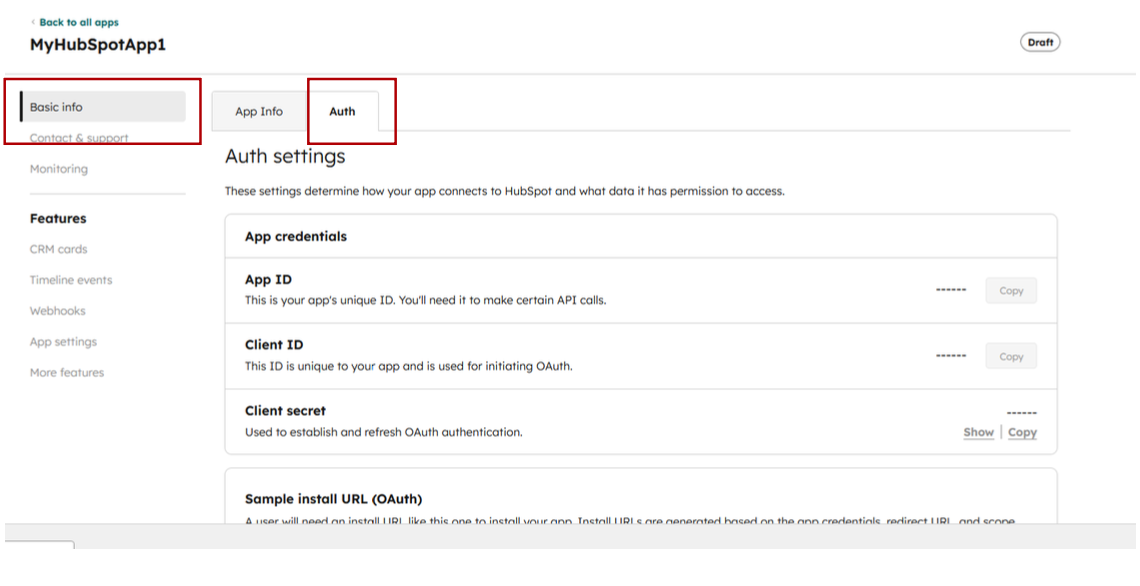
Get Client ID and Client Secret
- Go to the Auth tab in your app settings.
- Under App credentials, copy your Client ID and Client Secret.
Bitrix24 CRM integration
Integrating your assistant with Bitrix24 CRM allows it to create contacts, companies and leads, leave internal comments on records, and schedule tasks based on user requests. For example, a user might say, "Save this customer and remind me to call them on Friday", and the assistant will create the contact in Bitrix24 and add a task for the follow-up.
Setting up Bitrix24 CRM
Connecting Bitrix24 requires a Local Application registered inside your Bitrix24 portal. You will copy its Client ID, Client secret and your portal domain into the Mingleego connect popup.
- Open the assistants page and select the assistant you want to connect.
- Turn on Enable integration and choose Bitrix24 CRM from the list.
- In the popup, paste your portal domain (for example,
company.bitrix24.com), Client ID and Client secret. - Click Connect. You will be redirected to your Bitrix24 portal to authorize the application.
- After approving the requested permissions, Bitrix24 redirects you back to Mingleego and the integration becomes active.
Once connected, choose which tools the assistant is allowed to use in the Customer and User sections of the Bitrix24 configuration. See Bitrix24 tools below for what each tool does.
Need a Local Application? Follow the steps in Advanced: create your own Bitrix24 Local Application — it walks through creating the app, setting the right paths and granting CRM and Tasks permissions.
Bitrix24 tools
Each tool below is a specific capability the assistant uses when working with Bitrix24. The Customer section contains tools that may be triggered while the assistant is talking to a visitor — creating contacts, companies and leads. The User section contains tools meant for the CRM owner — searching the CRM, leaving internal notes and creating tasks.
Customer-facing tools
Create contact
bitrix_create_contact
Creates a new contact record in Bitrix24 with the details collected during the conversation — typically the name, phone number and email. The assistant gathers this information naturally and confirms key fields before saving them to the CRM.
Update contact
bitrix_update_contact_by_id
Updates an existing Bitrix24 contact when the visitor provides corrected or additional details. The assistant identifies the right contact by its ID before applying changes.
Create company
bitrix_create_company
Creates a new company record. Used when the conversation has a business dimension — a B2B inquiry, a partnership request, or any other situation where a company should be recorded in the CRM.
Create lead
bitrix_create_lead
Creates a sales lead in Bitrix24 with the information gathered from the visitor. Best used when the conversation indicates real buying intent and the lead should be picked up by your sales team.
Admin (User) tools
Search contacts
bitrix_customer_search_contacts
Searches contacts in Bitrix24 by name, email, phone, or partial matches. Used by the assistant before creating a new contact to avoid duplicates, and also when the user asks the assistant to look up a person.
Search companies
bitrix_customer_search_companies
Searches companies in Bitrix24 by title or other attributes. Useful for finding the right organization to attach a contact, lead or task to.
Search leads
bitrix_customer_search_leads
Searches existing leads by title, related contact, or company. Lets the assistant find and re-use existing pipeline records instead of duplicating them.
Add comment to contact
bitrix_add_comment_to_contact
Adds an internal note or comment to a Bitrix24 contact. Useful for recording context that should be visible to your team but not displayed to the customer.
Add comment to company
bitrix_add_comment_to_company
Adds an internal note or comment to a Bitrix24 company record — for example, a summary of a recent conversation or important context about the relationship.
Add comment to lead
bitrix_add_comment_to_lead
Adds an internal note or comment to a Bitrix24 lead, capturing useful context from the conversation alongside the sales record.
Create task
bitrix_create_task
Creates a Bitrix24 task with a title, description and responsible user. Used when the conversation produces a clear follow-up action — a callback, a document to prepare, or a check-in.
Example Usage
- User Prompt: "Add a new contact — John Smith, phone +1 555 0100, and create a task to call him tomorrow."
- Assistant Action: Creates a contact in Bitrix24 with the provided details and adds a follow-up task assigned to the responsible user.
- Response: "I've added John Smith to your Bitrix24 contacts and created a task for tomorrow's call."
The assistant works proactively as well. Whenever it talks to a new customer, it can register the visitor as a contact or lead, leave an internal note summarizing the conversation, and create a task for the team — as long as the matching tools are enabled in the Bitrix24 configuration.
Advanced: create your own Bitrix24 Local Application
Note: A Local Application is required to connect Bitrix24. Follow the steps below to register the app inside your portal and obtain the Client ID and Client secret used in the Mingleego connect popup.
Create a Bitrix24 Developer Account
- Go to https://www.bitrix24.com/ and sign in to (or create) your Bitrix24 portal.
- Open your portal — its address (for example,
company.bitrix24.com) is the portal domain you will use in Mingleego.
Open Developer resources
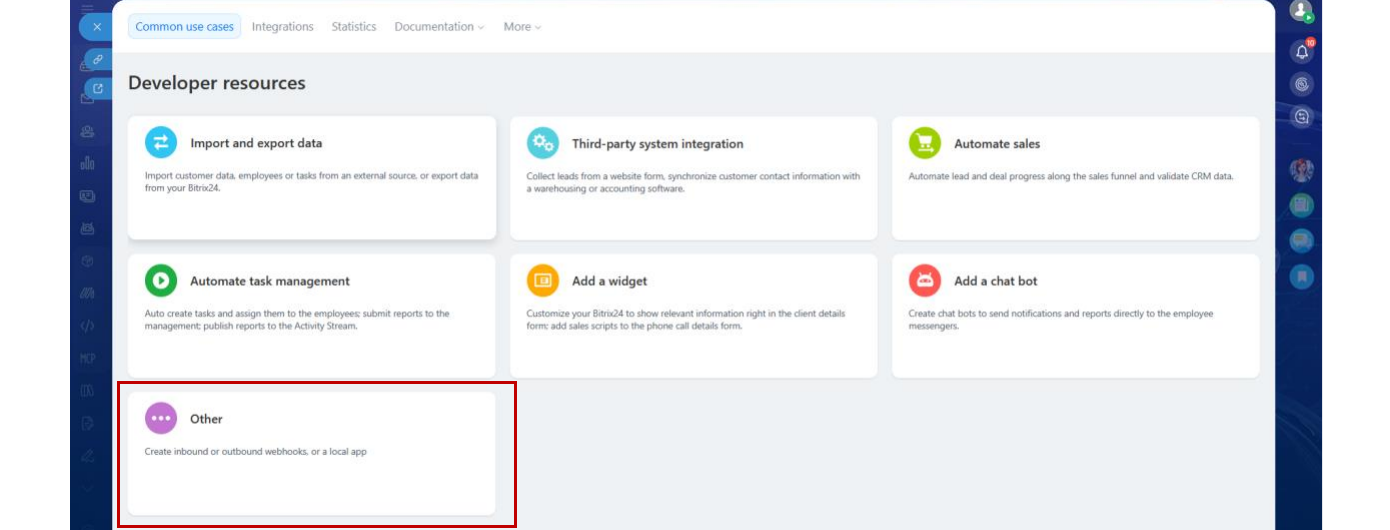
- In the left sidebar of your Bitrix24 portal, open Applications → Developer resources.
- You will see a list of integration categories — choose Other.
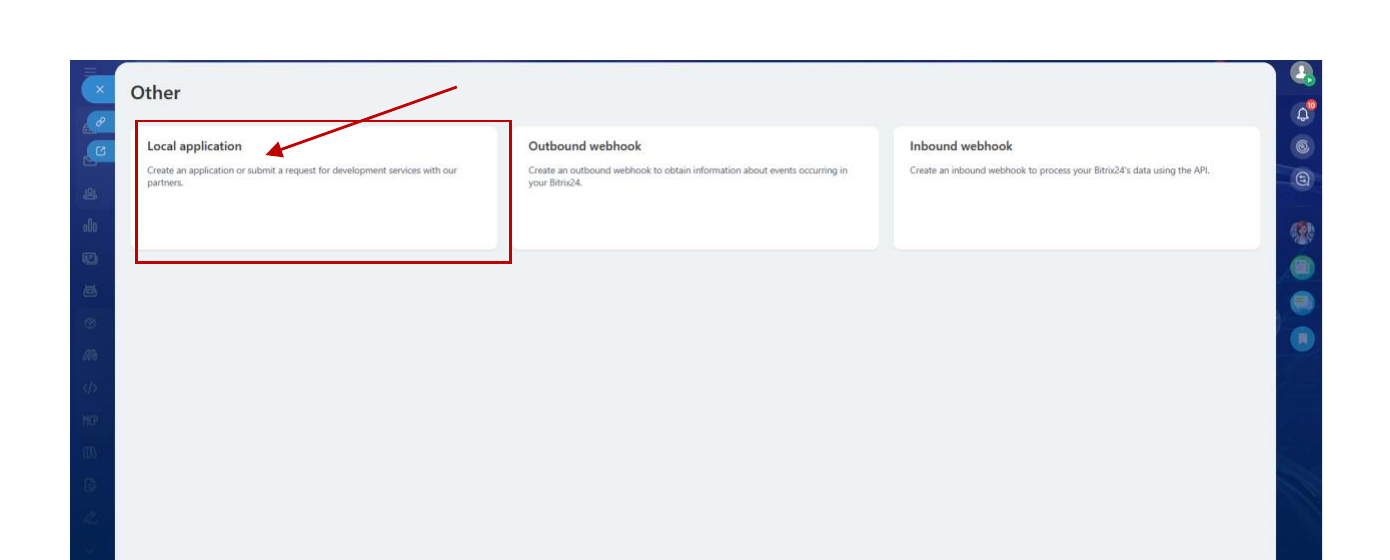
Create a Local Application
- Inside Other, click Local application to start creating a new app.
- Choose Server as the application type (this is required for the OAuth flow used by Mingleego).
Configure Handler and Installation paths
Fill in the form with the following values:
| Field | Value |
|---|---|
| Your handler path | https://mingleego.com/api/bitrix/callback |
| Initial installation path | https://mingleego.com/api/bitrix/callback |
| Menu item text | any descriptive name (for example, Mingleego AI, Your Company AI, AI Assistant) |
Note: Leave Script only (no user interface) unchecked. Supports BitrixMobile is optional.
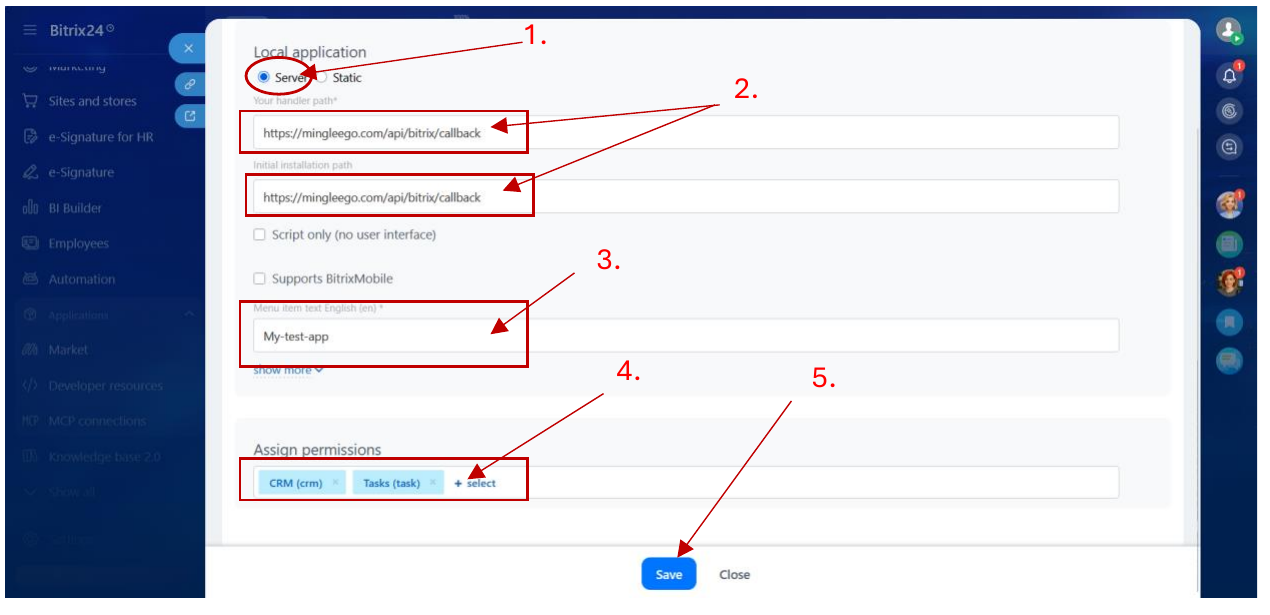
Grant CRM and Tasks permissions
- Scroll to Assign permissions and add the following scopes:
| Scope | Description |
|---|---|
crm (CRM) | Required for working with contacts, companies, leads, deals and comments |
task (Tasks) | Required only if you plan to enable the bitrix_create_task tool |
Note: Without the crm scope the assistant cannot create or update CRM records. Without the task scope it cannot create tasks.
Save the application
- Click Save to finalize the Local Application setup.
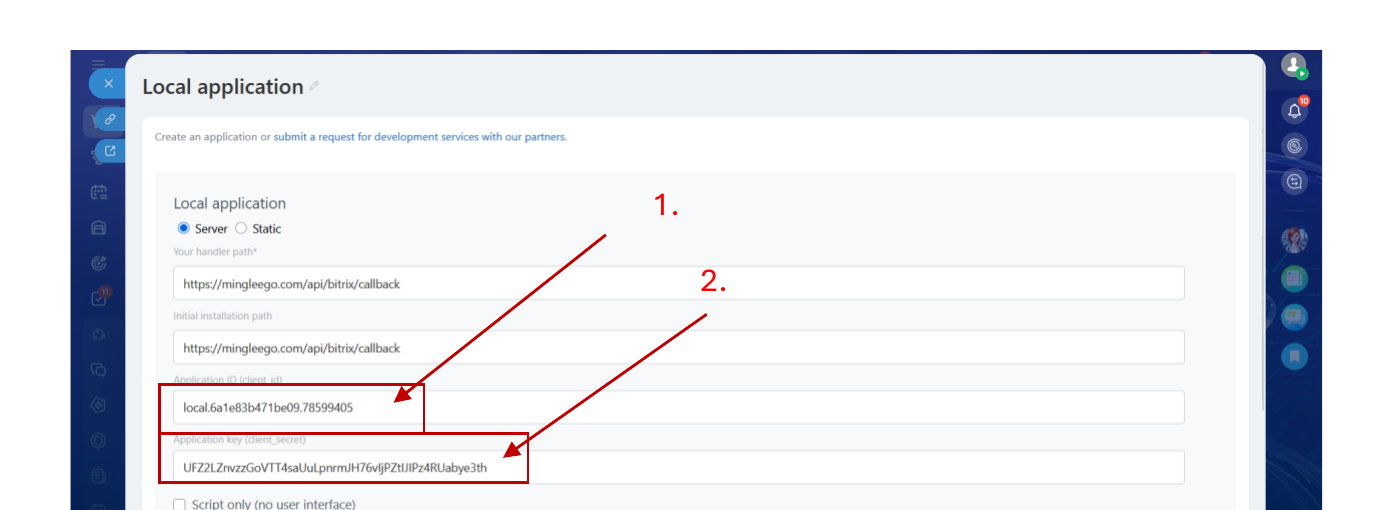
Get Client ID and Client secret
- After saving, Bitrix24 displays the Application ID (
client_id) and the Application key (client_secret) directly in the form. - Copy both values — these are the Client ID and Client secret you will paste into the Mingleego connect popup.
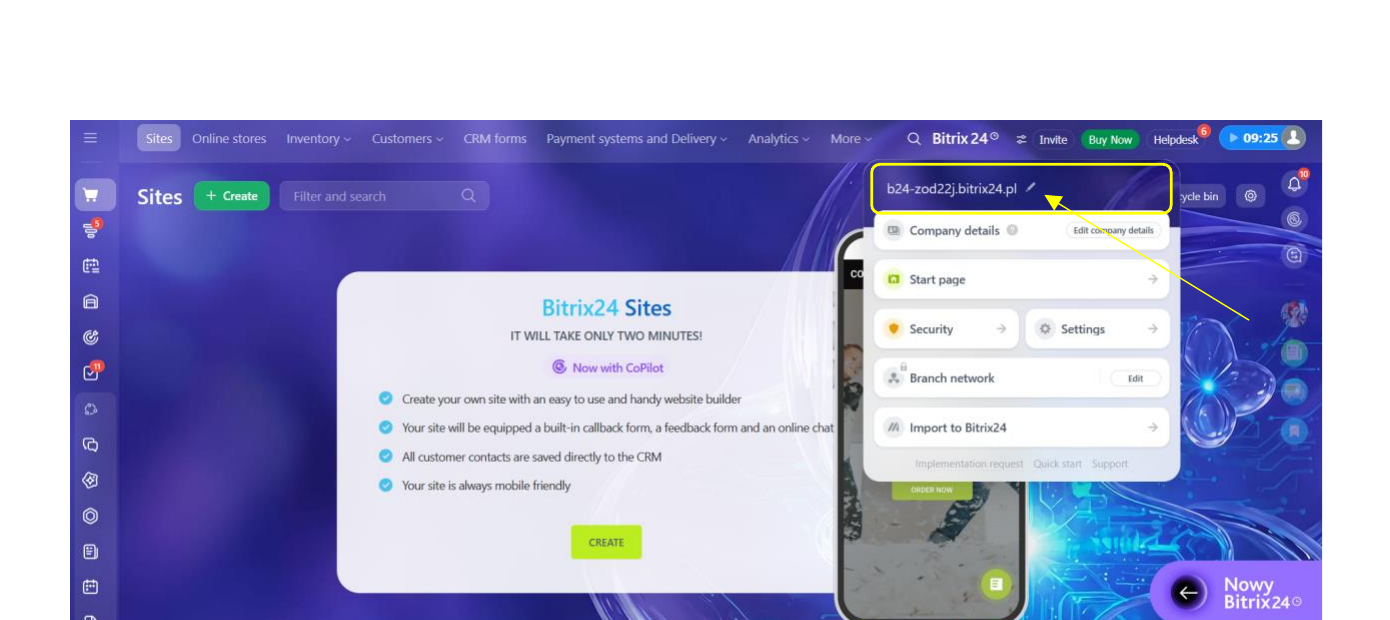
Find your Bitrix24 portal domain
- Log in to your Bitrix24 portal.
- Click the Bitrix24 badge in the bottom-left corner of the screen.
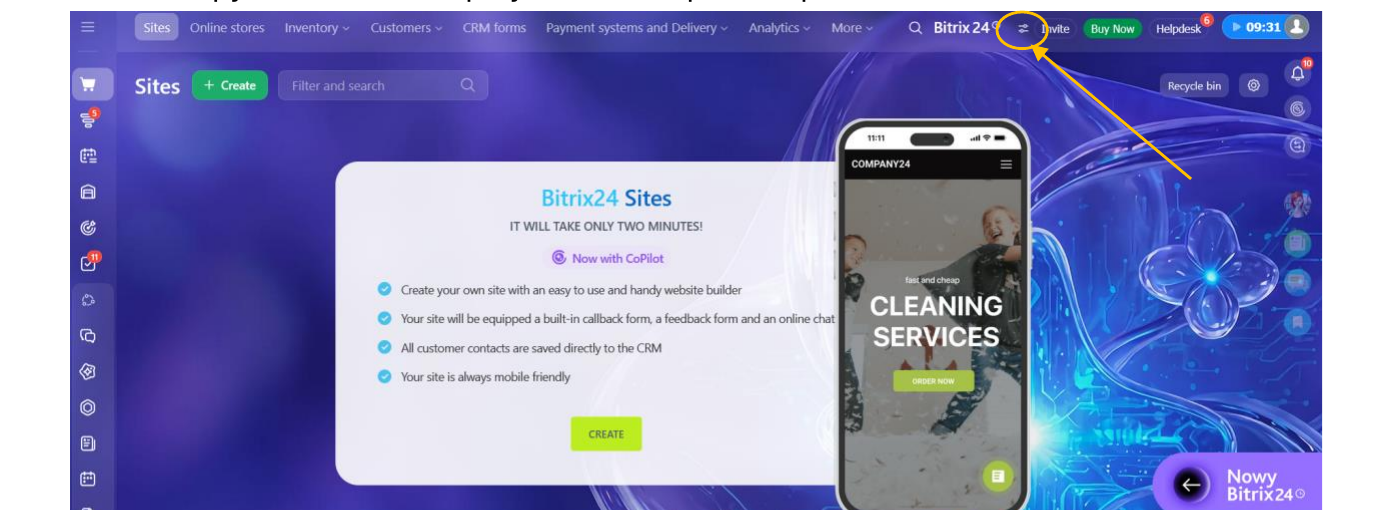
- A panel with your portal information will appear. Copy the domain shown at the top (for example,
b24-xxxx.bitrix24.plorcompany.bitrix24.com).
Connect in Mingleego
- Paste the Client ID, Client secret and portal domain into the Mingleego Connect Bitrix24 popup.
- Click Connect — Mingleego will redirect you to authorize the Local Application and complete the integration.
Notion integration
Integrating your assistant with Notion lets it search your workspace, read page properties and content, create and update pages, and leave comments — all based on user requests. For example, a user might say, "Create a task to call the client on Friday" or "Summarize the meeting notes on the launch page", and the assistant will carry it out in your Notion workspace.
Setting up Notion
Connecting Notion takes just a few clicks. Mingleego uses a managed OAuth application, so you do not need to create your own Notion integration or copy any tokens — you only authorize access and choose which pages and databases to share.
- Open the assistants page and select the assistant you want to connect.
- Turn on Enable integration and choose Notion from the list.
- Click Connect. You will be redirected to Notion's authorization page.
- Sign in to Notion, choose the pages and databases to share, and approve access.
- Notion redirects you back to Mingleego, and the integration becomes active.
Once connected, choose which tools the assistant is allowed to use in the Search tools and Action tools sections of the Notion configuration. See Notion tools below for what each tool does. To verify everything works, open the Playground and try a command such as "Create a note titled 'Launch checklist' in my Projects database".
The assistant can only see and act on the pages and databases you explicitly shared with the connection during authorization. To grant access to more (or fewer) pages later, update the connection's page access from within Notion.
Notion tools
Each tool below is a specific capability the assistant uses when working with Notion. All tools require a connected Notion integration and only work on the pages and databases shared with it. When the assistant needs to act on something it has no direct link to, it first locates it with Search workspace.
Discovery
Search workspace
notion_search
Finds any page or database in your Notion workspace by name. This is how the assistant locates things it doesn't already have a link to — say "find my Meeting Notes" or "look up the Acme Corp project" — and it is also used automatically behind the scenes before creating, updating, or commenting on anything.
Only pages and databases you've shared with the connection can be found.
Pages
Get page details
notion_get_page
Reads a page's tracked properties — status, due date, assignee, and so on — and answers in plain language. This does not read the actual text written on the page; for that, use Read page content.
Read page content
notion_get_page_content
Reads what's actually written inside a page — meeting notes, a written brief, a long document — rather than just its status fields. Long pages are read in chunks automatically, so the assistant keeps reading until it has what it needs.
Create page
notion_create_page
Creates a new task, note, meeting, or project in Notion. Tell the assistant what to add — "create a task to call the client Friday" or "add a note about today's meeting" — and it's saved straight into the right Notion database with a title and whatever details you gave it (due date, status, who's responsible, tags, and more, depending on the type).
If you haven't said what kind of item it is, the assistant will ask before creating it, so it captures the right details from the start.
Update page
notion_update_page
Updates an existing task, note, meeting, or project. Once the assistant knows which page you mean, tell it what changed — "mark it done", "push the due date to next week", "add the tag urgent" — and only that gets updated; everything else on the page stays as it was.
Databases
Get database
notion_get_database
Looks up what a Notion database tracks and its valid status/tag options. Mostly used internally so the assistant understands a database's structure before creating or updating rows in it. You can also ask directly — "what fields does the Projects board track?" — and get a plain-language summary.
Comments
Add comment
notion_add_comment
Leaves a comment on a Notion page. Tell the assistant to note something on a page — "add a comment saying this needs review" — and it's posted directly to that page's comment thread, visible to your whole team. It can also reply within an existing comment thread instead of starting a new one, when that's what's needed.
Example Usage
- User Prompt: "Create a task in my Projects database to prepare the Q3 report, due next Monday, and assign it to me."
- Assistant Action: Looks up the Projects database, creates the page with the title, due date, and assignee, then confirms.
- Response: "I've added 'Prepare the Q3 report' to your Projects database, due next Monday and assigned to you."
Calendly integration
Integrating your assistant with Calendly lets it check your real availability, book meetings, and answer questions about what's already scheduled. For example, a user might say, "When am I free next week?" or "Book the 2 PM slot for John", and the assistant will read your live Calendly availability and create the booking.
Setting up Calendly
Connecting Calendly takes just a few clicks. Mingleego uses a managed OAuth application, so you do not need to create your own Calendly app or copy any API keys — you only need to authorize access to your Calendly account.
- Open the assistants page and select the assistant you want to connect.
- Turn on Enable integration and choose Calendly from the list.
- Click Connect. You will be redirected to Calendly's authorization page.
- Sign in to Calendly and approve access.
- Calendly redirects you back to Mingleego, and the integration becomes active.
Once connected, choose which tools the assistant is allowed to use in the Search tools and Action tools sections of the Calendly configuration. See Calendly tools below for what each tool does. To verify everything works, open the Playground and try a command such as "Find me an open slot on Thursday afternoon".
Calendly tools
Each tool below is a specific capability the assistant uses when working with Calendly. All tools require a connected Calendly account and only work with the bookings and availability on that account. The tools build on each other: a booking always starts from an availability lookup, and booking details always start from a bookings list.
Availability
Find available times
calendly_find_available_times
Checks your connected Calendly for real, open time slots. Ask "when am I free next week?" or "find me a slot on Thursday" and the assistant looks up your actual Calendly availability — not a guess — for the meeting type you use for bookings. Results come back in your own timezone, grouped by day, so you can just read them and pick.
If you offer more than one type of meeting (a quick call vs. a full consultation, for example), tell the assistant which one you mean; otherwise it uses your main one.
Booking
Book event
calendly_book_event
Books a specific time slot on your calendar. Once a free time has been found and confirmed, tell the assistant to book it — "book the 2pm slot for John" — along with the invitee's name, email, and phone number. The assistant double-checks the slot is still open right before booking (in case someone else grabbed it in the meantime) and confirms back once it's done, including a link the invitee can use to cancel or reschedule.
This tool never books blind — it only works from a time you've already seen and approved, so Find available times must run first.
Your calendar
List bookings
calendly_list_bookings
Shows what's already on your Calendly calendar. Ask "what do I have this week?" or "show me my bookings for July" and the assistant pulls your scheduled meetings for that period — who's on them, when, and their status.
If you have a lot of meetings in range, it'll show a first batch and offer more if you ask ("show more").
Get booking details
calendly_get_booking_details
Gives you the full picture on one specific booking. After the assistant has shown you a list of bookings, ask for more on one of them — "tell me more about the 2nd one" or "who's on the call with Sarah" — and it pulls up everything: the invitee's name, email, phone (if given), and the meeting's exact time and status.
This always follows a List bookings lookup — the assistant can't jump straight to one booking's details without first finding it in your list.
Example Usage
- User Prompt: "Find an open slot on Thursday afternoon and book it for Anna Smith, anna@example.com."
- Assistant Action: Looks up your real Thursday availability, confirms the slot with you, then books it with the invitee's details.
- Response: "I've booked Thursday at 3:00 PM for Anna Smith. She'll get a confirmation with a link to reschedule or cancel."