Adding a Chatbot to a React Project
Overview
This guide will walk you through integrating the Mingleego chatbot into a React project. React is a popular JavaScript library for building user interfaces, developed by Facebook. This guide works with React projects created using Create React App, Vite, or other React build tools.
Note for Complete Beginners: If you don't have a React project yet, you'll need to create one first. This guide assumes you already have a React project set up. To create a new React project, follow one of these official guides:
- Using Create React App: Follow the official Create React App guide which provides step-by-step instructions for creating a React project, including installation and running your development server.
- Using Vite: Follow the official Vite guide which explains how to create a React project with Vite, including all setup steps.
Both guides include detailed instructions on how to compile and run your project, so make sure to complete the project creation process before proceeding with the chatbot integration steps below.
Integration Steps
Step 1: Download and Place the Chatbot Script
What you're doing: You need to get the chatbot script file and put it in the right location in your React project.
-
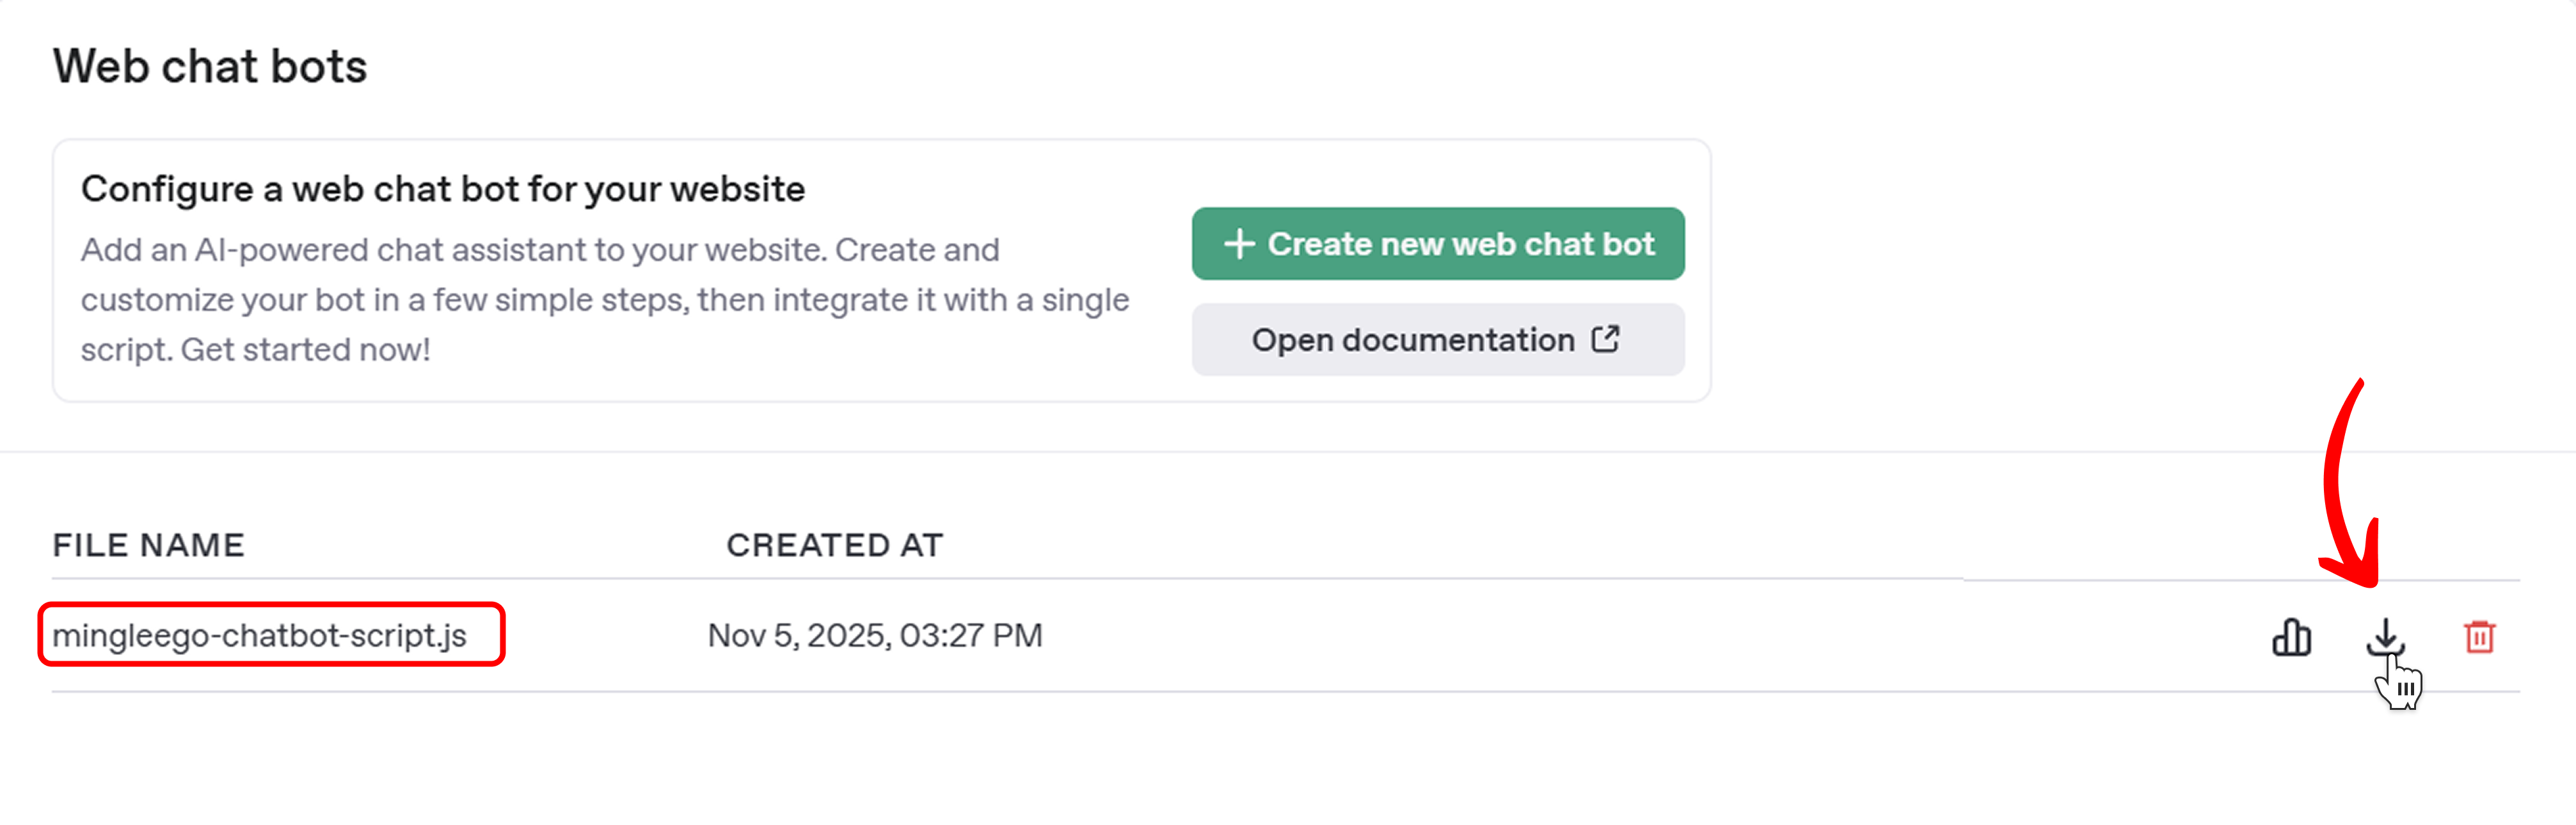
Download the Script File:
- Go to the Web Chat Bots page in your Mingleego dashboard
- Find your chatbot in the table
- Download the script file (it will have a name like
mingleego-chatbot-script.jsor similar) - Save it somewhere you can find it (like your Desktop)
-
Find Your React Project's Public Directory:
- Open your React project folder in a file explorer (Windows Explorer, Finder on Mac, etc.)
- Look for a folder called
public(it should be at the root level of your project, same level assrc,node_modules, etc.)
-
Copy the Script File:
-
Copy the downloaded
mingleego-chatbot-script.jsfile -
Paste it directly into the
publicfolder -
Your file structure should now look like this:
your-react-project/
├── public/
│   ├── mingleego-chatbot-script.js  ← Your chatbot script goes here
│   └── index.html
├── src/
├── node_modules/
└── package.json
Important: Make sure the file is directly inside the
publicfolder, not in a subfolder. The exact name of your script file might be different (likemingleego-web-chat-bot.jsor something similar) - that's fine, just remember the exact filename because you'll need it in the next step. -
Step 2: Include the Script in Your HTML
What you're doing: You need to tell your React app to load the chatbot script when the page loads. This is done in the main HTML file.
-
Locate the
index.htmlFile:- In your React project, find the
index.htmlfile - It's usually located in the
publicfolder - Open it with any text editor (VS Code, Notepad++, or even Notepad)
- In your React project, find the
-
Find the
<head>Section:- When you open
index.html, you'll see HTML code - Look for a line that says
<head>(it should be near the top, after<!DOCTYPE html>and<html>) - The
<head>section contains metadata about your page and usually has tags like<title>,<meta>, and possibly other<script>tags
- When you open
-
Add the Script Tag:
-
Inside the
<head>section, add this line:1 -
Important: Replace
mingleego-chatbot-script.jswith the actual name of your script file (the one you copied to thepublicfolder) -
The
/at the beginning means "start from the root of the public folder" -
The
deferattribute tells the browser to load the script after the HTML is parsed (this is good for performance)
-
-
What Your
index.htmlShould Look Like:1 2 3 4 5 6 7 8 9 10 11 12 13 14 15 16Troubleshooting: If your script file has a different name (like
mingleego-web-chat-bot.js), make sure thesrcattribute matches exactly, including capitalization. File names are case-sensitive on some systems.
Step 3: Add the Chatbot Component to Your React App
What you're doing: Now you need to actually place the chatbot on your page. There are several approaches depending on your project complexity.
Option A: Simple React App — Add to App.jsx (chatbot on all pages)
This is the standard approach for most simple React projects:
-
Locate Your
App.jsxorApp.jsFile:- Go to your
srcfolder - Find
App.jsx(orApp.jsif you're not using JSX extension) - Open it with your code editor
- Go to your
-
Add the Chatbot Element:
-
Inside your component's return statement, add
<mingleego-webchat></mingleego-webchat> -
You can place it anywhere in your JSX - typically at the end, just before the closing
</div>tag1 2 3 4 5 6 7 8 9 10 11 12 13 14 15 16
Important Notes:
- The
<mingleego-webchat>element is a custom HTML element (also called a Web Component) that the chatbot script creates - You must use both opening and closing tags:
<mingleego-webchat></mingleego-webchat> - The element is self-contained - you don't need to add any attributes or content inside it
- The chatbot will automatically position itself at the bottom of the screen. The exact position (left or right corner) is determined by the settings you chose when you created the chatbot in the Mingleego dashboard.
-
Option B: Complex React App — Add to index.html outside React root (recommended for apps with sidebars, modals, or navigation)
If your React app has complex UI elements like sidebars, modal dialogs, toast notifications, or navigation with high z-index values, placing the chatbot inside the React component tree can cause it to appear visually but be unclickable — it gets buried under other elements.
The solution is to place <mingleego-webchat> directly in index.html, outside of <div id="root"> where React renders:
1 2 3 4 5 6 7 8 9 10 11 12 13 14 15
Why this works: When <mingleego-webchat> is inside <div id="root">, it shares the same stacking context as the rest of your app. Other elements like a sidebar with z-index: 1001 or a modal overlay can cover the chatbot button even if it's visually floating in the corner. Placing it outside <div id="root"> puts the chatbot at the same level as the React app itself — no conflicts possible.
When to use this approach:
- Your app has a sidebar or navigation with
z-indexhigher than1000 - Your app has modal dialogs, toast notifications, or overlays
- The chatbot button appears on screen but cannot be clicked
- You are building an admin dashboard or a complex SPA
Option C: Chatbot only on specific pages — React Portal
Use this option when you want the chatbot to appear only on certain pages, not on every page of your site.
How it works in plain terms: React's createPortal is a way to say "render this element at the very top of the page's HTML, not inside my component". The chatbot will appear when the user opens that specific page and disappear automatically when they navigate away — you don't need to write any cleanup code.
1. Find the page file where you want the chatbot
Your React project's pages are usually inside the src/pages/ folder (sometimes src/views/ or src/screens/). For example:
your-react-project/
├── public/
│   └── mingleego-chatbot-script.js
├── src/
│   ├── pages/
│   │   ├── HomePage.jsx        ← no chatbot here
│   │   ├── ContactPage.jsx     ← we want chatbot here ✅
│   │   └── AboutPage.jsx       ← no chatbot here
│   └── App.jsx
└── index.html
Open the file where you want the chatbot to appear (e.g. ContactPage.jsx) in your code editor.
2. Add the import line at the top of the file
At the very top of the file, you will see other import lines. Add this line together with them:
1
3. Add the chatbot element inside the component's return
Find the return ( statement in the file. It contains the page's HTML structure. Add the chatbot at the end, just before the last closing tag:
1 2 3 4 5 6 7 8 9 10 11 12 13 14 15 16 17 18 19 20 21
What <> </> means: These empty tags (called a Fragment) let you return multiple elements from a component without adding an extra <div> to the page. If your existing code already has <> </> or <React.Fragment>, just add the createPortal block inside it.
4. Repeat for other pages if needed
If you want the chatbot on multiple specific pages, repeat steps 1–3 for each page file. Each page manages its own copy — the chatbot appears when that page is open and is removed when the user leaves.
Important: Do not add the chatbot to App.jsx if you are using this option, otherwise it will appear on all pages.
Option D: Using TypeScript (.tsx / .ts)
TypeScript is a stricter version of JavaScript that checks your code for errors before it runs. When you write <mingleego-webchat> in a .tsx file, TypeScript will show a red error because it doesn't know what that element is. You need to tell TypeScript about it by creating a special declaration file.
Note: If you used Option B (placing the element in index.html), you can skip Option D entirely — index.html is plain HTML and TypeScript does not check it.
1. Create the types folder (if it doesn't exist)
In your src/ folder, create a subfolder called types:
your-react-project/
├── src/
│   ├── types/          ← create this folder
│   │   └── (empty)
│   ├── pages/
│   └── App.tsx
2. Create the declaration file
Inside src/types/, create a new file called custom-elements.d.ts (the .d.ts extension means it's a TypeScript declaration file — a file that only describes types, contains no real code):
src/
└── types/
    └── custom-elements.d.ts    ← create this file
Open the file and paste this content exactly as-is:
1 2 3 4 5 6 7 8
What this does: It tells TypeScript "the HTML element called mingleego-webchat is valid and it accepts standard HTML attributes". You never need to edit this file again.
3. Use the element normally in any .tsx file
After saving the declaration file, the red error will disappear and you can use the element in any page:
1 2 3 4 5 6 7 8 9 10 11 12 13 14 15 16 17 18 19
Tip: If TypeScript still shows an error after creating the file, try restarting your code editor (VS Code). Sometimes it needs a restart to pick up new declaration files.
Step 4: Test the Integration
What you're doing: Now you need to start your React app and make sure everything works correctly.
-
Start Your Development Server:
- Open a terminal (Command Prompt on Windows, Terminal on Mac/Linux)
- Navigate to your React project folder using
cdcommand:1 - Run one of these commands depending on how your project was set up:
- If using Vite:
npm run dev - If using Create React App:
npm start - If you're not sure, try
npm startfirst, and if that doesn't work, trynpm run dev
- If using Vite:
-
Open Your App in the Browser:
- After running the command, you should see a message like "Local: http://localhost:3000" (Create React App) or "Local: http://localhost:5173" (Vite)
- Copy that URL and paste it into your web browser
- Your React app should now be running
-
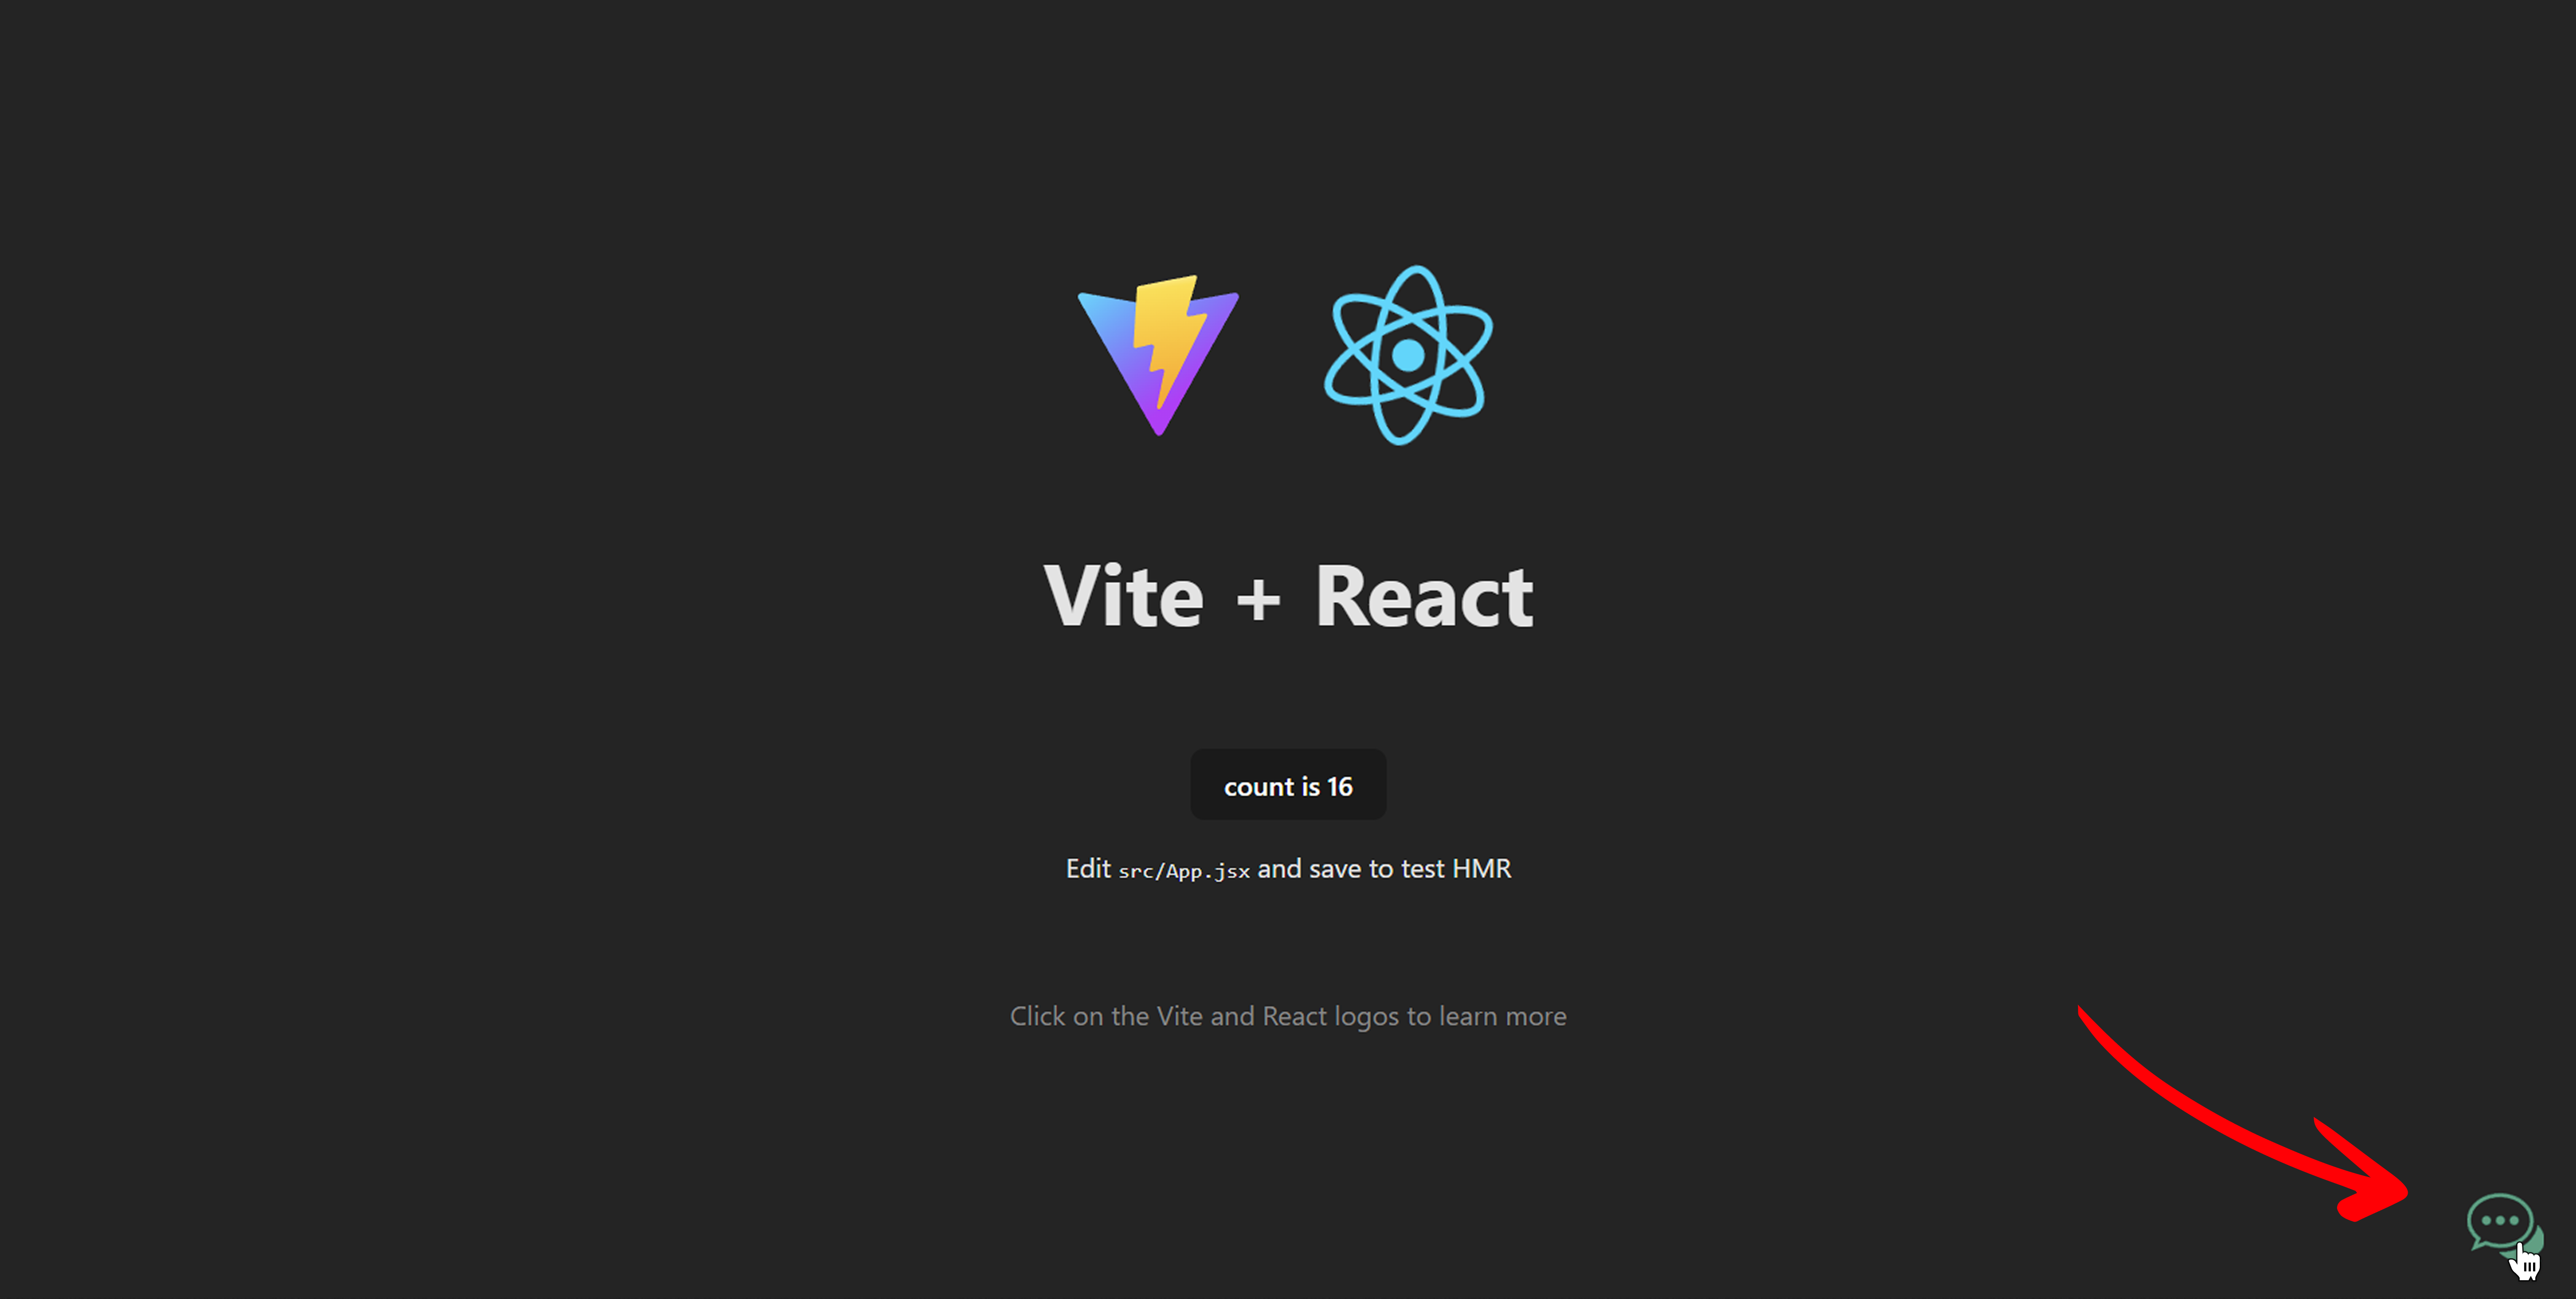
Verify the Chatbot Appears:
- Look at your webpage — you should see a chatbot widget, usually in the bottom-right corner of the screen (or bottom-left, depending on the position you chose when creating the chatbot)
- It might be a small chat bubble icon that you can click to open
- The chatbot icon should be visible on your page, as shown in the example below:
- Try clicking on the chatbot icon to open it
- When you click it, the chatbot window should open and display the chat interface, as shown below:
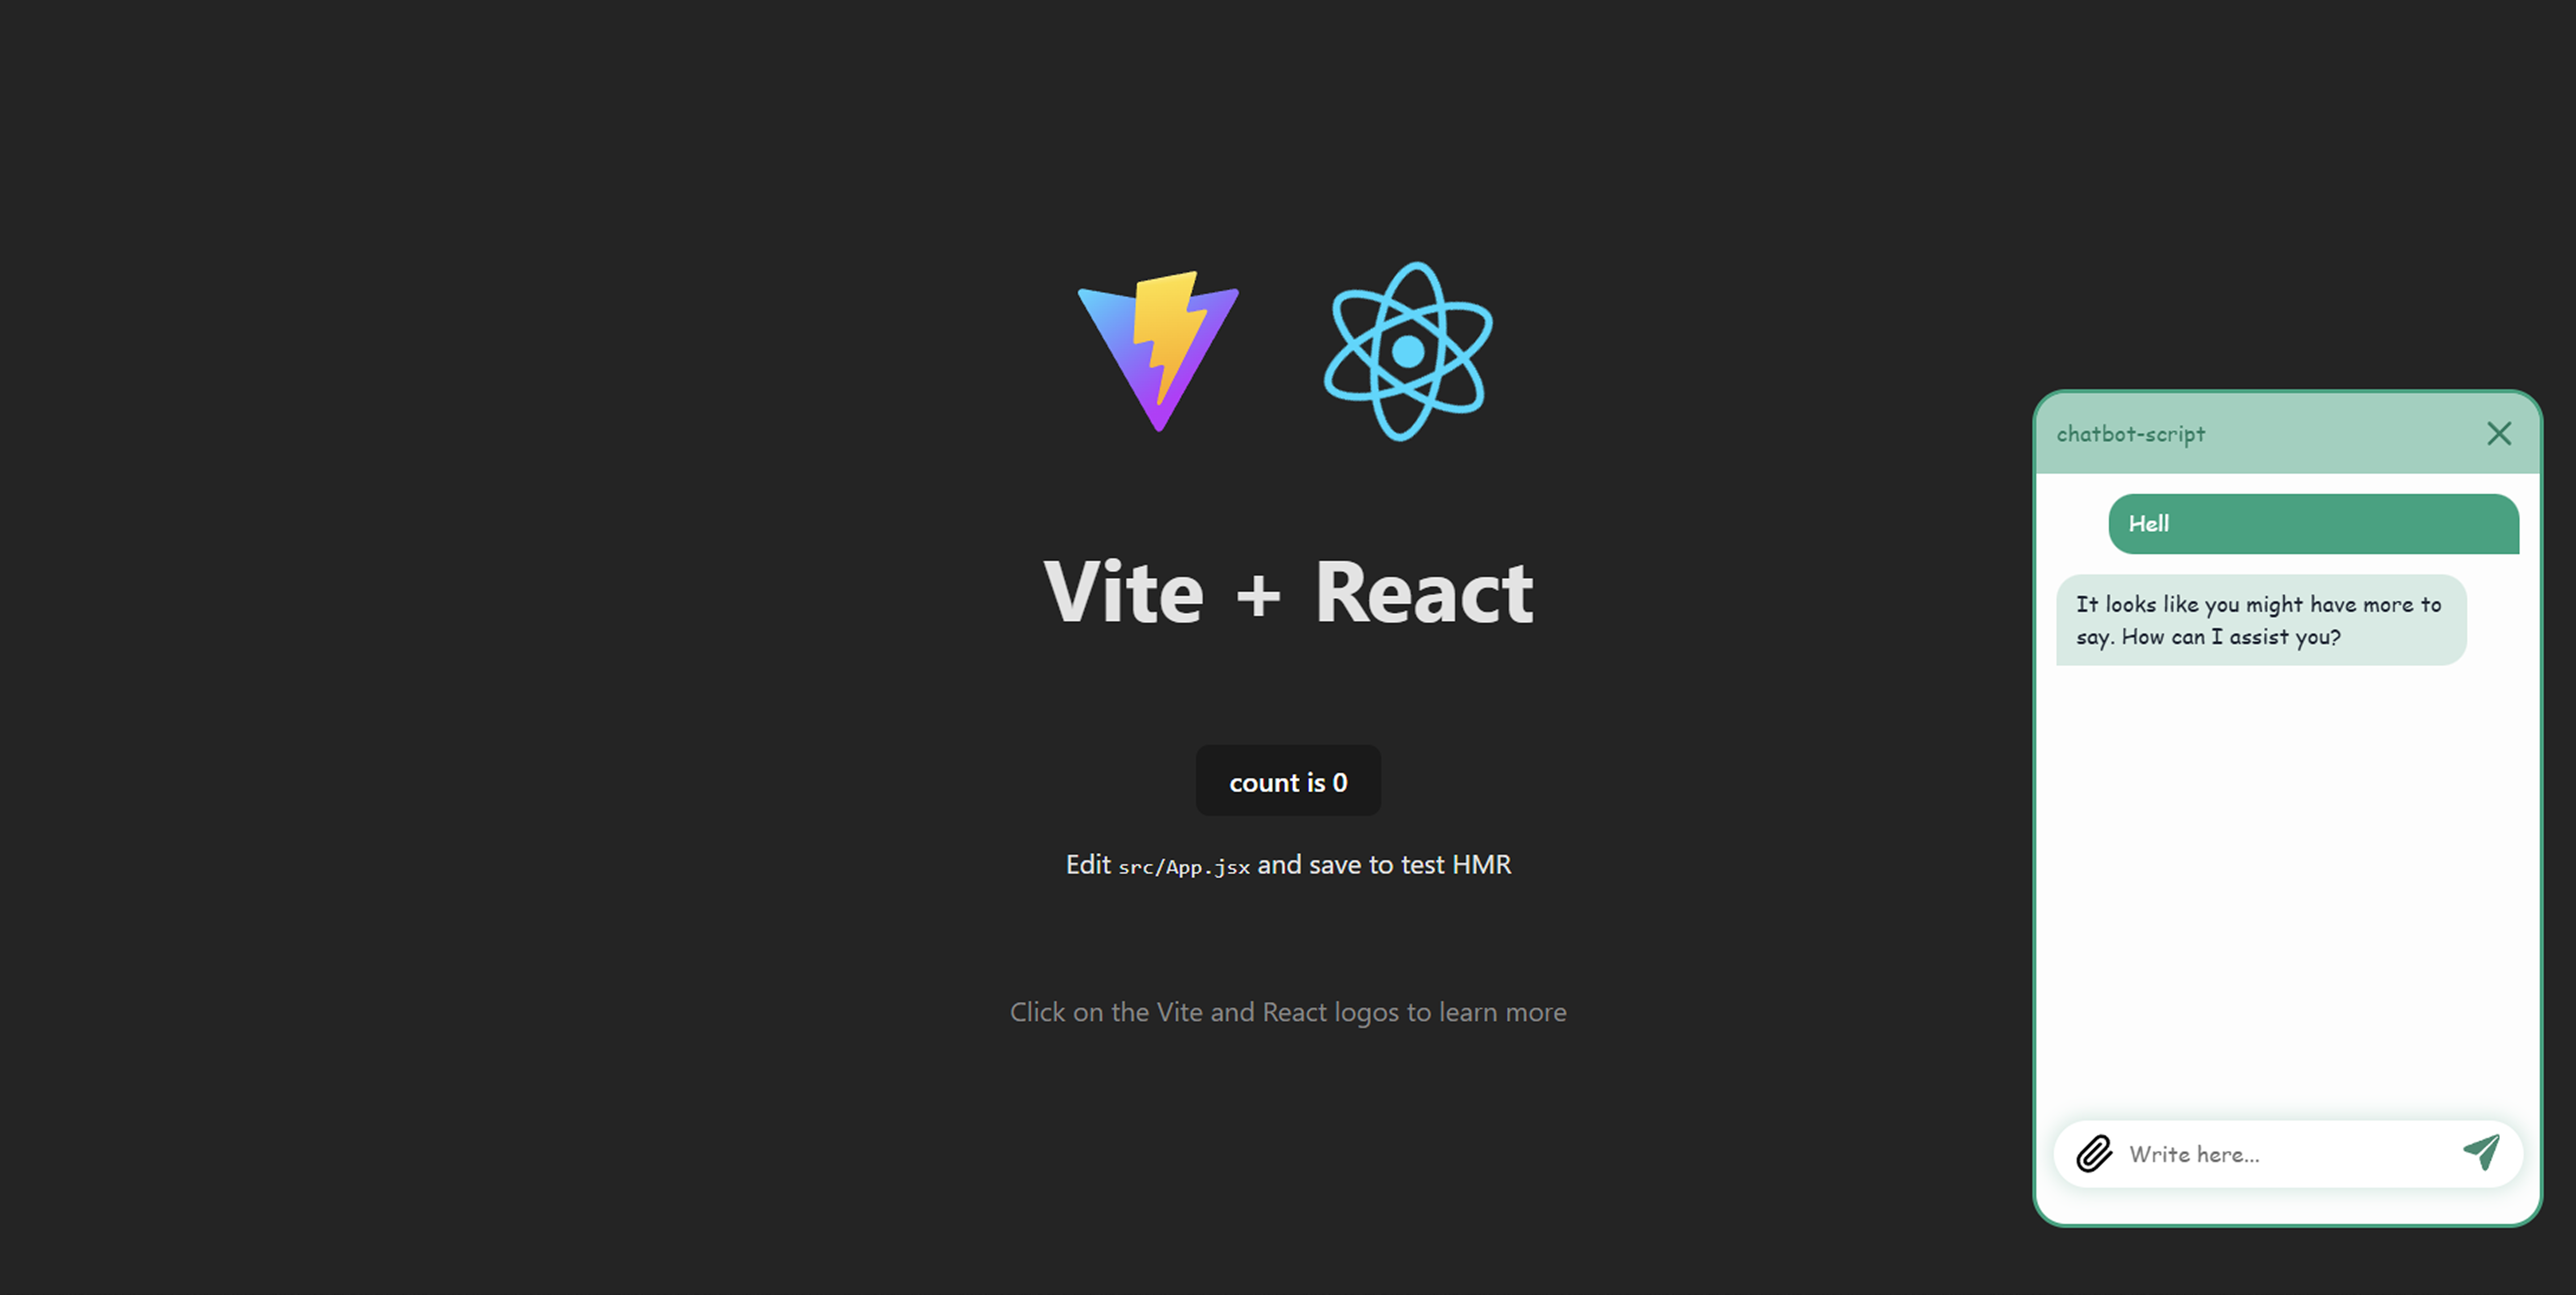
- Try sending a test message to ensure it functions properly and responds correctly
-
Common Issues and Solutions:
Problem: The chatbot doesn't appear at all
- Solution 1: Check the browser's Developer Console (press F12, then click the "Console" tab) for any error messages
- Solution 2: Make sure the script file name in
index.htmlexactly matches the file name in yourpublicfolder (check for typos and capitalization) - Solution 3: Make sure the script tag is inside the
<head>section, not the<body> - Solution 4: Try hard-refreshing the page (Ctrl+F5 on Windows, Cmd+Shift+R on Mac)
Problem: The chatbot button is visible but cannot be clicked
- Cause: This happens in complex React apps where other UI elements (sidebar, modals, overlays) have a higher
z-indexthan the chatbot and cover it even if it looks clickable - Solution: Move
<mingleego-webchat>out of the React component tree. Place it directly inindex.htmlafter<div id="root">but before</body>(see Option B above). This puts the chatbot at the document root level, outside any React stacking context
Problem: The chatbot appears but doesn't respond to messages
- Solution 1: Check the browser console for JavaScript errors
- Solution 2: Make sure you're using the correct script file for your chatbot (each chatbot has its own unique script file)
- Solution 3: Verify that your internet connection is working (the chatbot needs to connect to Mingleego servers)
Problem: The chatbot appears in the wrong place or looks broken
- Solution: This is usually a CSS conflict. The chatbot should position itself automatically, but if you have global CSS that affects positioning, you might need to adjust it. Check if you have any CSS rules that might interfere with the chatbot's styling.
-
Build for Production (Optional):
- When you're ready to deploy your app, run
npm run build(ornpm run build:proddepending on your setup) - The chatbot script in the
publicfolder will automatically be included in the build - Make sure to test the production build as well to ensure everything works correctly
- When you're ready to deploy your app, run
Summary
Choose the right approach based on your project:
| Your situation | Recommended approach |
|---|---|
| Simple React app, chatbot on all pages | Option A — add to App.jsx |
| Complex app with sidebar / modals / high z-index elements | Option B — place in index.html outside <div id="root"> |
| Chatbot only on specific pages | Option C — use createPortal in the page component |
| TypeScript project | Add type declaration file + use any option above |
To recap, integrating the Mingleego chatbot into your React project involves:
- ✅ Placing the chatbot script file in your
publicfolder - ✅ Adding a
<script>tag in yourindex.htmlfile's<head>section - ✅ Adding the
<mingleego-webchat></mingleego-webchat>element using the approach that fits your project - ✅ Testing that everything works correctly
Once these steps are complete, your chatbot should be live and ready to interact with your website visitors!